
Note: Before you start, see Chapter 2. When installing the carburetor, use new gaskets. A tachometer and an exhaust gas analyzer will be required to check the idle speed and mixture.
Removing
1. Disconnect the negative cable from the battery.
2. On early models, remove the air filter. On late models, disconnect the main air line from the air filter, then disconnect the vacuum pipe and breather hose from the air unit. Unscrew the three fastening screws, remove the air unit together with the main air duct.
3. On 1.4 liter models, disconnect the fuel supply hose from the carburetor, and on 1.6 and 1.8 liter models, disconnect the fuel supply and return hoses from the vapor separator. Seal the ends of the hoses to prevent dirt from entering and further fuel leakage.
4. Remove the clip from the end of the throttle cable in the bracket on the carburetor, then pull the o-ring off the bracket, disconnect the end of the cable from the throttle lever.
5. Disconnect the coolant hoses from the automatic choke housing; note their location to make installation easier. Cap or secure hoses upside down to prevent further loss of coolant.
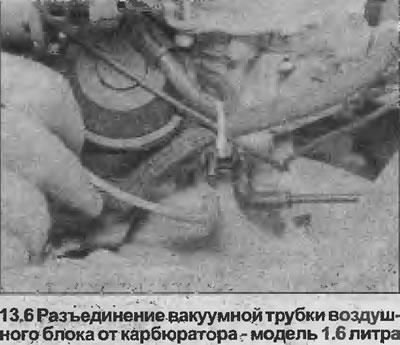
6. Disconnect the vacuum tubes in front of the carburetor, remembering their location and direction so as not to confuse during installation (see illustration).
7. Disconnect the damper heater wire and other electrical wiring.
8. Turn off three fixing nuts, remove the carburetor from racks on an inlet manifold.
9. Remove the gaskets and seal block installed between the carburetor and intake manifold.
Bulkhead
11. Blow jets and holes with compressed air, never use wire for cleaning. If it is necessary to remove the jets, unscrew them carefully with a well-suited tool.
12. Remove the fuel filter gauze from the inlet connector, following Chapter 21. Opel recommends replacing it every time you clean the carburetor.
13. Clean the float chamber. Replace float, needle, and seat if worn or if float is punctured or otherwise damaged. Check that the float regulator needle is fully closed before the float reaches the top position. To check the top position of the float, see Chapter 15.
14. Replace the diaphragms in the partial load enrichment valve and in the accelerator pump. If the repair kit contains accelerator pump or enrichment valve parts, replace those parts as well.
15. Further disassembly is not recommended. Pay special attention to the location of the throttle opening mechanism if you decide to disassemble it.
16. Assembly is carried out in the reverse order. Use new gaskets and seals throughout; lubricate the rods with molybdenum grease.
Installation
17. Perform the following procedure before starting work.
- a) Place the fast idle adjusting screw on the highest step of the fast idle cam.
- b) Use a drill of the diameter specified in the Specifications to measure the opening of the primary throttle.
- c) Adjust the fast idle screw if necessary.
- d) Note that this is all preliminary adjustment; The final adjustment of the high idle speed must be done with the engine running.
18. Installation is carried out in the reverse order, replace the gaskets.
19. After installation, perform the following checks and adjustments.
20. Check the free play of the throttle cable, adjust if necessary, as described in Chapter 11.
21. Check the coolant level and top up if necessary as described in Section 3.
22. Check and, if necessary, adjust the idle speed and mixture as described in Chapter 14.
Visitor comments