
Note: Before you start, see Chapter 2. Use a new carburetor top cover gasket when assembling. A tachometer and an exhaust gas analyzer will be required to check the idle speed and mixture.
Removing
1. Disconnect the negative cable from the battery.
2. Remove the round air filter, on models where it is installed. On other models, disconnect the main air line from the air filter, then disconnect the vacuum pipe and breather hose from the air unit. Unscrew the three fastening screws, remove the air unit together with the main air duct.
3. Thoroughly clean the carburetor.
4. Disconnect the fuel supply hose from the carburetor. Cap the end of the hose to prevent dirt from entering and further loss of fuel.
5. Mark the position of the auto choke cooling hoses to facilitate installation, then disconnect the hoses. Cap or secure hoses upside down to prevent loss of coolant.
6. Disconnect the electrical wiring from the damper heater.
7. Disconnect the lower vacuum hoses from the pull-down damper block.
8. Unscrew the four screws securing the top cover of the carburetor, remember their location, as they have different lengths (see illustration).
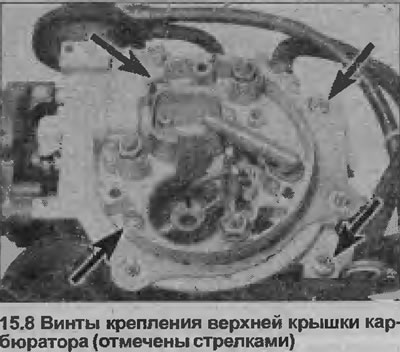
9. Remove the top cover and gasket.
Inspection
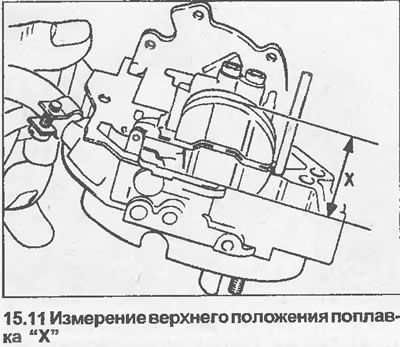
10. Position the cover vertically so that the float hangs on the pivot pin. Then tilt the cap until the needle begins to close - the needle spring should not be compressed by the weight of the float.
11. Measure distance X (see illustration) from the base of the float to the gasket surface on top of the underside of the cap. If the measured distance is greater or less than the specified distance, then the weight of the float is incorrect and the float must be replaced.
12. If the top float position is correct, reassemble the carburetor using a new top cover gasket. Check idle speed and mixture quality as described in Chapter 14.
13. Use a punch to knock out the float mounting pin from the base of the top cover, remove the float and needle.
14. Check the condition of the components, replace as needed. Check the float regulator needle for signs of wear, check the float for leaks, i.e. whether there is gasoline inside it.
15. Clean mating surfaces of carburetor body and top cap.
Installation
16. Install in reverse order, paying attention to the following.
17. After installation, check that the float and needle move completely and freely.
18. Use a new gasket between the top cover and carburetor body.
19. Check that all hoses, tubes and wires are properly connected.
20. Finally, check the coolant level and, if necessary, top up as described in Section 3. Check and, if necessary, adjust the idle speed and mixture as described in Chapter 14.
Visitor comments