
Note: A new gasket must be used when installing the carburetor top cap. After installation, you will need a tachometer and an exhaust gas analyzer to check the idle speed and mixture.
Removing
Disconnect the negative battery terminal.
Disconnect the hoses from the air cleaner, then disconnect the vacuum tube and breather hose from the air box.
Loosen the three screws and remove the air box along with its connections.
Carefully remove dirt from the outside of the carburetor.
Disconnect the fuel supply hose to the carburetor Since fuel may leak, take appropriate precautions. Insert a plug into the hose to keep out dirt and fuel leaks.
After noting the location of the automatic choke coolant supply hoses, disconnect them. There may be a refrigerant leak, so plug the hoses. Disconnect the air damper heating wire connector.
Disconnect the two vacuum hoses from the ajar choke device.
Remove the four carburetor top cap screws, noting their location, screws of different lengths are used.
Remove the top cover and remove the gasket.
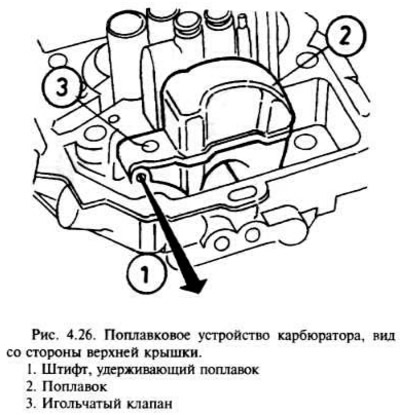
Use a pin to push the float shaft out of the top cap side and pull out the float and needle valve.
Inspection
Inspect parts for damage and replace if necessary. Check the needle valve for wear and see if the float is leaking by shaking it to check for gasoline.
Installation
Remove dirt from mating surfaces of body and carburetor top cap.
Installation is carried out in the reverse order of removal, taking into account the following.
After installation, check the needle valve and float and their free play. The float is not adjustable.
Install a new gasket between the top cover and carburetor body.
Check that all hoses, tubes and wiring are properly connected.
After installation, check and, if necessary, add refrigerant to the correct level, as indicated in chapter 3, check and, if necessary, adjust the idle speed and mixture quality.
Visitor comments