


Electrical equipment and devices of the car Opel Astra H

Specifications
General information System type - 12V with negative grounding Fuses Colour identification of fuses by rated current Location of fuses in the underhood mounting...
General information System type - 12V with negative grounding Fuses Colour identification of fuses by rated current Location of fuses in the underhood mounting...

General information
Caution: Before servicing components of on-board electrical systems, familiarize yourself with the safety requirements for working with electrical devices. The...
Caution: Before servicing components of on-board electrical systems, familiarize yourself with the safety requirements for working with electrical devices. The...
Search for causes of electrical equipment failures
Warning: The following procedures can be used to troubleshoot simple electrical circuits that do not involve electronic control circuits. However, they must be...
Warning: The following procedures can be used to troubleshoot simple electrical circuits that do not involve electronic control circuits. However, they must be...

Fuses — General Information
1. Various combinations of fuses, circuit breakers and fusible links can be used to protect the contact circuits of vehicle electrical equipment. 2. On the...
1. Various combinations of fuses, circuit breakers and fusible links can be used to protect the contact circuits of vehicle electrical equipment. 2. On the...
Relays — general information and checking the correct functioning
General information 1. To supply power or control signal to some of the electrical consumers in the vehicle (such as fuel injection system components, horn,...
General information 1. To supply power or control signal to some of the electrical consumers in the vehicle (such as fuel injection system components, horn,...

Removal and installation the horn
1. The horn is installed on the right side of the car under the front bumper cover. 2. Disconnect the cable from the negative terminal of the battery ( see...
1. The horn is installed on the right side of the car under the front bumper cover. 2. Disconnect the cable from the negative terminal of the battery ( see...

Removal and installation parking assistance system sensors
Note: Depending on the configuration, the sensors can be installed on either the rear or front bumper. The operating principle of the system is described in...
Note: Depending on the configuration, the sensors can be installed on either the rear or front bumper. The operating principle of the system is described in...

Removal and installation windshield washer nozzles
Windshield 1. Remove the fairing grille ( see Chapter 11 ). 2. Press the latch (see accompanying illustration) on the back of the grille and remove the nozzle...
Windshield 1. Remove the fairing grille ( see Chapter 11 ). 2. Press the latch (see accompanying illustration) on the back of the grille and remove the nozzle...

Removal and installation the washer fluid reservoir/pump
Astra Models Note: If necessary, the pumps can be removed without removing the tank from the vehicle. 1. Remove the decorative radiator grille ( see Chapter 11...
Astra Models Note: If necessary, the pumps can be removed without removing the tank from the vehicle. 1. Remove the decorative radiator grille ( see Chapter 11...

Removal and installation the wiper arms (leashes)
Windshield Removal 1. Wash the windshield, turn the windshield wipers on and off again until they are in the lowest position. 2. Mark the position of the...
Windshield Removal 1. Wash the windshield, turn the windshield wipers on and off again until they are in the lowest position. 2. Mark the position of the...

Removal and installation the windshield wiper drive electric motor
Astra Models 1. Remove the windshield wiper arms ( see Section 9 ). 2. Remove the fairing grille ( see Chapter 11 ). 3. Disconnect the cable from the negative...
Astra Models 1. Remove the windshield wiper arms ( see Section 9 ). 2. Remove the fairing grille ( see Chapter 11 ). 3. Disconnect the cable from the negative...

Removal and installation the rear window wiper motor
1. Disconnect the cable from the negative terminal of the battery ( see Chapter 5 ). 2. Remove the windshield wiper arm ( see Section 9 ). 3. Remove the...
1. Disconnect the cable from the negative terminal of the battery ( see Chapter 5 ). 2. Remove the windshield wiper arm ( see Section 9 ). 3. Remove the...

Removal and installation the rain sensor
Astra Models 1. Pry up and separate the rearview mirror pillar cover using a plastic wedge (see accompanying illustration). Disconnect the rain sensor wiring...
Astra Models 1. Pry up and separate the rearview mirror pillar cover using a plastic wedge (see accompanying illustration). Disconnect the rain sensor wiring...

Replacing headlight bulbs
General information Note: Replace bulbs only with bulbs of the same type. Before replacing a bulb, make sure that the corresponding light fixture is switched...
General information Note: Replace bulbs only with bulbs of the same type. Before replacing a bulb, make sure that the corresponding light fixture is switched...

Removal and installation the electric motor for adjusting the headlight position (halogen headlights, Astra models)
1. Disconnect the battery ( see Chapter 5 ). 2. Remove the headlights ( see Section 15 ). 3. The drive motor is mounted on the rotary device on the back side...
1. Disconnect the battery ( see Chapter 5 ). 2. Remove the headlights ( see Section 15 ). 3. The drive motor is mounted on the rotary device on the back side...

Removal and installation of the headlight unit
Note: It is recommended that this operation be performed by car service specialists. 1. Set the rotary switch for the outdoor lighting modes to position "0"...
Note: It is recommended that this operation be performed by car service specialists. 1. Set the rotary switch for the outdoor lighting modes to position "0"...

Removal and installation fog lights
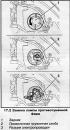
1. Set the rotary switch for the outdoor lighting modes to position "0" (see Chapter "Controls and operating techniques", Section 17 ) and turn off the...
1. Set the rotary switch for the outdoor lighting modes to position "0" (see Chapter "Controls and operating techniques", Section 17 ) and turn off the...
Replacing the fog light bulb
Note: It is recommended to entrust this operation to car service specialists. 1. If necessary, raise the vehicle on a lift. 2. Turn the lid (see accompanying...
Note: It is recommended to entrust this operation to car service specialists. 1. If necessary, raise the vehicle on a lift. 2. Turn the lid (see accompanying...

Removal and installation turn signal repeaters
1. Before starting work, set the rotary switch for the outdoor lighting modes to the "0" position (see Chapter "Controls and operating techniques", Section 17...
1. Before starting work, set the rotary switch for the outdoor lighting modes to the "0" position (see Chapter "Controls and operating techniques", Section 17...

Removal and installation rear combination lights/replacing bulbs
Hatchback and Astra GTC models Removal and installation 1. Set the rotary switch for the outdoor lighting modes to position "0" (see Chapter "Controls and...
Hatchback and Astra GTC models Removal and installation 1. Set the rotary switch for the outdoor lighting modes to position "0" (see Chapter "Controls and...

Removal and installation the high-level brake light bulb
Note: The high-level brake light is made using LEDs. Individual LEDs cannot be replaced; the entire assembly must be replaced if necessary. Hatchback models 1....
Note: The high-level brake light is made using LEDs. Individual LEDs cannot be replaced; the entire assembly must be replaced if necessary. Hatchback models 1....

Removal and installation the license plate light, replacing the bulb
Removal and installation the lamp 1. Turn off the ignition and disconnect the battery ( see Chapter 5 ). 2. Use a screwdriver to press the retaining spring...
Removal and installation the lamp 1. Turn off the ignition and disconnect the battery ( see Chapter 5 ). 2. Use a screwdriver to press the retaining spring...

Removal and installation of the assembly of individual directional front seat lamps
1. Set the rotary switch for the outdoor lighting modes to position "0" (see Chapter "Controls and operating techniques", Section 17 ) and turn off the...
1. Set the rotary switch for the outdoor lighting modes to position "0" (see Chapter "Controls and operating techniques", Section 17 ) and turn off the...

Replacing interior lighting bulbs
1. Before starting work, set the rotary switch for the outdoor lighting modes to the "0" position (see Chapter "Controls and operating techniques", Section 17...
1. Before starting work, set the rotary switch for the outdoor lighting modes to the "0" position (see Chapter "Controls and operating techniques", Section 17...

Removal and installation the instrument cluster
Note: The LEDs of the control lamps and indicators are built into the instrument cluster. If the LED fails or any defect is detected, the entire instrument...
Note: The LEDs of the control lamps and indicators are built into the instrument cluster. If the LED fails or any defect is detected, the entire instrument...

Removal and installation the information display
Note: The condition of the information display is checked using a special diagnostic device at an Opel service station. Based on this check, the need for its...
Note: The condition of the information display is checked using a special diagnostic device at an Opel service station. Based on this check, the need for its...

Removal and installation the exterior lighting/instrument lighting switch panel
Removal 1. Disconnect the cable from the negative terminal of the battery ( see Chapter 5 ). 2. Turn the rotary switch for the external lighting modes to the...
Removal 1. Disconnect the cable from the negative terminal of the battery ( see Chapter 5 ). 2. Turn the rotary switch for the external lighting modes to the...
This section is available on russian, bulgarian, belarusian, ukrainian, serbian, croatian, romanian, polish, slovak, hungarian
See similar ones from other Opel car manuals:
▶ Electrical equipment: Equipment and devices Opel Zafira A (1999-2005, petrol)
▶ Electrical equipment: Equipment and devices Opel Kadett E (1984-1995)
▶ Electrical equipment: Equipment and devices Opel Omega B (1993-1999)
▶ General information: Vehicle device Opel Corsa C (2000-2006)
▶ General information: Vehicle device Opel Vectra C (2002-2008)
▶ Electrical equipment: Equipment and devices Opel Zafira A (1999-2005, petrol)
▶ Electrical equipment: Equipment and devices Opel Kadett E (1984-1995)
▶ Electrical equipment: Equipment and devices Opel Omega B (1993-1999)
▶ General information: Vehicle device Opel Corsa C (2000-2006)
▶ General information: Vehicle device Opel Vectra C (2002-2008)
Share information:
- General information
- Vehicle device
- User manual
- Faults en route
- Maintenance
- Power unit
- Engine repair
- Cooling and lubrication system
- Engine power system
- Exhaust system
- Transmission
- Clutch
- Car gearbox
- Drive shafts
- Chassis
- Front suspension
- Rear suspension
- Steering
- Brake system
- Wheels and tires
- Body
- Exterior
- Interior
- Doors and windows
- Body Care
- Heating and air conditioning
- Security systems
- Electrical equipment
- Equipment and devices
- Lighting and signaling
- Power devices
- Electrical circuits
- General information
- Introduction to the guide
- Troubleshooting
- User manual
- Maintenance
- Power unit
- Engine repair
- Cooling and heating
- Power and exhaust system
- Ignition system
- Launch and charge system
- Transmission
- Mechanical gearbox
- Automatic gearbox
- Drive shafts
- Chassis
- Brake system
- Car suspension
- Steering
- Body
- Interior
- Exterior
- Electrical equipment
- Equipment and devices
- Electrical circuits
- General information
- Introduction to manual
- User manual
- Maintenance
- Power unit
- SOHC gasoline engines
- DOHC gasoline engines
- Diesel engines 1.7 and 2.0
- Engine repair
- Cooling system
- Supply system
- Injection system (gasoline)
- Injection system (diesel)
- Exhaust system
- Charge and launch system
- Ignition system (gasoline)
- Preheat system (diesel)
- Transmission
- Manual gearbox
- Automatic gearbox
- Clutch
- Drive shafts
- Chassis
- Brake system
- Wheel suspension
- Steering
- Body
- Exterior
- Interior
- Doors and windows
- Ventilation and heating
- Electrical equipment
- Equipment and devices
- Electrical circuits
- General information
- User manual
- Car care
- Maintenance
- Power unit
- Single shaft engines
- Twin shaft engines
- Engine repair
- Cooling and heating
- Fuel and exhaust systems
- Starting and charging system
- Ignition system
- Transmission
- Clutch
- Mechanical gearbox
- Automatic gearbox
- Drive shafts
- Chassis
- Brake system
- Car suspension
- Steering
- Body
- Interior
- Exterior
- Electrical equipment
- Equipment and devices
- Wiring diagrams Opel Astra
- Wiring diagrams Opel Zafira
- General information
- Maintenance
- Power unit
- Engine in car
- Engine removed
- Cooling system
- Heating and ventilation
- Fuel supply (carburetor)
- Fuel supply (injector)
- Emission control
- Ignition system
- Transmission
- Clutch
- Mechanical gearbox
- Automatic gearbox
- Drive shafts
- Chassis
- Brake system
- Car suspension
- Steering
- Body
- Exterior
- Interior
- Electrical equipment
- Equipment and devices
- Electrical circuits