


Contents: General information ⬇ Halogen headlights ⬇ Xenon headlights ⬇ Astra Models ⬇ Zafira Models ⬇
General information
Note: Replace bulbs only with bulbs of the same type. Before replacing a bulb, make sure that the corresponding light fixture is switched off. Do not touch the bulb with bare fingers, use a clean towel or cotton gloves. Dirt left by fingers on the bulb evaporates and settles on the reflector. Accidental fingerprints should be removed with an alcohol-soaked cloth. Do not wipe headlight reflectors covered with a protective varnish with a dry, hard cloth, or use any cleaners or solvents for this purpose. Use soft, damp cloths.
Warning: Halogen bulbs are under pressure and may burst, so wear protective glasses and gloves when replacing them. When replacing xenon bulbs, there is a risk of injury due to high voltage! Be sure to turn off the headlights and disconnect the wiring from the battery. After replacing, briefly turn the headlight on and off to relieve residual voltage.
Warning: Do not leave the lamp mounting hole open for a long time - dust, moisture or smoke getting inside the headlight unit may affect the quality of lighting! When installing the cap, make sure that it is completely adjacent to the surface of the headlight!
1. The models considered in this Manual can be equipped with two types of headlights: halogen and xenon (see below).
2. Before starting work on replacing lamps, set the rotary switch of the outdoor lighting modes to the "O" position (see Chapter "Controls and operating techniques", Section 17) and turn off the ignition. Disconnect the wire from the negative terminal of the battery (see Chapter 5).
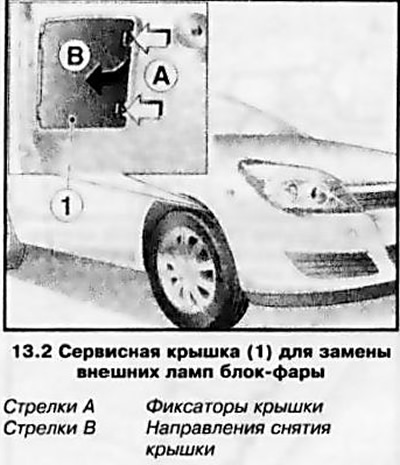
3. Replacement of lamps installed on the outer side of the headlight unit is carried out through the arches of the front wheels, for which it is necessary to turn the wheels in the appropriate direction until they stop, press the locks of the service cover and remove the cover (see accompanying illustration).
Note: If you have time and the appropriate equipment, jack up the appropriate wheel and remove it to make the procedure easier.
4. Replacement of lamps installed on the inside of the headlight assembly is performed through the engine compartment.
5. After replacing the bulbs, check the proper functioning of the lighting - if the result is unsatisfactory, contact the Opel service station. It is recommended to adjust the headlights only at a service station that has special equipment for this, while the regulator (with appropriate equipment) the direction of the optical axes of the headlights must be set to 0 (see Chapter "Controls and operating techniques", Section 17).
Halogen headlights
6. The general layout of the halogen headlamp lamps is shown in the accompanying illustration.
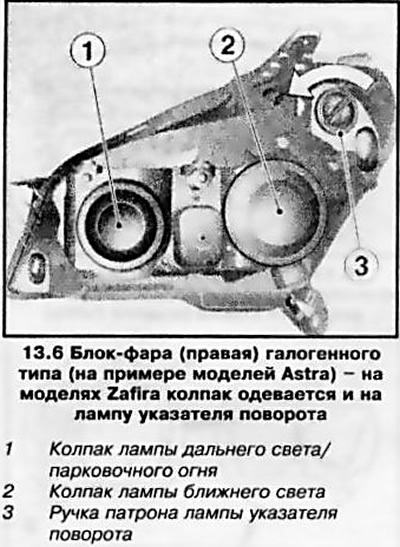
Low beam
7. Remove the wheel arch service cover of the corresponding front wheel (see above).
8. Remove the low beam lamp cap (see illustration 13.6) from the back of the headlight.
9. Turn the lamp holder counterclockwise, release it from the holder and remove it together with the lamp from the reflector seat.
10. Remove the lamp from the socket.
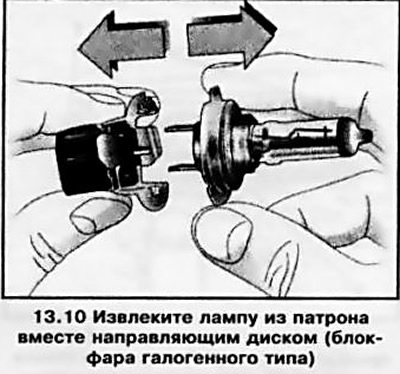
Note: The socket consists of a guide disc and a plug connector. If necessary, the lamp can be removed together with the guide disc (see accompanying illustration) - remember its installation position.
11. Insert the new lamp into the socket and install it into the seat so that the socket's locking tabs align with the reflector's notches. Turn the socket clockwise until it stops.
12. Cover the lamp with a cap and install the service cover.
High beam
13. Open the hood.
14. To replace the bulb on the left headlight, first disconnect the electrical connector of the fuse box. When replacing the bulb on the right headlight, disconnect the air cleaner duct.
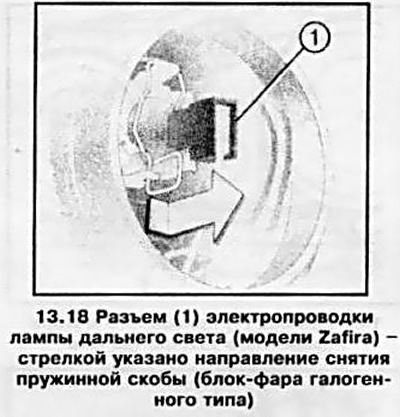
15. Remove the high beam lamp cover, disconnect the lamp wiring connector and release the wire spring clip from the holders (see accompanying illustration), fold it down.
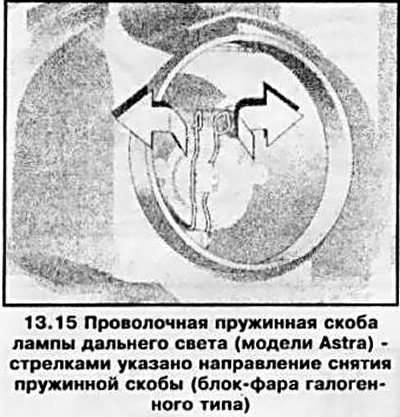
16. Remove the lamp from the reflector seat.
17. Installation is carried out in reverse order.
18. On Zafira models, the wiring connector and spring clip have a slightly different design (see accompanying illustration), but the procedure for replacing the lamp is completely consistent with the one described above.
19. The parking light bulb is mounted on the reflector next to the high beam bulb (force. comp. illustration).
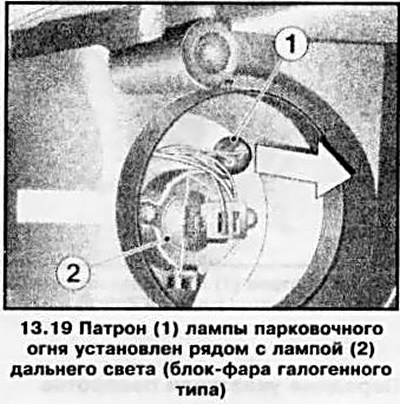
Note: On Zafira models, the parking light bulb is located under the high beam bulb. To access the bulb, remove the low beam bulb cover (see above).
20. Pull the parking light bulb socket towards you (see illustration 13.19) and remove it from the reflector. Remove the lamp from the socket.
21. Installation is carried out in reverse order.
Xenon headlights
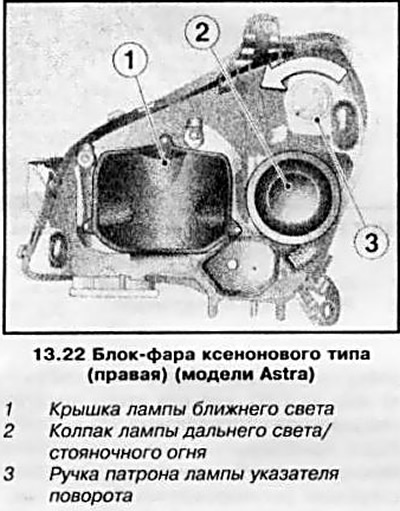
22. The general layout of the xenon headlamp lamps is shown in the accompanying illustration.
Low beam
Warning: High voltage accumulates in the 8 electrical circuit of the xenon headlights! Be careful, follow the recommendations given at the beginning of this Section! It is advisable to entrust the replacement of xenon lamps to service station specialists.
23. To replace the low beam lamp of the left headlight, you must first remove the headlight from the vehicle (see Section 15). When replacing the corresponding right headlight bulb, remove the air cleaner with the air duct (see Chapter 4).
24. Remove the 3 mounting bolts and remove the low beam lamp cover (see accompanying illustration).
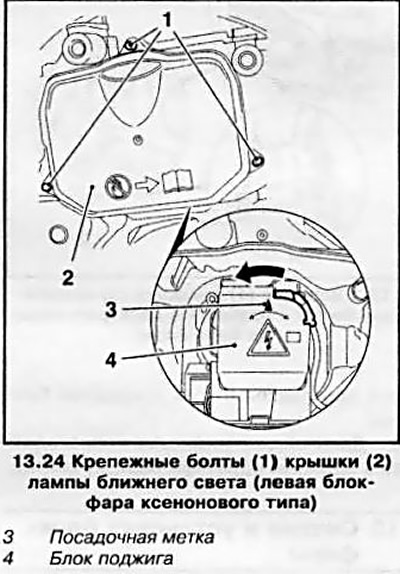
25. Turn the ignition unit counterclockwise (see illustration 13.24) and release it from the holder. Disconnect the wiring connector of the unit and remove the unit from the lamp.
Caution: Never turn on the headlights with the ignition unit removed!
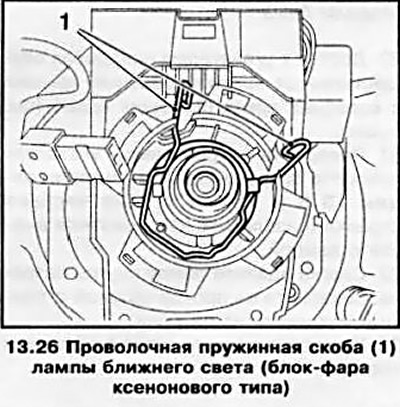
26. Squeeze the wire clip and remove it (see accompanying illustration). Remove the xenon lamp from the reflector.
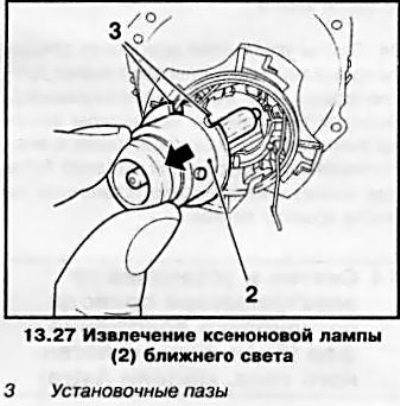
27. Install the new lamp into the reflector socket so that the grooves on the lamp base fit into the corresponding guides (see accompanying illustration).
28. Installation is carried out in the reverse order of removal.
Note: After installing the ignition unit, its landing mark (see illustration 13.24) on the left headlight it should be at the top, and on the right one it should be at the bottom.
High beam and parking lights
29. The replacement of high beam and parking lights is done through the service cover in the front wheel arch. The replacement procedure itself is completely identical to the similar procedure for halogen headlights (see above).
Astra Models
30. Access to the direction indicators is through the service covers in the wheel arches of the front wheels (see above).
31. Turn the turn signal bulb holder by the handle (see illustrations 13.6 and 13.22) counterclockwise and remove from the holder together with the lamp.
32. Gently press the lamp into the socket, turn it counterclockwise and remove it from the socket.
33. Installation is carried out in reverse order.
Zafira Models
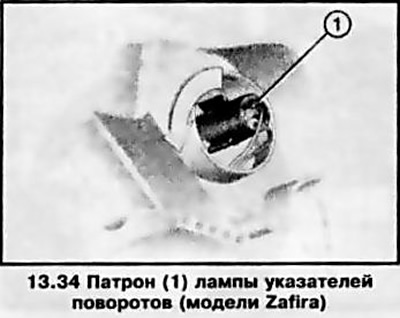
34. The direction indicator lamps are covered with covers and the lamp sockets have a different shape (see accompanying illustration). The procedure for replacing the lamp is almost the same as for the Astra models (see above) - do not forget to replace the lamp cover.
Visitor comments