
OpelBook.ru
Cars AvtoVAZ Cars Mitsubishi Cars BMW Cars Mercedes Cars Nissan Cars Toyota Cars Chevrolet
English Русский
Български
Беларускі
Український
Српски
Hrvatski
Română
Polski
Slovenský
Magyar
 |  Sitemap  |  Contacts  |    


Main Astra Corsa Insignia Kadett Omega Vectra Zafira Others Articles
Astra F (1991-1998, petrol) Astra G (1998-2004, petrol) Astra G (1998-2004) Astra H (2004-2009) Astra J (2009-2015, petrol)
  • Main
  • Astra
  • Astra H
  • Power unit
  • Power and exhaust system
  • Removal and installation air intake tract components

Removal and installation air intake tract components (Opel Astra H)

            0

Contents: Removal ⬇ Installation ⬇

Removal


1. The general connection diagram of the air supply system intake tract components is shown in the accompanying illustration. Basically, the fastening of pipelines and hoses is carried out using clamps of various types. In some cases, bolted connections are used for this purpose.
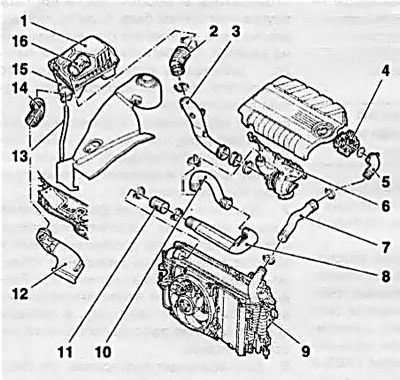
6.1 Connection diagram of the air intake tract components (using the Z19DTH engine as an example)

6.1 Connection diagram of the air intake tract components (using the Z19DTH engine as an example)
1 Air cleaner housing
2 Air intake duct
3 Boost sleeve
4 Throttle body pipe
5, 7, 10, 11 Boost hoses
6 Turbocharger with exhaust manifold
8 Boost pipe
9 Charge air cooler (intercooler)
12 Resonator
13 Drainage tube
14 Connecting sleeve
15 Lower part of the air filter housing
16 Air mass measurement sensor


2. The most important element of the air supply system is the air cleaner. When performing maintenance work, it is sufficient to remove only the top cover (see Chapter 1), but when performing many repairs and replacing other elements of the engine compartment, it is necessary to dismantle the entire air cleaner assembly.

Material published on the website [www.opelbook.ru]


3. On the Z16XEP engine, disconnect the air mass sensor wiring connector (see accompanying illustration), to do this, slide the yellow locking clip back and press the retainer, unscrew the mounting bolt, loosen the clamp and disconnect the intake manifold from the throttle body (or, depending on the type and brand of engine (see below), from the intake sleeve).
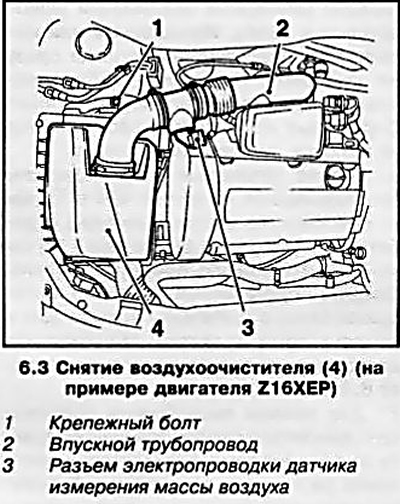
3. On the Z16XEP engine, disconnect the air mass sensor wiring connector (see accompanying…


4. For other engines, you need to perform a few additional steps:
  • Z14XEP/Z18XE Engines: Remove the PCV hose by first loosening the clamp and sliding it back along the hose;
  • Z14XEP/Z22YH Engines: Disconnect the fuel tank vent hose;
  • Z14XEP Engines: Disconnect the lower air cleaner rubber support and remove the front connecting sleeve;
  • Z13DTH Engines: Disconnect 2 vacuum hoses;
  • Z19DT(H)/Z17DT(L/H)/ Z13DTH engines: Disconnect the lower water drain tube from the air cleaner.

5. Remove the air cleaner with the intake manifold.

Installation


6. Installation is performed in the reverse order of dismantling the components. Make sure that the air duct clamps are tightened securely. On 2.0 L diesel engines, do not forget to replace the sealing ring at the junction of the metal sleeve with the turbocharger (if the sleeve was disconnected).


This article is available at russian, bulgarian, belarusian, ukrainian, serbian, croatian, romanian, polish, slovak, hungarian
Checking the article: Simonov Timofey

Share information:

Previous articles
Opel Astra H: Power and exhaust system
Next articles

Removal dirt and water from the fuel system of a diesel engine
Removal air from the fuel system of a diesel engine
Checking the condition and replacing fuel lines and their fittings
Relieving pressure in the fuel system of gasoline engines
Power supply system. General information and safety precautions
Specifications
Removal and installation the gas pedal
Removal and installation the fuel pump
Removal and installation the fuel level sensor
Removal and installation the fuel filter mounting clamp (diesel models)
Removal and installation glow plugs (diesel engines)
Removal and installation the fuel tank


See similar ones from other Opel car manuals:
▶ Removal and installation air intake tract components Opel Corsa B (1993-2000)
▶ Removal and installation air intake tract components Opel Vectra C (2002-2008)
▶ Precautions to prevent the collapse of the vehicle or its… Opel Insignia A (2008-2017)
▶ Distinctive components of the Motronic ML4.1 system from… Opel Kadett E (1984-1995)
▶ Engine Components — Inspection and Refurbishment Opel Omega A (1986-1993)
Link to this page in different formats

Visitor comments


No comments yet


How much will 40 + 39 =


Astra J (2009-2015, petrol) 
  • General information
  • Vehicle device
  • User manual
  • Faults en route
  • Maintenance
  • Power unit
  • Engine repair
  • Cooling and lubrication system
  • Engine power system
  • Exhaust system
  • Transmission
  • Clutch
  • Car gearbox
  • Drive shafts
  • Chassis
  • Front suspension
  • Rear suspension
  • Steering
  • Brake system
  • Wheels and tires
  • Body
  • Exterior
  • Interior
  • Doors and windows
  • Body Care
  • Heating and air conditioning
  • Security systems
  • Electrical equipment
  • Equipment and devices
  • Lighting and signaling
  • Power devices
  • Electrical circuits
Astra H (2004-2009) 
  • General information
  • Introduction to the guide
  • Troubleshooting
  • User manual
  • Maintenance
  • Power unit
  • Engine repair
  • Cooling and heating
  • Power and exhaust system
  • Ignition system
  • Launch and charge system
  • Transmission
  • Mechanical gearbox
  • Automatic gearbox
  • Drive shafts
  • Chassis
  • Brake system
  • Car suspension
  • Steering
  • Body
  • Interior
  • Exterior
  • Electrical equipment
  • Equipment and devices
  • Electrical circuits
Astra G (1998-2004) 
  • General information
  • Introduction to manual
  • User manual
  • Maintenance
  • Power unit
  • SOHC gasoline engines
  • DOHC gasoline engines
  • Diesel engines 1.7 and 2.0
  • Engine repair
  • Cooling system
  • Supply system
  • Injection system (gasoline)
  • Injection system (diesel)
  • Exhaust system
  • Charge and launch system
  • Ignition system (gasoline)
  • Preheat system (diesel)
  • Transmission
  • Manual gearbox
  • Automatic gearbox
  • Clutch
  • Drive shafts
  • Chassis
  • Brake system
  • Wheel suspension
  • Steering
  • Body
  • Exterior
  • Interior
  • Doors and windows
  • Ventilation and heating
  • Electrical equipment
  • Equipment and devices
  • Electrical circuits
Astra G (1998-2004, petrol) 
  • General information
  • User manual
  • Car care
  • Maintenance
  • Power unit
  • Single shaft engines
  • Twin shaft engines
  • Engine repair
  • Cooling and heating
  • Fuel and exhaust systems
  • Starting and charging system
  • Ignition system
  • Transmission
  • Clutch
  • Mechanical gearbox
  • Automatic gearbox
  • Drive shafts
  • Chassis
  • Brake system
  • Car suspension
  • Steering
  • Body
  • Interior
  • Exterior
  • Electrical equipment
  • Equipment and devices
  • Wiring diagrams Opel Astra
  • Wiring diagrams Opel Zafira
Astra F (1991-1998, petrol) 
  • General information
  • Maintenance
  • Power unit
  • Engine in car
  • Engine removed
  • Cooling system
  • Heating and ventilation
  • Fuel supply (carburetor)
  • Fuel supply (injector)
  • Emission control
  • Ignition system
  • Transmission
  • Clutch
  • Mechanical gearbox
  • Automatic gearbox
  • Drive shafts
  • Chassis
  • Brake system
  • Car suspension
  • Steering
  • Body
  • Exterior
  • Interior
  • Electrical equipment
  • Equipment and devices
  • Electrical circuits
OpelBook.ru © 2017–2026 · Mobile version · · Sitemap: EN BG BY UA RS HR RO PL SK HU · Feedback · Site search
Astra F, petrol · Astra G, petrol · Astra G · Astra H · Astra J, petrol · Corsa B · Corsa C, petrol · Corsa C · Insignia A · Kadett D · Kadett E · Omega A · Omega B · Omega B2 · Vectra A, petrol · Vectra A · Vectra B, petrol · Vectra B · Vectra C · Zafira A, petrol · Frontera A, petrol · Frontera B · Ascona C · Vivaro A ·
We want your visit to be comfortable 🤝! We use cookies 🍪 to make that happen.