
Visual control of leaks
2. With an oily engine and high oil consumption, check the places where leaks are most likely to develop:
- a) Open the filler cap and check the seal for cracks or damage;
- b) Crankcase ventilation: eg vent hose from cylinder head cover to air intake hose;
- c) Cylinder head cover gasket;
- d) Cylinder head gasket;
- e) Oil removal plug (sealing ring);
- f) Oil pump gasket;
- g) Oil pan gasket;
- h) Front and rear crankshaft seals.
Since in the presence of leaks, oil spreads over the surface of the engine, it is difficult to immediately determine the location of leaks. To detect leaks, proceed as follows:
3. Wrap the generator in polyethylene. Spray the engine with a normal cold cleaner and after a short time wash it with water at a car wash.
4. Sprinkle the joints of the engine components on the outside with lime or talc.
5. Check the oil level, top up if necessary.
6. Carry out a test drive to warm up the oil to normal operating temperature.
7. Finally, examine the engine with a lamp and locate leaks by troubleshooting.
Level check
8. Checking the level of impellent oil is carried out using a dipstick threaded into the guide tube and lowered into the engine to the lowest point of its oil pan.
9. Checking the oil level should be done before the first ride of the day, or about 5 minutes after the engine has stopped. If the check is performed immediately after the engine is turned off, the results will not adequately reflect the situation, as part of the oil will be distributed to the internal galleries and engine components.
10. Remove the feeler gauge from the guide tube and wipe the feeler blade dry with a clean cloth or paper towel. Insert the dipstick back into the tube until it stops, then remove it again. After examining the probe blade, estimate the size of the area wetted with oil. The oil level must be between the upper and lower marks on the dipstick blade (see resist. illustrations). If necessary, top up the engine with the appropriate amount of oil of the required grade.
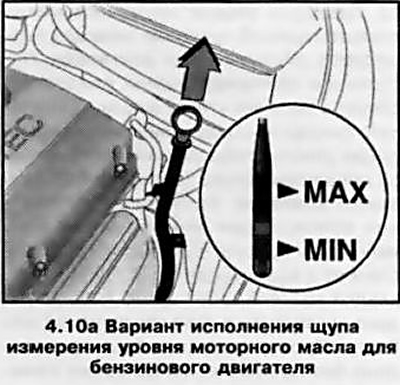
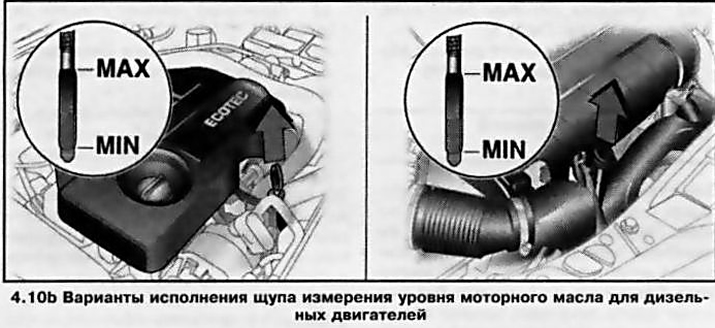
11. To raise the level from the bottom (MIN) marks on the dipstick to the top (MAX) Approximately 1 liter of oil is required. Lowering the level beyond the lower limit of the permissible range leads to the development of engine oil starvation, which is fraught with serious mechanical damage to the latter. Also try not to overfill the oil above the upper mark, as this can lead to throwing spark plugs or failure of the oil seals of the power unit as a result of an excessive increase in pressure - when overflowing oil, it should be pumped out using a special tool.
12. In order to fill the engine with oil, it is necessary to remove the threaded filler cap. Use a funnel or an oil can with a long spout to avoid splashing oil when filling it into the engine. After filling in oil, screw on and firmly tighten the cap, then start the engine and carefully inspect the drain plug and the surface of the oil filter mating with the block for signs of leakage. Stop the engine, wait about 5 minutes for the oil to drain into the sump, then check the level again.
13. Checking the engine oil level is an important preventative engine maintenance procedure. A constantly low level indicates the presence of oil leaks as a result of failed oil seals, damaged seals, worn piston rings or valve guides. If the oil resembles milk in color or consistency, or there are drops of water in it, this indicates a possible damage to the cylinder head gasket, or the formation of cracks in the body of the head (-OK) or block. The check must be made without delay. When measuring the oil level, always also check its condition. Using your thumb and forefinger, remove traces of oil from the dipstick blade - if there are small metal particles in it, the oil must be replaced (see Section 6).
Visitor comments