
Note: If the vehicle is used in severe conditions, the intervals between the next replacement of impellent oil / oil filter should be shortened (see section 1).
1. Regular and fairly frequent replacement of engine oil is one of the main preventive maintenance procedures for a car that lies within the skill of an average amateur mechanic. Over time, motor oil is subject to aging, which is manifested in its gradual dilution and contamination, leading to premature wear of internal engine components. Despite the fact that some sources recommend changing the oil filter only every second engine oil change, the compilers of this Guide believe that due to the relative insignificance of the cost of the replacement component and the importance of its condition on the correct functioning of the engine / efficiency of its return, it makes sense to change the filter every time you change the oil.
2. Make sure you have all the materials and tools needed to perform an oil and oil filter change on hand (see resist. illustration). Also, have enough rags and old newspapers ready to catch any spilled oil. Before changing the oil, the engine must be warmed up to operating temperature - hot oil is more fluid and better flushes out sludge and sediment.

3. Oil from the engine can be removed in two ways: pumped out using a special syringe (devices) through the dipstick tube for measuring the engine oil level, or drained through the drain hole in the engine oil pan. Depending on the availability of appropriate equipment, you can choose any of them - the first is more preferable for a private garage, because. does not require special lifting equipment or a viewing hole. Park the vehicle on a level surface, apply the parking brake lever and stop the engine.
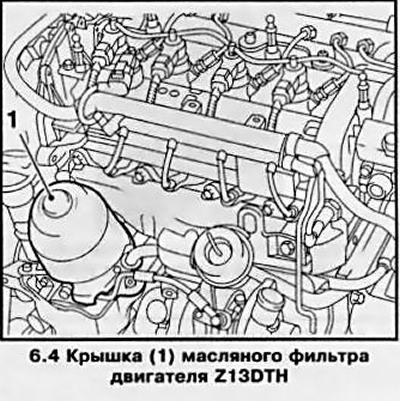
4. On the Z13DTH engine, you must first remove the engine cover (see chapter 2). To remove the oil filter cover (see resist. illustration) unscrew the two fixing bolts and the hex nut. If it is necessary to apply significant force to unscrew the stuck bolts, use the Torx T30 head with an extension and a ratchet mechanism.
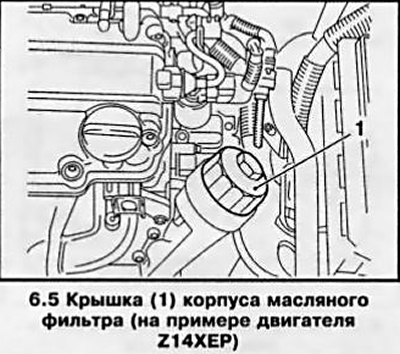
5.Other models oil filter/ oil filter housing cover (see resist. illustration) removed with a spanner wrench or special tools. When unscrewing the filter cap, oil begins to drain into the engine oil pan, wait until all the oil has drained from the filter and then remove the filter element. Note: Depending on the engine model, the oil filter is completely separated (see paragraph 15 below) or only the filter cover with replaceable filter element is removed (engines Z14XEP/Z22YH/Z13DTH/ Z17DT (L/H) /Z19DT (J/H)). Then remove the dipstick from the tube (see Section 4) and pump out the oil.
6. If there is no special syringe / device, engine oil can be drained from the crankcase, for which lift the car using a lift, drive it onto a flyover, or jack it up and place it on props.
Attention: Never carry out any work under the car, supported only by the bumper or held in a raised position only by a jack!
Make sure that the car is securely fixed in the raised position.
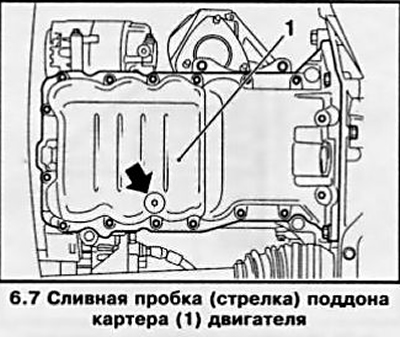
7. Get under the car and familiarize yourself with the location of the oil pan drain plug (see resist. illustration). Remember that the power unit and components of the exhaust system will remain hot enough during the entire procedure - consider a safe hand manipulation scheme to avoid accidental contact with heated surfaces.
8. Make sure the vehicle is level on the stands/lift. Remove the cap from the engine oil filler neck (see Section 4). On diesel engines with a working volume of 1.7 and 1.9 liters, you must first unscrew the 4 fixing bolts and remove the service cover on the protective casing of the engine compartment. In addition, on diesel engines with a displacement of 1.9 liters, in order not to damage the flexible pipe of the exhaust gas system with a hot jet of escaping engine oil, it is necessary to install a protective screen and secure it with wire.
9. Install a drain pan under the oil pan, so that at first the jet will flow through the hole with a decent pressure. Taking care not to touch the hot surfaces of the power unit and exhaust system components, remove the drain plug from the bottom of the oil pan. It is recommended to wear protective rubber gloves during this operation.
10. Allow the oil to flow freely into the container, adjusting the position of the latter accordingly as the pressure of the jet weakens. Check the drained oil for the presence of metal filings.
11. After the oil stops flowing from the crankcase, carefully wipe the drain plug with a clean rag - small metal filings can stick to it, which will immediately lead to contamination of fresh oil.
12. Wipe the surface of the pan around the drain hole, screw the plug into place and tighten to the required torque (see specs). Remember to replace the copper/aluminum seal on the drain plug threaded connection.
Note: A gasket is sometimes included with a new oil filter change.
13. If equipped, remove the protective screen, reinstall the service cover. Collect traces of spilled oil, remove drain pan and tools from under the car. Lower the car to the ground. The oil filter is installed in place and tightened with the appropriate torque (see below).
Visitor comments