
OpelBook.ru
Cars AvtoVAZ Cars Mitsubishi Cars BMW Cars Mercedes Cars Nissan Cars Toyota Cars Chevrolet
English Русский
Български
Беларускі
Український
Српски
Hrvatski
Română
Polski
Slovenský
Magyar
 |  Sitemap  |  Contacts  |    


Main Astra Corsa Insignia Kadett Omega Vectra Zafira Others Articles
Corsa B (1993-2000) Corsa C (2000-2006, petrol) Corsa C (2000-2006)
  • Main
  • Corsa
  • Corsa B
  • Power unit
  • SOHC gasoline engines
  • Removal and installation the timing cover

Removal and installation the timing cover (Opel Corsa B)

            0

Contents: Removal ⬇ Installation ⬇

Removal


1. Remove the intake air duct cover from the throttle body cover (see Chapter Fuel, exhaust and emission control systems).

2. Loosen the mounting clamps and disconnect the hoses from the timing cover.

3. Unscrew the cover mounting bolts. Remove the cover from the timing case. If the cover is stuck and cannot be removed, do not pry it off with a lever to avoid damaging the mating surfaces. Instead, lightly tap the sides of the cover with a soft-faced hammer to release it. A damaged sealing gasket must be replaced.

Installation


1. Before installation, inspect the cover from the inside for slag deposits and other contaminants. If necessary, thoroughly clean the cover by wiping it with a rag soaked in kerosene or another suitable solvent. Check the condition of the filter element of the crankcase ventilation system; if necessary, wash it with the same solvent. For easy access to the filter element, it can be removed from the cover by unscrewing the mounting bolts. Before installation, wipe the cover dry with a clean rag.

2. Make sure that the mating surfaces of the cover and the camshaft housing are clean and dry. Place a new sealing gasket in the cover's receiving groove, checking that it is correctly positioned relative to the protrusions. Carefully, checking that the gasket is correctly positioned, press the cover against the mating surface of the camshaft housing.

3. Screw in the mounting bolts and tighten the bolts to the required torque in the prescribed order.


Timing Belt Cover Bolt Tightening Procedure
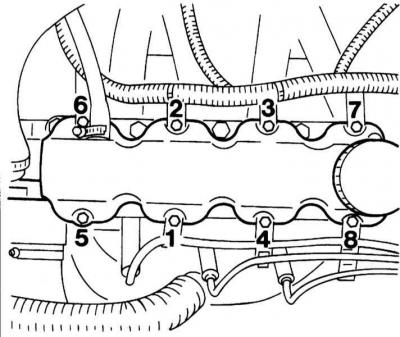
Timing Belt Cover Bolt Tightening Procedure


4. Restore the original hose connections.


This article is available at russian, bulgarian, belarusian, ukrainian, serbian, croatian, romanian, polish, slovak, hungarian
Checking the article: Trifonova Emilia

Share information:

Previous articles
Opel Corsa B: SOHC gasoline engines
Next articles

Bringing the piston of the first cylinder to the position of the top dead center of the compression stroke (TDC)
Engine condition diagnostics using a vacuum gauge
Checking the compression pressure in the cylinders and engine oil parameters
General information about all engines
Specifications of all engines
Removal and installation the crankshaft pulley
Removal and installation the timing belt cover
Removal and installation the timing belt
Removal and installation timing gear wheels
Replacing the camshaft seal
Removal, condition check and installation of the camshaft with the timing mechanism housing


See similar ones from other Opel car manuals:
▶ Removal and installation the timing belt cover Opel Astra G (1998-2004)
▶ Timing Belt Cover Opening, 1.4L and 1.6L Models — General… Opel Vectra A (1988-1995, petrol)
▶ Front timing belt cover Opel Frontera B (1998-2004)
▶ Luggage compartment cover Opel Insignia A (2008-2017)
▶ Technical characteristics of the valve timing mechanism Opel Kadett E (1984-1995)
Link to this page in different formats

Visitor comments


No comments yet


How much will 42 + 10 =


Corsa C (2000-2006) 
  • General information
  • Introduction to guide
  • Troubleshooting
  • Vehicle device
  • User manual
  • Maintenance
  • Power unit
  • Engine repair
  • Cooling system
  • Power and exhaust system
  • Control system
  • Engine electrical equipment
  • Transmission
  • Clutch
  • Mechanical gearbox
  • Automatic gearbox
  • Drive shafts
  • Chassis
  • Brake system
  • Wheel suspension
  • Steering
  • Body
  • Exterior
  • Interior
  • Doors and windows
  • Heating and air conditioning
  • Electrical equipment
  • Equipment and devices
  • Lamps and lighting
  • Electrical circuits
Corsa C (2000-2006, petrol) 
  • User manual
  • Car access
  • Governing bodies
  • Seat control
  • Heating and air conditioning
  • Driving and maintenance
  • Engines 1.0 and 1.2 l
  • Engine repair
  • Cooling and lubrication system
  • Injection system
  • Engines 1.4, 1.6 and 1.8 l
  • Engine repair
  • Cooling and lubrication system
  • Injection system
  • Transmission
  • Clutch
  • Mechanical gearbox
  • Automatic gearbox
  • Drive shafts
  • Chassis
  • Wheels and tires
  • Wheel suspension
  • Steering
  • Brake system
  • Body
  • Exterior
  • Doors and windows
  • Electrical equipment
  • Equipment and devices
  • Lighting system
  • Electrical circuits
Corsa B (1993-2000) 
  • General information
  • Introduction to guide
  • User manual
  • Maintenance
  • Power unit
  • SOHC gasoline engines
  • DOHC gasoline engines
  • Diesel engines
  • Engine repair
  • Cooling system
  • Supply system
  • Injection system (gasoline)
  • Injection system (diesel)
  • Exhaust systems
  • Control system (gasoline)
  • Preheat system (diesel)
  • Charge and launch system
  • Transmission
  • Mechanical gearbox
  • Automatic gearbox
  • Clutch and drive shafts
  • Chassis
  • Brake system
  • Front suspension
  • Rear suspension
  • Steering
  • Body
  • Ventilation and heating
  • Exterior
  • Interior
  • Doors and windows
  • Electrical equipment
  • Equipment and devices
  • Lamps and lighting
  • Electrical circuits
OpelBook.ru © 2017–2026 · Mobile version · · Sitemap: EN BG BY UA RS HR RO PL SK HU · Feedback · Site search
Astra F, petrol · Astra G, petrol · Astra G · Astra H · Astra J, petrol · Corsa B · Corsa C, petrol · Corsa C · Insignia A · Kadett D · Kadett E · Omega A · Omega B · Omega B2 · Vectra A, petrol · Vectra A · Vectra B, petrol · Vectra B · Vectra C · Zafira A, petrol · Frontera A, petrol · Frontera B · Ascona C · Vivaro A ·
We want your visit to be comfortable 🤝! We use cookies 🍪 to make that happen.