
Checking the compression pressure in the cylinders
Cylinder compression test results provide an indication of the overall condition of the top of the engine components (pistons, piston rings, valves, cylinder head gaskets, etc.) and qualitatively assess the degree of their wear. Most importantly, the analysis of the information obtained as a result of the check allows us to narrow the range of possible causes of a drop in compression in the cylinders, quite accurately tying the failure to malfunctions of quite specific components, be it piston rings, valves, their seats or head gaskets.
The engine must be warmed up to normal operating temperature and the battery fully charged.
1. Start by cleaning the candle niches (blow them with compressed air, the source of which in this case is perfect for an ordinary bicycle pump). The main objective is to prevent debris from entering the cylinders during measurements.
2. On DOHC 1.0 engines and 1.2 l disconnect both connectors of the engine control unit and remove the ignition module.
In this case, the ignition must be switched off.
3. On DOHC 1.4 engines and 1.6 l remove the wire cover. To do this, remove the oil filler cap and then reinstall it.
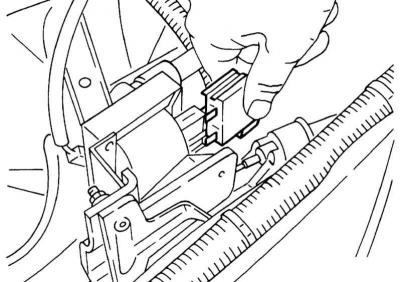
4. Disconnect the spark plug connectors. For engines OHC 1.2 and 1.4 l special forceps are used (e.g. HAZET 1849). When disconnecting connectors, only handle the connectors themselves, never the wiring. On engines DOHC 1.4 and 1.6 l spark plug connectors are disconnected using a special tool located on one of the connectors. Unscrew the candles with a special candle wrench.
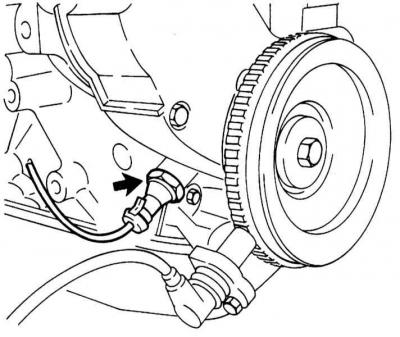
5. On C14NZ engine Disconnect the multi-pin connector of the ignition coil.
Ignition coil multipin connector on C14NZ engine
6. On all engines except C14NZ X10XE and X12XE Disconnect the DIS ignition module multi-pin connector.
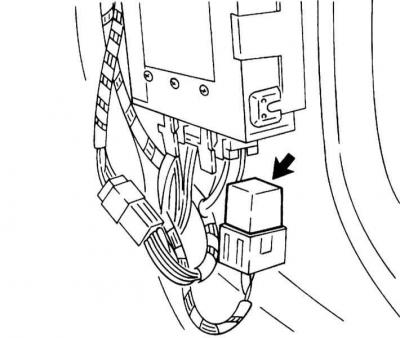
7. On gasoline engines 1.2, 1.4 and 1.6 l remove the fuel pump relay (arrow). This prevents the situation in which, during engine start, the injected fuel in unburned form can enter the catalytic converter. The relay is located in the passenger compartment behind the A-pillar trim, bottom right. On diesel engines, disconnect the electrical wiring from the switch on the injection pump.
Removing the fuel pump relay will de-energize the gasoline engine power system
8. Turn the engine over with the starter to remove any remaining air/fuel mixture and soot.
Shift the transmission to neutral and apply the parking brake first. At the same time, do not bend over the engine, so as not to be injured from the emission of soot particles.
9. Install a compression tester in the spark plug hole of the first cylinder - it is preferable to use a threaded nozzle rather than a clamping type to connect the compression tester. Do not forget to open the throttle valve all the way during the check.
In diesel engines, the compression ratio is much higher than in gasoline engines, therefore, to check the compression pressure, you will need a special compression gauge with a measurement range of at least 40 atm. The compression tester is screwed into the hole of the glow plug with its adapter nozzle.
10. Ask the assistant to press the gas pedal and hold it during the test.
11. Crank the starter for 4 seconds, or as long as necessary to ensure that there are no pressure surges on the compression gauge. On a healthy engine, the pressure should build up fairly quickly. Low pressure on the first stroke, accompanied by a gradual increase in subsequent strokes, indicates wear on the piston rings. If the pressure does not rise with further rotation of the shaft, this can be regarded as evidence of valve leaks or a leak in the cylinder head gasket (the possibility of cracks in the head is also not excluded). The accumulation of deposits on the working facets of the valve plates can also lead to a decrease in compression pressure. Record the maximum compression gauge reading.
12. Repeat the procedure for the remaining engine cylinders. Compare results with regulatory requirements (see chapter Engines). The number of revolutions of the crankshaft when checking should be at least 300 rpm for petrol engines and at least 200 rpm for diesel.
13. If the measurement results are excessively low, pour a little engine oil into each of the cylinders through the candle hole (two to three teaspoons) and recheck.
14. If the addition of oil leads to an increase in pressure, this indicates wear on the piston rings. If the compression does not increase, the cause of the decrease is valve leaks or a leaking head gasket. Valve leaks can be associated with burnout of their seats, or deformation / burnout or mechanical damage to the working chamfers.
15. If the compression pressure is equally low in two adjacent cylinders, then with a high degree of probability we can talk about a violation of the integrity of the head gasket within its jumper between these cylinders. The presence of coolant in the engine oil will confirm this assumption.
16. If the pressure in one of the cylinders is about 20% lower than in the others and this is accompanied by a violation of the stability of the idle speed, the degree of wear of the corresponding valve drive cams on the camshaft should be assessed.
17. An unusual increase in compression pressure is usually the result of excessive carbon formation in the combustion chambers. In this case, the cylinder head must be removed in order to carry out decarbonization.
18. In case of excessively low measurement results, as well as in the event of a violation of the uniform distribution of pressure between the cylinders, it will be useful to test the engine for leaks in a car service workshop. This check will pinpoint the source of the leak and assess its severity.
19. After the end of measurements, install all spark plugs / glow plugs and connect electrical wiring to them.
20. Install all removed components in the reverse order of their removal.
Checking the unit for leaks
During this test, the rate of exit from the cylinders of the compressed air pumped into them and the leaks directly are determined. This test is an alternative to the compression test. Moreover, from many points of view, it is much more effective, since it is easier to visually identify the source of a leak than to comprehend the results of a compression measurement.
The equipment needed to test for leaks is not publicly available, so this test will have to be entrusted to the service center specialists.
Engine oil temperature measurement
To perform various adjustment work, determining the temperature of the engine oil is important. The temperature should be measured 1 cm above the oil pan.
1. To measure the temperature, insert a measuring probe into the guide of the dipstick of the engine oil level, rest it against the oil pan, and then raise it by 1 cm.
2. To prevent air from being sucked through the probe guide, seal its opening with a rubber plug.
3. Oil temperature 80 degrees. and above corresponds to the operating temperature of the engine.
When the engine is overloaded, the oil temperature can reach 150 degrees.
Oil pressure check
1. Warm up to operating temperature.
2. Turn off the ignition and disconnect the electrical wiring from D/V engine oil pressure.
3. Turn out Д/В oil pressures. It is located:
- on gasoline engines DOHC 1.0 and 1.2 L – on top of the cylinder head, above the water pump;
- on gasoline engines 1.2, 1.4 and 1.6 l - on the side of the oil pump, above the CKP sensor
- on diesel engines - on the front side of the engine, next to the oil filter.
D / V oil pressure of gasoline engines
4. Screw a manometer into the threaded hole Д/В of the oil pressure. Opel service stations use a KM-135 hose with a KM-498-B pressure gauge for this.
5. Start the engine and let it idle.
6. Read the pressure gauge readings and compare them with the requirements of the Specifications in Chapter Engines. If necessary, check the oil circuit for leaks.
Unscrew the pressure gauge, install a new engine oil pressure D / V with a new copper gasket and tighten it with force 30 Nm. Connect the wiring to the sensor.
Visitor comments