
OpelBook.ru
Cars AvtoVAZ Cars Mitsubishi Cars BMW Cars Mercedes Cars Nissan Cars Toyota Cars Chevrolet
English Русский
Български
Беларускі
Український
Српски
Hrvatski
Română
Polski
Slovenský
Magyar
 |  Sitemap  |  Contacts  |    


Main Astra Corsa Insignia Kadett Omega Vectra Zafira Others Articles
Vectra A (1988-1995, petrol) Vectra A (1988-1995) Vectra B (1995-2002, petrol) Vectra B (1995-2002) Vectra C (2002-2008)
  • Main
  • Vectra
  • Vectra C
  • Power unit
  • Engine repair
  • Checking the compression pressure in the cylinders

Checking the compression pressure in the cylinders (Opel Vectra C)

            0

1. The results of the cylinder compression pressure test allow you to determine the general condition of the components of the upper part of the engine (pistons, piston rings, valves, cylinder head gaskets, etc.) and qualitatively assess the degree of their wear. What is especially important is that the analysis of the information obtained as a result of the check allows us to narrow the range of possible causes of the compression drop in the cylinders, quite accurately linking the failure to malfunctions of very specific components, be it piston rings, valves, their seats or head gaskets.

Note: The engine must be warmed up to normal operating temperature (at least 80°C) and the battery fully charged.


2. Start by cleaning the spark plug niches (blow them out with compressed air, a regular bicycle pump is a great source of air in this case). The main objective is to prevent debris from entering the cylinders during measurements.

3. Depending on the model, you must first remove the engine cover and disconnect all elements that may interfere with the removal of the ignition module or block access to the glow plugs of a diesel engine.

4. On a gasoline engine, remove the ignition module and spark plugs

Attention! Work is carried out on a hot engine - do not touch the heated parts of the engine with your hands, use special handles/bolts to remove the module!


On diesel engines, disconnect the supply wiring from the glow plugs and remove the glow plugs.

5. Using the OBD on-board diagnostic system connector (see Chapter 5) and the device TESN - 2 (program "Compression test") open the engine throttle valve. On models not equipped with these connectors (earlier years of production), release the pressure in the fuel system (see Chapter 4) and de-energize it by removing the fuel pump relay from the mounting block installed in the luggage compartment (see Chapter 12) and fix the throttle valve in the fully open position.
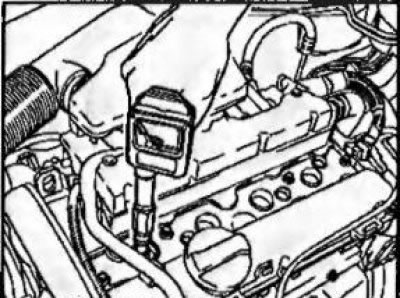


3.6a Checking the compression pressure in the first cylinder of a gasoline engine (using the Z16XE…

3.6a Checking the compression pressure in the first cylinder of a gasoline engine (using the Z16XE engine as an example)


6. Install the compression gauge into the spark plug hole of the first cylinder (see illustrations), using the appropriate adapter for the given engine

Note: When installing the compression gauge, do not forget to check for the presence of a rubber sealing gasket on the adapter.


On the measuring device of the compression tester, it is necessary to set the appropriate digit for taking measurements - for gasoline engines 1750 kPa (17.5 bar). In diesel engines, the compression ratio is much higher than in petrol engines, so to check the compression pressure you will need a special compression tester with a measurement range from 10 to 40 bar.
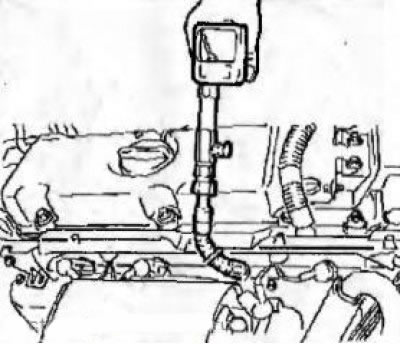
3.6b Checking the compression pressure of a diesel engine (using the Y22DTH engine as an example)

3.6b Checking the compression pressure of a diesel engine (using the Y22DTH engine as an example)


7. Crank the engine with the starter for about four seconds (use the help of an assistant) in this case, the engine crankshaft rotation speed must be no less than 300 rpm for gasoline and not less 150 rpm for diesel. Read and record the meter reading. Repeat the operation for the remaining cylinders. Compare the readings with the standard (see Specifications) - the pressure in any of the cylinders should not be less than 75%from the standard, while the difference in pressure in different cylinders should not exceed 100 kPa (1 bar).

8. Equally low measurement results in all cylinders usually indicate wear of the compression rings in all cylinders and the need to replace them. Excessive pressure drop in one or more cylinders indicates the occurrence of local faults. When low compression pressure is detected in the engine cylinders, a more thorough check is carried out to accurately determine the cause - for example, a leak test (see below). Such a check is usually carried out in a car service workshop.

9. There are several practical ways to more accurately determine the cause of the malfunction. For example, if you add 2-3 teaspoons of engine oil to a cylinder in which excessively low pressure is determined, then an increase in pressure upon repeated measurement indicates wear of the piston rings. If the compression does not increase, the cause of its decrease is valve leaks or a leak in the head gasket.

10. If the compression pressure is equally low in two adjacent cylinders, then with a high degree of probability we can speak about a violation of the integrity of the head gasket within its bridge between these cylinders. The presence of coolant in the engine oil will confirm this assumption.


11. After completing the check, disconnect the compression gauge and reinstall the removed components.

Checking the block for leaks


12. During this test, the speed of the compressed air pumped into the cylinders and the leak locations are determined. This test is an alternative to the compression test. Moreover, from many points of view, it is much more effective, since it is easier to visually identify the source of the leak, but it requires a slightly larger volume of preparatory work and the use of a special device for measuring leaks, the handling of which requires certain skills, in addition, for the convenience of visual inspection, it is preferable to use a special lift.

13. The equipment required to check for leaks is not generally available, so this test will have to be entrusted to service center specialists.


This article is available at russian, bulgarian, belarusian, ukrainian, serbian, croatian, romanian, polish, slovak, hungarian
Checking the article: Meshcheryakov Damir

Share information:

Previous articles
Opel Vectra C: Engine repair
Next articles

Engine cover — removal and installation
General information about engines
Engine specifications
Engine condition diagnostics using a vacuum gauge
Preparatory operations for engine repair
Removal the right engine mount
Removal and installation the crankshaft pulley
Removal and installation camshaft sprockets
Bringing the piston of the first cylinder to the top dead center (TDC) position


See similar ones from other Opel car manuals:
▶ Checking the compression pressure in the cylinders Opel Astra H (2004-2009)
▶ Checking the compression pressure in the cylinders and… Opel Corsa B (1993-2000)
▶ Checking the compression in the cylinders Opel Insignia A (2008-2017)
▶ Checking the compression in the cylinders Opel Kadett D (1979-1984)
▶ Checking the compression pressure Opel Omega B (1993-1999)
Link to this page in different formats

Visitor comments


No comments yet


How much will 16 + 18 =


Vectra C (2002-2008) 
  • General information
  • User manual
  • Vehicle device
  • Maintenance
  • Troubleshooting
  • Power unit
  • Engine repair
  • Cooling system
  • Power and control system
  • Engine electrics
  • Transmission
  • Clutch
  • Car gearbox
  • Drive shafts
  • Chassis
  • Car suspension
  • Steering
  • Brake system
  • Body
  • Exterior
  • Interior
  • Doors, locks and windows
  • Heating and ventilation
  • Electrical equipment
  • Equipment and devices
  • Headlights and lighting
  • Electrical circuits
Vectra B (1995-2002) 
  • General information
  • User manual
  • Weekly checks
  • Maintenance (gasoline)
  • Maintenance (diesel)
  • Troubleshooting
  • Power unit
  • SOHC gasoline engine
  • DOHC petrol engine
  • Diesel engine 1.7 liter
  • Diesel engine 2.0 liters
  • Engine repair
  • Cooling system
  • Fuel system (gasoline)
  • Fuel system (diesel)
  • Charging system
  • Launch system
  • Ignition and preheat
  • Transmission
  • Clutch
  • Mechanical gearbox
  • Automatic gearbox
  • Drive shafts
  • Chassis
  • Brake system
  • Wheel suspension
  • Steering
  • Body
  • Exterior
  • Interior
  • Doors and windows
  • Heating and ventilation
  • Electrical equipment
  • Equipment and devices
  • Electrical circuits
Vectra B (1995-2002, petrol) 
  • General information
  • Maintenance
  • Help with malfunctions
  • Power unit
  • Engine repair
  • Exhaust system
  • Cooling system
  • Fuel system
  • Multec injection system
  • Four point injection
  • Transmission
  • Clutch
  • Gearbox and drive
  • Chassis
  • Wheel suspension
  • Steering
  • Brake system
  • Wheels and tires
  • Body
  • Exterior
  • Interior
  • Electrical equipment
  • Fuses and electronics
  • Power devices
  • Ignition system
  • Lighting and signaling
  • Equipment and devices
  • Heating and ventilation
  • Electrical circuits
Vectra A (1988-1995) 
  • Power unit
  • Engine repair
  • Ignition system
  • Lubrication system
  • Cooling system
  • Injection system
  • Fuel system (carburetor)
  • Fuel system (diesel)
  • Exhaust system
  • Transmission
  • Clutch
  • Car gearbox
  • Chassis
  • Front suspension
  • Rear suspension
  • Steering
  • Brake system
  • Wheels and tires
  • Body
  • Exterior
  • Interior
  • Electrical equipment
  • Electrical circuits
Vectra A (1988-1995, petrol) 
  • General information
  • User manual
  • Maintenance
  • Power unit
  • SOHC engine
  • DOHC engine
  • Cooling and ventilation
  • Fuel system (carburetor)
  • Fuel system (injector)
  • Exhaust converter
  • Transmission
  • Clutch
  • Mechanical gearbox
  • Automatic gearbox
  • Drive shafts
  • Chassis
  • Brake system
  • Car suspension
  • Steering
  • Body
  • Body elements
  • Electrical equipment
  • Power devices
  • Equipment and devices
  • Electrical circuits
OpelBook.ru © 2017–2026 · Mobile version · · Sitemap: EN BG BY UA RS HR RO PL SK HU · Feedback · Site search
Astra F, petrol · Astra G, petrol · Astra G · Astra H · Astra J, petrol · Corsa B · Corsa C, petrol · Corsa C · Insignia A · Kadett D · Kadett E · Omega A · Omega B · Omega B2 · Vectra A, petrol · Vectra A · Vectra B, petrol · Vectra B · Vectra C · Zafira A, petrol · Frontera A, petrol · Frontera B · Ascona C · Vivaro A ·
We want your visit to be comfortable 🤝! We use cookies 🍪 to make that happen.