
OpelBook.ru
Cars AvtoVAZ Cars Mitsubishi Cars BMW Cars Mercedes Cars Nissan Cars Toyota Cars Chevrolet
English Русский
Български
Беларускі
Український
Српски
Hrvatski
Română
Polski
Slovenský
Magyar
 |  Sitemap  |  Contacts  |    


Main Astra Corsa Insignia Kadett Omega Vectra Zafira Others Articles
Vectra A (1988-1995, petrol) Vectra A (1988-1995) Vectra B (1995-2002, petrol) Vectra B (1995-2002) Vectra C (2002-2008)
  • Main
  • Vectra
  • Vectra C
  • Power unit
  • Engine repair
  • Engine cover — removal and installation

Engine cover — removal and installation (Opel Vectra C)

            0

1. During vehicle operation, especially in areas with increased air dustiness and in the autumn-winter period, all units located in the engine compartment are exposed to increased contamination. Before performing maintenance work, it is imperative to clean the joints of mating surfaces, pipeline connectors and electrical wiring before disconnecting them.

2. Various elements and pipelines of its systems are located on top of the engine. Depending on the type and configuration of the engine, this may be a fuel distribution line, high-pressure pipes of the fuel system, an ignition module, various types of supply hoses, cable lines, etc., which is especially typical for diesel engines. These elements form a complex configuration and do not allow for a high-quality cleaning of the engine surface from dust and dirt, although these systems are the most sensitive to contamination. Despite the misconception of many, the cover not only gives the engine a more presentable appearance, but also serves to reduce the degree of contamination and prevents accidental damage to the pipelines. Almost all diesel and some gasoline engines are equipped with an upper protective and decorative cover - do not forget to install it in its regular place after completing the work

Z19DTH Engine
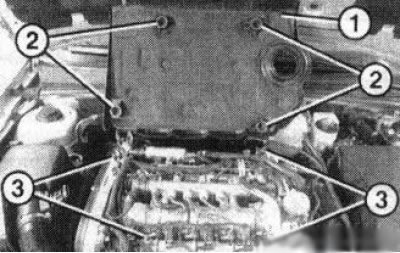


2.3 Cover (1) of the Z19DTH engine: 2. Support seals; 3. Spherical supports

2.3 Cover (1) of the Z19DTH engine: 2. Support seals; 3. Spherical supports


3. The engine cover is installed on spherical supports fixed to various elements of the engine assembly (see illustration). The tight fit is ensured by rubber sealing supports.

4. To remove the cover, simply pull it up with sufficient force - the rubber seals should remain on the cover, otherwise remove them manually and install them in the corresponding slots on the cover.

5. To install, align the mounting sockets with the rubber seals of the top cover with ball-shaped tips and press on the cover until it is fixed on the supports - the cover should fit tightly to the mating surfaces.

Z16XE, Z18XE and Z19DT engines
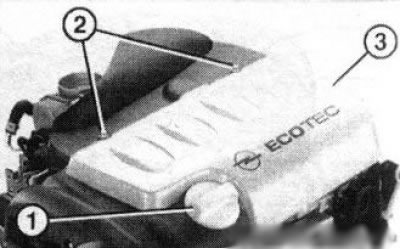


2.6 Engine cover (3) (using the Z18XE engine as an example): 1. Oil filler cap; 2. Mounting screws

2.6 Engine cover (3) (using the Z18XE engine as an example): 1. Oil filler cap; 2. Mounting screws


6. To remove the cover, you must first remove the oil filler cap. Unscrew the fastening screws (see illustration), lift the cover slightly by the rear edge and slide it horizontally forward (to the radiator), then disconnect from the front rubber holders. Install the oil filler caps in place.

7. Install the cover in reverse order.

Y20DTH and Y22DTR engines
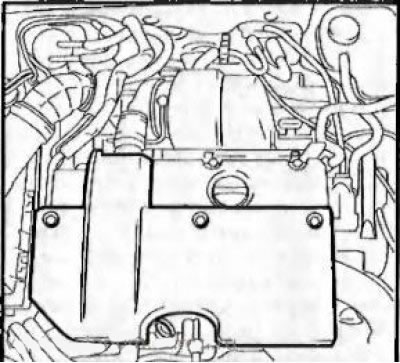


2.8 Y20DTH and Y22DTR Engine Cover

2.8 Y20DTH and Y22DTR Engine Cover


8. Remove the 3 mounting screws (see illustration) engine cover, carefully pull the cover up and away from the engine.

9. Installation is carried out in reverse order.


This article is available at russian, bulgarian, belarusian, ukrainian, serbian, croatian, romanian, polish, slovak, hungarian
Checking the article: Meshcheryakov Damir

Share information:

Previous articles
Opel Vectra C: Engine repair
Next articles

General information about engines
Engine specifications
Checking the compression pressure in the cylinders
Engine condition diagnostics using a vacuum gauge
Preparatory operations for engine repair
Removal the right engine mount
Removal and installation the crankshaft pulley
Removal and installation camshaft sprockets


See similar ones from other Opel car manuals:
▶ Removal and installation the rear bulkhead cover of the… Opel Astra H (2004-2009)
▶ Removal and installation the engine compartment bulkhead… Opel Corsa C (2000-2006)
▶ 1.8 DOHC Engine Cylinder Head Cover — Removal, Gasket… Opel Zafira A (1999-2005, petrol)
▶ Engine compartment fuse box Opel Insignia A (2008-2017)
▶ Engine hood Opel Kadett E (1984-1995)
Link to this page in different formats

Visitor comments


No comments yet


How much will 21 + 34 =


Vectra C (2002-2008) 
  • General information
  • User manual
  • Vehicle device
  • Maintenance
  • Troubleshooting
  • Power unit
  • Engine repair
  • Cooling system
  • Power and control system
  • Engine electrics
  • Transmission
  • Clutch
  • Car gearbox
  • Drive shafts
  • Chassis
  • Car suspension
  • Steering
  • Brake system
  • Body
  • Exterior
  • Interior
  • Doors, locks and windows
  • Heating and ventilation
  • Electrical equipment
  • Equipment and devices
  • Headlights and lighting
  • Electrical circuits
Vectra B (1995-2002) 
  • General information
  • User manual
  • Weekly checks
  • Maintenance (gasoline)
  • Maintenance (diesel)
  • Troubleshooting
  • Power unit
  • SOHC gasoline engine
  • DOHC petrol engine
  • Diesel engine 1.7 liter
  • Diesel engine 2.0 liters
  • Engine repair
  • Cooling system
  • Fuel system (gasoline)
  • Fuel system (diesel)
  • Charging system
  • Launch system
  • Ignition and preheat
  • Transmission
  • Clutch
  • Mechanical gearbox
  • Automatic gearbox
  • Drive shafts
  • Chassis
  • Brake system
  • Wheel suspension
  • Steering
  • Body
  • Exterior
  • Interior
  • Doors and windows
  • Heating and ventilation
  • Electrical equipment
  • Equipment and devices
  • Electrical circuits
Vectra B (1995-2002, petrol) 
  • General information
  • Maintenance
  • Help with malfunctions
  • Power unit
  • Engine repair
  • Exhaust system
  • Cooling system
  • Fuel system
  • Multec injection system
  • Four point injection
  • Transmission
  • Clutch
  • Gearbox and drive
  • Chassis
  • Wheel suspension
  • Steering
  • Brake system
  • Wheels and tires
  • Body
  • Exterior
  • Interior
  • Electrical equipment
  • Fuses and electronics
  • Power devices
  • Ignition system
  • Lighting and signaling
  • Equipment and devices
  • Heating and ventilation
  • Electrical circuits
Vectra A (1988-1995) 
  • Power unit
  • Engine repair
  • Ignition system
  • Lubrication system
  • Cooling system
  • Injection system
  • Fuel system (carburetor)
  • Fuel system (diesel)
  • Exhaust system
  • Transmission
  • Clutch
  • Car gearbox
  • Chassis
  • Front suspension
  • Rear suspension
  • Steering
  • Brake system
  • Wheels and tires
  • Body
  • Exterior
  • Interior
  • Electrical equipment
  • Electrical circuits
Vectra A (1988-1995, petrol) 
  • General information
  • User manual
  • Maintenance
  • Power unit
  • SOHC engine
  • DOHC engine
  • Cooling and ventilation
  • Fuel system (carburetor)
  • Fuel system (injector)
  • Exhaust converter
  • Transmission
  • Clutch
  • Mechanical gearbox
  • Automatic gearbox
  • Drive shafts
  • Chassis
  • Brake system
  • Car suspension
  • Steering
  • Body
  • Body elements
  • Electrical equipment
  • Power devices
  • Equipment and devices
  • Electrical circuits
OpelBook.ru © 2017–2026 · Mobile version · · Sitemap: EN BG BY UA RS HR RO PL SK HU · Feedback · Site search
Astra F, petrol · Astra G, petrol · Astra G · Astra H · Astra J, petrol · Corsa B · Corsa C, petrol · Corsa C · Insignia A · Kadett D · Kadett E · Omega A · Omega B · Omega B2 · Vectra A, petrol · Vectra A · Vectra B, petrol · Vectra B · Vectra C · Zafira A, petrol · Frontera A, petrol · Frontera B · Ascona C · Vivaro A ·
We want your visit to be comfortable 🤝! We use cookies 🍪 to make that happen.