
OpelBook.ru
Cars AvtoVAZ Cars Mitsubishi Cars BMW Cars Mercedes Cars Nissan Cars Toyota Cars Chevrolet
English Русский
Български
Беларускі
Український
Српски
Hrvatski
Română
Polski
Slovenský
Magyar
 |  Sitemap  |  Contacts  |    


Main Astra Corsa Insignia Kadett Omega Vectra Zafira Others Articles
Vectra A (1988-1995, petrol) Vectra A (1988-1995) Vectra B (1995-2002, petrol) Vectra B (1995-2002) Vectra C (2002-2008)
  • Main
  • Vectra
  • Vectra C
  • Power unit
  • Engine repair
  • Removal and installation the crankshaft pulley

Removal and installation the crankshaft pulley (Opel Vectra C)

            0

17. The pulley is mounted directly on the journal or on the crankshaft gear. On most engines, the pulley acts as a torsional vibration damper.

18. Before removing the pulley, the multi-rib belt cover/engine crankcase guard and multi-rib belt must first be removed

Note: It may be necessary to remove the right front wheel.
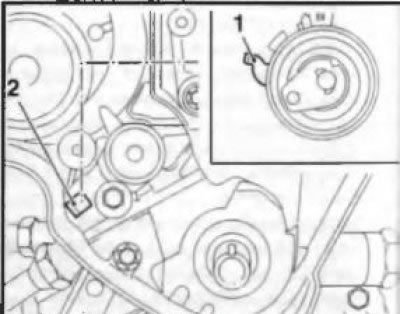

5.19 Blocking the engine flywheel from turning using the KM-911 device

5.19 Blocking the engine flywheel from turning using the KM-911 device


19. Removing the pulley is not particularly difficult. Depending on the model, you need to unscrew one central bolt or several bolts located around the perimeter of the mounting flange. To unscrew the bolts, you must first block the engine flywheel from turning. On Z16XE/Z18XE engines, remove the plug on the flywheel dome and install the special device Orel-KM-911 (see illustration).

Note: Remember to remove the locking device if it is necessary to turn the crankshaft after disconnecting the pulley.


On some engine models, the crankshaft can be held from turning by the central hexagon using a socket wrench (in this case, the pulley mounting bolts are located along its perimeter).
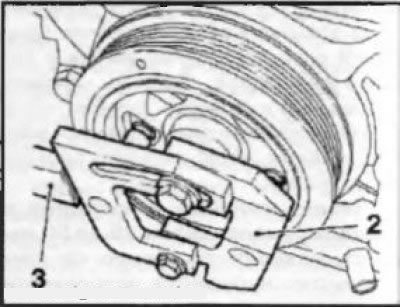
5.20 Installation of special devices KM-6347 (2) and KM-956-1 (3) for removing the pulley (using…

5.20 Installation of special devices KM-6347 (2) and KM-956-1 (3) for removing the pulley (using the Y30DT engine as an example)


20. Pulleys that have holes evenly spaced around the inner perimeter, or that have a spoke-shaped mount to the pulley rim, can be held from turning using special devices (see illustration), just as when removing the camshaft drive gears (see below), use the help of an assistant.

21. On engines with high resistance to manual turning (for example, the Z32SE engine), the pulley mounting bolts are loosened and unscrewed with the multi-rib belt on. Then you need to remove the belt, remove the pulley from the crankshaft journal.

22. If the gearbox was previously disconnected from the engine, the flywheel is locked using a special stopper installed on the engine housing

23. To eliminate the malfunction when making a long trip, when it is not possible to jack up the car, etc., in order to block the crankshaft from turning, ask an assistant to engage the highest gear and press the foot brake pedal all the way down (on models with manual transmission).

24. Before removal, if there are no special marks or mounting pins/keys for installing the pulley in a strictly defined position, it is necessary to remember its position on the mounting flange/tail of the crankshaft - apply marks yourself using a punch or marker.

25. Install the pulley in the reverse order of its removal. Tighten the mounting bolts to the required torque. Only use new bolts when installing.


This article is available at russian, bulgarian, belarusian, ukrainian, serbian, croatian, romanian, polish, slovak, hungarian
Checking the article: Meshcheryakov Damir

Share information:

Previous articles
Opel Vectra C: Engine repair
Next articles

Removal the right engine mount
Preparatory operations for engine repair
Engine condition diagnostics using a vacuum gauge
Checking the compression pressure in the cylinders
Engine cover — removal and installation
General information about engines
Removal and installation camshaft sprockets
Bringing the piston of the first cylinder to the top dead center (TDC) position
Removal and installation a multi-ribbed accessory drive belt
Removal and installation the timing belt/chain
Checking and adjusting the timing valves
Removal, installation and inspection of camshafts and valve lifters


See similar ones from other Opel car manuals:
▶ Crankshaft pulley — removal and installation Opel Astra F (1991-1998, petrol)
▶ Removal and installation the crankshaft pulley Opel Corsa B (1993-2000)
▶ Replacing the crankshaft pulley Opel Insignia A (2008-2017)
▶ Crankshaft pulley — removal and installation Opel Omega B2 (1999-2003)
▶ Front crankshaft oil seal (pulley side) — replacement Opel Ascona C (1981-1988)
Link to this page in different formats

Visitor comments


No comments yet


How much will 31 + 14 =


Vectra C (2002-2008) 
  • General information
  • User manual
  • Vehicle device
  • Maintenance
  • Troubleshooting
  • Power unit
  • Engine repair
  • Cooling system
  • Power and control system
  • Engine electrics
  • Transmission
  • Clutch
  • Car gearbox
  • Drive shafts
  • Chassis
  • Car suspension
  • Steering
  • Brake system
  • Body
  • Exterior
  • Interior
  • Doors, locks and windows
  • Heating and ventilation
  • Electrical equipment
  • Equipment and devices
  • Headlights and lighting
  • Electrical circuits
Vectra B (1995-2002) 
  • General information
  • User manual
  • Weekly checks
  • Maintenance (gasoline)
  • Maintenance (diesel)
  • Troubleshooting
  • Power unit
  • SOHC gasoline engine
  • DOHC petrol engine
  • Diesel engine 1.7 liter
  • Diesel engine 2.0 liters
  • Engine repair
  • Cooling system
  • Fuel system (gasoline)
  • Fuel system (diesel)
  • Charging system
  • Launch system
  • Ignition and preheat
  • Transmission
  • Clutch
  • Mechanical gearbox
  • Automatic gearbox
  • Drive shafts
  • Chassis
  • Brake system
  • Wheel suspension
  • Steering
  • Body
  • Exterior
  • Interior
  • Doors and windows
  • Heating and ventilation
  • Electrical equipment
  • Equipment and devices
  • Electrical circuits
Vectra B (1995-2002, petrol) 
  • General information
  • Maintenance
  • Help with malfunctions
  • Power unit
  • Engine repair
  • Exhaust system
  • Cooling system
  • Fuel system
  • Multec injection system
  • Four point injection
  • Transmission
  • Clutch
  • Gearbox and drive
  • Chassis
  • Wheel suspension
  • Steering
  • Brake system
  • Wheels and tires
  • Body
  • Exterior
  • Interior
  • Electrical equipment
  • Fuses and electronics
  • Power devices
  • Ignition system
  • Lighting and signaling
  • Equipment and devices
  • Heating and ventilation
  • Electrical circuits
Vectra A (1988-1995) 
  • Power unit
  • Engine repair
  • Ignition system
  • Lubrication system
  • Cooling system
  • Injection system
  • Fuel system (carburetor)
  • Fuel system (diesel)
  • Exhaust system
  • Transmission
  • Clutch
  • Car gearbox
  • Chassis
  • Front suspension
  • Rear suspension
  • Steering
  • Brake system
  • Wheels and tires
  • Body
  • Exterior
  • Interior
  • Electrical equipment
  • Electrical circuits
Vectra A (1988-1995, petrol) 
  • General information
  • User manual
  • Maintenance
  • Power unit
  • SOHC engine
  • DOHC engine
  • Cooling and ventilation
  • Fuel system (carburetor)
  • Fuel system (injector)
  • Exhaust converter
  • Transmission
  • Clutch
  • Mechanical gearbox
  • Automatic gearbox
  • Drive shafts
  • Chassis
  • Brake system
  • Car suspension
  • Steering
  • Body
  • Body elements
  • Electrical equipment
  • Power devices
  • Equipment and devices
  • Electrical circuits
OpelBook.ru © 2017–2026 · Mobile version · · Sitemap: EN BG BY UA RS HR RO PL SK HU · Feedback · Site search
Astra F, petrol · Astra G, petrol · Astra G · Astra H · Astra J, petrol · Corsa B · Corsa C, petrol · Corsa C · Insignia A · Kadett D · Kadett E · Omega A · Omega B · Omega B2 · Vectra A, petrol · Vectra A · Vectra B, petrol · Vectra B · Vectra C · Zafira A, petrol · Frontera A, petrol · Frontera B · Ascona C · Vivaro A ·
We want your visit to be comfortable 🤝! We use cookies 🍪 to make that happen.