
The timing belt must be removed when the engine is cold!
Do not crank the engine with the timing belt removed!
Removing
1. Disconnect the negative cable from the battery.
2. Remove the air cleaner.
3. Apply the parking brake, jack up the front of the vehicle and place it on jack stands. Remove the right front wheel.
4. Chalk or paint mark the direction of rotation of the accessory drive belt. Using a spanner wrench to retract the tensioner, loosen the belt and remove it from the engine (see chapter Vehicle settings and routine maintenance).
5. Remove the upper section of the timing cover (see Section Removing and installing timing cover).
6. Set the crankshaft to the TDC position of the first cylinder (see Section Procedures for repairing SOHC gasoline engines without removing them from the vehicle) and do not change this position.
7. Remove the crankshaft pulley (see Section Removal and installation of the crankshaft pulley).
8. Remove the lower section of the timing cover (see Section Removing and installing timing cover).
9. If you plan to install an old toothed belt, mark the direction of its movement with a felt-tip pen (clockwise).
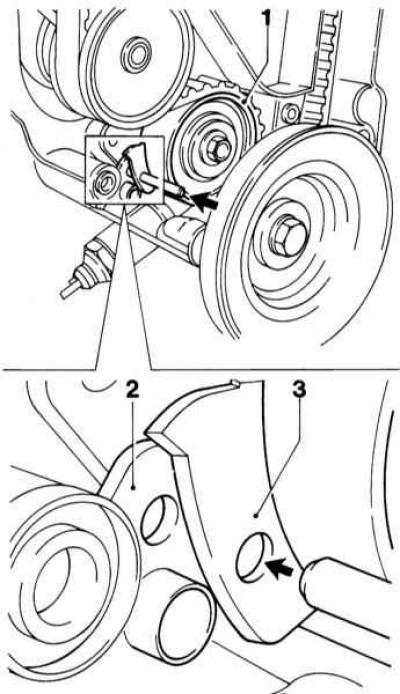
10. Loosen the belt tension. To do this, press the tension roller (1) so that the holes in its movable element coincide (3) and in the plate (2). Lock the toothed belt tensioner in position with a suitable pin.
Fixing the timing belt tensioner.
11. Remove the timing belt.
Do not rotate the shafts with the belt removed.
Installation
1. Make sure that the alignment marks are correctly aligned (refer to illustrations).
2. Starting at the crankshaft sprocket and working counterclockwise, install the timing belt according to the gasket pattern. Make sure the belt is tight in the areas between adjacent wheels.
If an old belt is installed, follow the direction of its movement.
Timing belt routing diagram

3. Remove the locking rod from the tensioner and loosen the water pump assembly mounting bolts.
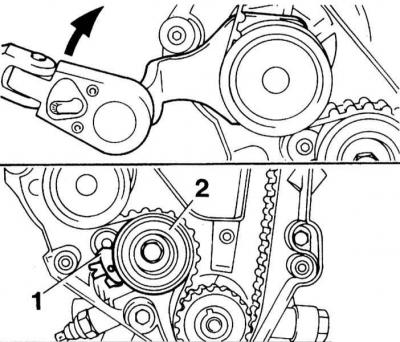
4. Tension the timing belt by turning the water pump with a tool KM-421-A so that the moving element (1) tension roller (2) was opposite the right stop. If the specified tool is not available, a suitable wrench can be used (approximately 42.5 mm).
Toothed belt tension adjustment, step 1
5. Turn the crankshaft two full turns clockwise and achieve the correct alignment of the TDC alignment marks.
Turn the crankshaft smoothly so as not to disturb the position of the water pump.
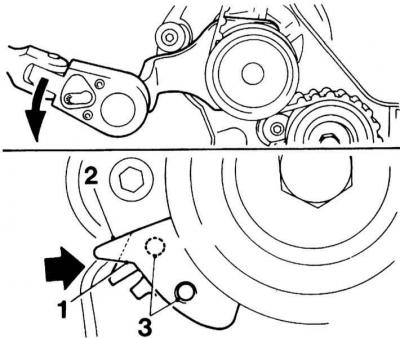
6. Slightly tension the toothed belt by turning the water pump counterclockwise until the pointer (1) and a mark on the tension roller plate (2) matched.
Toothed belt tension adjustment, step 2
7. Tighten the pump mounting bolts to the required torque (8 Nm).
8. Screw in all bolts of fastening of a pulley of a cranked shaft. Remove the fixing mandrel and turn the shaft by hand two turns in a clockwise direction. In conclusion, check whether the marks on the crankshaft and camshaft pulleys are opposite each other.
9. Check the tension of the toothed belt: the pointer of the movable element of the tension roller must match the plate. Otherwise, repeat the adjustment.
If during installation it is necessary to loosen the tension of the toothed belt, press the tensioner with your finger so that the holes match (3).
10. In this position, insert a suitable rod into the holes. Thus, the tensioner is fixed and the belt can be removed.
11. Reinstall the removed components in the reverse order of removal.
12. When installing the air filter, check and, if necessary, replace its filter element.
13. Screw a bolt of a pulley of a cranked shaft and tighten it with the demanded effort.
14. On engine C14NZ check and, if necessary, adjust the ignition.
Visitor comments