
Removing
1. Disconnect the negative cable from the battery.
2. Apply the parking brake, then jack up the front of the vehicle and place it on jack stands. If equipped, remove the crankcase protection.
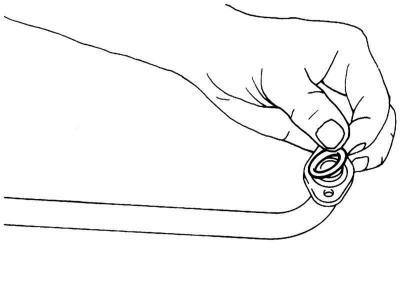
3. Drain the engine oil (see chapter Vehicle settings and routine maintenance), then, after replacing the sealing washer, screw the plug into place and tighten it with the required force.
4. Remove a reception pipe of system of release of the fulfilled gases (see chapter Power supply systems, release and reduction of toxicity of exhaust gases).
5. If equipped, disconnect the wiring of the oil level sensor from the sump.
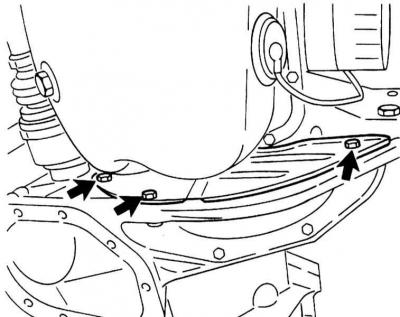
6. On models without К/В turn out bolts of fastening and remove a flywheel cover.
Removing the flywheel cover
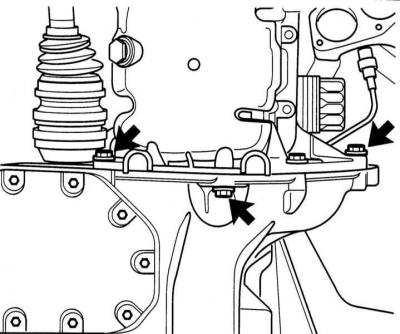
7. On models with К/В turn out bolts of fastening of the pallet of a crankcase to a transmission crankcase.
Bolts of fastening of the pallet of a crankcase of the engine to a transmission
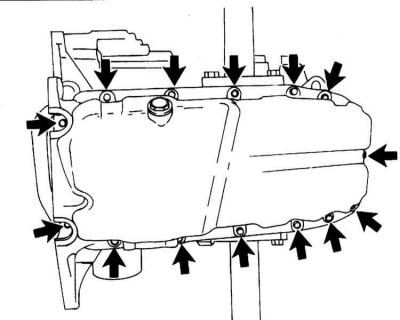
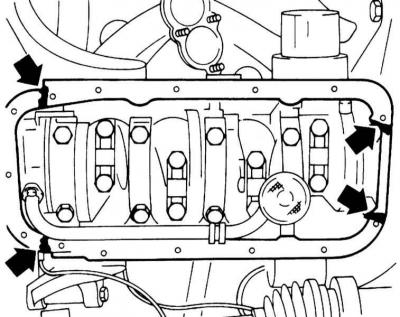
8. Turn out bolts of fastening of the pallet crankcase to the block of cylinders.
Bolts of fastening of the pallet crankcase of the engine to the block of cylinders
9. After lightly tapping the pan from the sides with a soft-faced hammer, separate it from the engine crankcase, lower it and remove it from under the car.
10. After removing the oil pan, it is recommended to also disconnect the mesh oil intake and clean it.
Bolts of fastening of a mesh oil intake
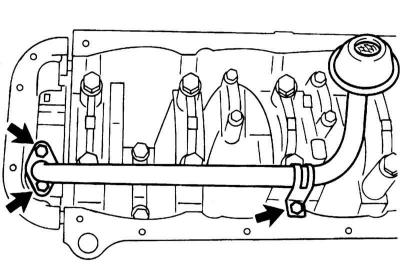
11. Check the oil intake screen for damage, replace if necessary. Check the patency of the mesh filter of the oil intake, - wash the mesh with a solvent, or replace the filter.
Installation
1. Thoroughly clean and dry the mating surfaces of the sump flange and crankcases of the power unit. Remove all traces of oil, dirt and old sealant from the threads of the sump and oil pickup bolts.
2. If necessary, replace the O-ring and reinstall the oil pickup. Apply a fixing anaerobic sealant, e.g. OPEL 15 10 177, to the threaded part of the mounting bolts, screw them in and tighten them with force 8 Nm.
Installing a new oil pickup O-ring
3. On 1.6 l engine and 1.4 l engine with A/C tighten the bolts securing the oil pan to the gearbox housing with a force 60 Nm.
4. Apply a layer of sealant, e.g. OPEL 15 03 294 (90 001 851) on the mating surface of the cylinder block in the area of \u200b\u200binstallation of the oil pump and the rear main bearing cover.
Places for applying sealant to the surface of the cylinder block mating with the oil pan
5. Lay a new gasket on the pallet, then press the pallet against the block. Lubricate with an anaerobic fixing sealant, for example, OPEL 15 10 177, the threaded part of the pan bolts. Screw in the bolts and, moving from the center to the edges, diagonally tighten them to the required force.
6. Further installation is carried out in the reverse order of the dismantling of the components.
7. Fill the engine with fresh oil (see chapter Vehicle settings and routine maintenance).
8. Take a test drive and check the oil pan and drain plug for leaks, tighten the oil pan bolts if necessary.
9. If removed, reinstall the oil pickup.
10. Thoroughly clean and dry the mating surfaces of the sump flange and crankcases of the power unit. Remove all traces of oil, dirt and old sealant from the threads of the sump and oil pickup bolts.
11. Apply a layer of suitable sealant to the mating surface of the cylinder block in the area where the oil pump and rear main bearing cap are installed.
12. Lay a new gasket on the pallet, then press the pallet against the block. Lubricate the threaded part of the pan bolts with an anaerobic fixative sealant. Screw in the bolts and, moving from the center to the edges, diagonally tighten them to the required force.
13. Screw in and tighten the bolts of the sump mounting flange to the required force. Install rubber plugs in the flange cutouts.
14. Install the exhaust pipe (see chapter Power supply systems, release and reduction of toxicity of exhaust gases). If equipped, connect the wiring to the oil level sensor on the side of the sump.
15. If equipped, reinstall the crankcase protection, then lower the vehicle.
16. Fill the engine with fresh oil (see chapter Vehicle settings and routine maintenance).
Visitor comments