
Removing
The engine is removed from the vehicle without the gearbox. For this, a mechanism of the appropriate load capacity is used. It is recommended to use the help of an assistant for this purpose. If you do not have sufficient experience to carry out the operation in question, it is recommended that it be carried out by an experienced auto mechanic. Before removing the engine, it is necessary: to prepare the appropriate tool, a container for draining engine oil and coolant, cables, a lifting mechanism and a hook. To carry out the work in question, a site must be selected where the car can be left with the engine removed. In addition, you should familiarize yourself with the contents of this section.
1. Disconnect the mass cable from the battery and remove the battery to prevent a short circuit during work. Removing the battery will also free up work space for further work.
2. Remove the hood. Place the hood in a vertical position beforehand and disconnect the fluid supply hose to the washer nozzles. Use a pencil to trace the hinges on the surface of the steel sheet of the hood so that you can put the hood back in its original position later. Loosen the hinge screws. In this case, the assistant must hold the hood. Remove the hood and put it in a well protected place. Place a thick cloth under the edges of the hood.
3. If the engine is to be disassembled, the engine oil must be drained.
4. Drain the liquid from the cooling system (Chapter Filling the cooling system cooler Chapters Ongoing care and maintenance) and plug the hoses. Completely remove the heatsink as described in Cooling and heating systems.
5. Remove the air suction hose.
6. Remove the power steering pump drive belt, remove the pump from the engine or take it to the side.
7. Disconnect all cables, hoses and lines from the engine. Mark their position.
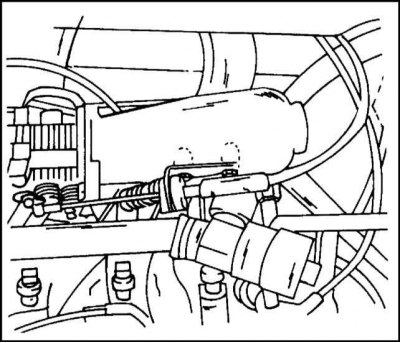
8. Disconnect the gas control cable from the intake manifold. Its fastening is shown in the illustration "Connecting the throttle actuator to the throttle lever and support".
9. Turn away bolts of connection of a final collector and a reception pipe of system of release of the fulfilled gases and take a pipe aside.
10. Turn away bolts of fastening of a transmission to the block of cylinders. To do this, first unscrew the bottom six bolts. Disconnect the clutch slave cylinder and hang it on the hose. After that turn away four bolts from the top party of a transmission.
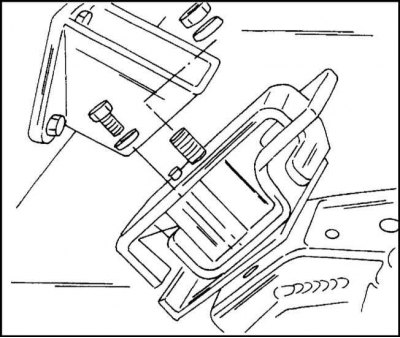
11. View of the right and left engine mounts. Loosen the left and right engine mount bolts and completely remove the left engine mount.
12. Disconnect the brake booster vacuum hose from the intake manifold. To do this, loosen the clamps and remove the hoses at their junctions with the fuel distribution line. Keep in mind that the fuel is under some pressure and the hoses must be disconnected carefully. After disconnecting the fuel hoses, close their ends with plugs in the form of a bolt of the appropriate diameter to prevent fuel from escaping.
Attention! When a pressurized pipeline is opened, fuel is ejected. Never place a control lamp near. When unscrewing the connection, it is recommended to put a wrench on it and cover it with a rag on top. After that, slowly unscrew the hollow bolt.
13. Disconnect and disconnect all fuel injection cables.
14. Disconnect the heating hoses from the reverse side of the cylinder block.
15. Disconnect the following electrical connections: ignition distributor or ignition module (pay attention to the way of docking with the ignition cable), oil pressure indicator sensor, oil temperature indicator sensor, piston TDC position sensor, oil level indicator, (if it is installed), coolant temperature gauge sensor, remote thermometer sensor. Not all listed instruments are available on every engine. It is important to find and disconnect all cable connections, and also carefully lay them aside, ensuring that the engine can be easily removed from the compartment.
16. Detach the bottom protective sheet, if present.
17. Hook the hoist cables or chains to the eyelets on the top side of the cylinder head and lift the engine off the suspension so that it is suspended.
18. Now lift the engine up. Be careful not to damage any cable connection or piping, or hit the engine against anything in the engine compartment. When performing the described operation, it is recommended to use the help of an assistant.
Installation
The engine is installed in the reverse order of its removal. In doing so, the following instructions must be observed, especially concerning the tightening torques of the screwed connections.
1. Attach the engine securely to the chains or hoist cables, and carefully lower it into the engine compartment. Be careful not to damage any items in the engine compartment. After installing the engine in place, tighten the bolts securing the engine to the gearbox with a torque of 76 Nm. Fix the left engine mount to the longitudinal beam with a tightening torque of 52 Nm, and fix both engine mounts to the suspension beams with a torque of 85 Nm. After that, you can disconnect the engine from the lifting mechanism.
2. Reinstall the exhaust system. Replace gaskets if necessary. Lubricate the bolts of the system elements with grease. Tightening torque for threaded connections 25 Nm.
3. Install new fuel line o-rings.
4. Tighten the brake booster vacuum hose with a torque of 20 Nm.
When installing the power steering, tighten the bolt on the pulley side with a torque of 18 Nm, the other bolts with a torque of 25 Nm.
5. Put on the V-belt (the arrow on the belt should point in the same direction). Tension the belt as described below.
6. Fill the cooling system with liquid (see Chapter Ongoing care and maintenance). Make sure the drain cock on the radiator is closed.
7. After installing the hood, check that it opens and closes freely and that it is installed correctly.
8. Match the electrical connections, carefully monitoring the correct pairing. An error in docking can lead to a short circuit.
Visitor comments