


Electrical equipment and devices of car Opel Vivaro A

Removal and installation the battery
The battery is located under the front left seat. Removal 1. Move the front left seat back as far as it will go. 2. Remove the floor mat (fixators A) (figure...
The battery is located under the front left seat. Removal 1. Move the front left seat back as far as it will go. 2. Remove the floor mat (fixators A) (figure...

Removal and installation the headlight
Removal 1. Disconnect the wiring connectors from the headlight. 2. Remove the turn signal and unscrew the bolts A securing the radiator grille (figure 9.37)....
Removal 1. Disconnect the wiring connectors from the headlight. 2. Remove the turn signal and unscrew the bolts A securing the radiator grille (figure 9.37)....

Headlight corrector
Headlight range control By inserting a small screwdriver into slot 2, detach the control unit holder (figure 9.41). Disconnect the wiring connector and then...
Headlight range control By inserting a small screwdriver into slot 2, detach the control unit holder (figure 9.41). Disconnect the wiring connector and then...

Removal and installation fog lights
Removal 1. Unscrew the two mounting bolts. 2. Disconnect the wiring connectors from the fog light. 3. Remove the fog light with its holder. 4. Disconnect the...
Removal 1. Unscrew the two mounting bolts. 2. Disconnect the wiring connectors from the fog light. 3. Remove the fog light with its holder. 4. Disconnect the...

Removal and installation rear lights
The rear lights consist of two parts: the upper (side light, brake light and direction indicator) and lower (reversing light and fog light). Removal the top...
The rear lights consist of two parts: the upper (side light, brake light and direction indicator) and lower (reversing light and fog light). Removal the top...

Relays and Fuses
Relay block 1 is located in the passenger compartment on the driver's side (figure 9.49). Figure 9.49. Relay block 1 is located in the passenger compartment on...
Relay block 1 is located in the passenger compartment on the driver's side (figure 9.49). Figure 9.49. Relay block 1 is located in the passenger compartment on...
Removal and installation the instrument panel
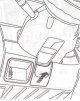
Removal 1. Remove the cover under the steering wheel to connect the diagnostic tool (figure 9.53). Figure 9.53. Remove the cover under the steering wheel to...
Removal 1. Remove the cover under the steering wheel to connect the diagnostic tool (figure 9.53). Figure 9.53. Remove the cover under the steering wheel to...

Removal and installation the instrument panel
Removal 1. Remove the instrument panel visor attached to the instrument panel (figure 9.78). Figure 9.78. Remove the instrument panel visor secured to the...
Removal 1. Remove the instrument panel visor attached to the instrument panel (figure 9.78). Figure 9.78. Remove the instrument panel visor secured to the...
Fuel level sensor
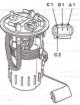
The purpose of the fuel level sensor contacts is shown in the figure 9.80. Figure 9.80. Purpose of fuel level sensor contacts: A1 - Fuel level signal; A2, B2 -...
The purpose of the fuel level sensor contacts is shown in the figure 9.80. Figure 9.80. Purpose of fuel level sensor contacts: A1 - Fuel level signal; A2, B2 -...

Removal and installation windshield wipers
The UCH controls the operation of the windscreen wipers only in intermittent and time-delay modes (when the washer pump is turned on). The modes "continuous...
The UCH controls the operation of the windscreen wipers only in intermittent and time-delay modes (when the washer pump is turned on). The modes "continuous...

Removal and installation rear window wipers
The sequence and order of connecting electric motors for vehicles with a lifting rear door and with hinged doors are the same. Removal 1. Make sure the wiper...
The sequence and order of connecting electric motors for vehicles with a lifting rear door and with hinged doors are the same. Removal 1. Make sure the wiper...

Removal and installation the windshield washer pump
Depending on the vehicle's configuration, either a conventional electric pump can be installed, supplying fluid to the front windshield washer, or a...
Depending on the vehicle's configuration, either a conventional electric pump can be installed, supplying fluid to the front windshield washer, or a...
This section is available on russian, bulgarian, belarusian, ukrainian, serbian, croatian, romanian, polish, slovak, hungarian
See similar ones from other Opel car manuals:
▶ Electrical equipment: Equipment and devices Opel Zafira A (1999-2005, petrol)
▶ Electrical equipment: Equipment and devices Opel Kadett E (1984-1995)
▶ General information: Vehicle device Opel Corsa C (2000-2006)
▶ Electrical equipment: Equipment and devices Opel Vectra B (1995-2002, petrol)
▶ Electrical equipment: Equipment and devices Opel Astra H (2004-2009)
Share information:
- General information
- User manual
- Power unit
- Petrol engine F4R
- Diesel engine F9Q
- Diesel engine G9U
- Transmission
- Clutch and drive shafts
- Manual gearbox
- Chassis
- Front suspension
- Rear suspension
- Brake system
- Body
- Exterior
- Interior
- Electrical equipment
- Heating and ventilation
- Air conditioner
- Equipment and devices
- Electrical diagrams
- General information
- Maintenance
- Power unit
- Gasoline engines
- Diesel engines
- Cooling system
- Fuel and exhaust system
- Contact ignition system
- Contactless ignition system
- Transmission
- Clutch
- Mechanical gearbox
- Automatic gearbox
- Drive shafts
- Chassis
- Steering
- Brake system
- Car suspension
- Body
- Exterior
- Interior
- Doors and windows
- Electrical equipment
- Equipment and devices
- Power devices
- Electrical circuits
- General information
- User manual
- Maintenance
- Power unit
- Petrol engines 2.2 l
- Petrol engines 3.2 l
- Diesel engines 2.2 l
- Cooling system
- Fuel system (petrol)
- Fuel system (diesel)
- Ignition system
- Transmission
- Clutch
- Manual gearbox MUA5C
- Automatic gearbox 4L30E
- Chassis
- Suspension and axles
- Steering
- Brake system
- Body
- Exterior
- Interior
- Doors, locks and windows
- Heating and air conditioning
- Electrical equipment
- Power devices
- Equipment and devices
- Lighting and signaling
- Electrical diagrams
- General information
- Introduction to guide
- User manual
- Maintenance
- Power unit
- Engine repair
- Lubrication system
- Cooling system
- Power and exhaust system
- Engine electrics
- Transmission
- Clutch
- Mechanical gearbox
- Cardan shafts
- Chassis
- Brake system
- Front suspension
- Rear suspension
- Steering
- Body
- Repair and care
- Electrical equipment
- Equipment and devices
- Electrical circuits
