
OpelBook.ru
Cars AvtoVAZ Cars Mitsubishi Cars BMW Cars Mercedes Cars Nissan Cars Toyota Cars Chevrolet
English Русский
Български
Беларускі
Український
Српски
Hrvatski
Română
Polski
Slovenský
Magyar
 |  Sitemap  |  Contacts  |    


Main Astra Corsa Insignia Kadett Omega Vectra Zafira Others Articles
Frontera A (1991-1998, petrol) Frontera B (1998-2004) Ascona C (1981-1988) Vivaro A (2001-2014)
  • Main
  • Opel
  • Frontera A
  • General information
  • Maintenance
  • Filling the cooling system coolant

Filling the cooling system coolant (Opel Frontera A)

            0

Contents: Dehumidification ⬇ Flushing ⬇ Filling ⬇
Warning! Do not allow antifreeze to come into contact with your skin or painted surfaces of your vehicle. In case of contact, rinse immediately with plenty of water. Antifreeze is extremely toxic and deadly if ingested. Do not leave antifreeze in an open container or spilled on the floor; its sweet smell can easily attract children or pets. Check with your local authorities for disposal of used antifreeze. In many areas there are special centers for its reception.
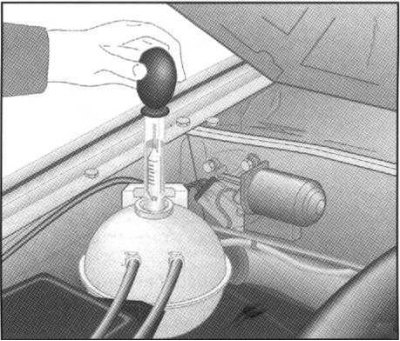

1. The cooling system must be regularly drained, flushed and refilled. This procedure is performed…


1. The cooling system must be regularly drained, flushed and refilled. This procedure is performed to maintain the quality of the cooling mixture and prevent the formation of corrosion, which reduces the efficiency of the cooling system and can cause engine failure. When servicing the cooling system, you should also check the condition of all hoses and the radiator cap and replace defective components if necessary. Check the frost resistance of the coolant using a special hydrometer.

Dehumidification


Attention! The radiator and cooling pipes are made of aluminum. To avoid damage due to corrosion, the system must be filled only with liquid approved by Opel. Other types of liquid must not be used, even if they guarantee reliable operation of the cooling system.


1. Set the heater control lever on the instrument panel to the "Heiss" ("Hot") position.

2a. Unscrew the expansion tank cap. If the engine is hot, wait and then remove the plug completely. The location of the expansion tank is shown in the illustrations below.
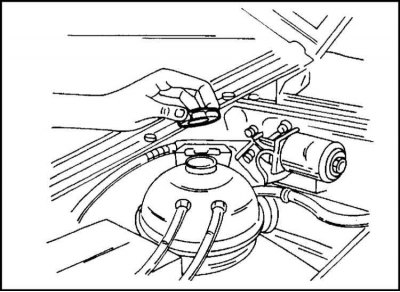
2b. Unscrewing the expansion tank cap (2.0L engine).
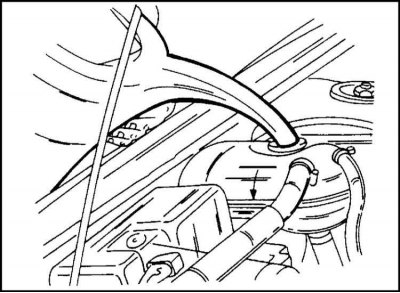

2b. Unscrewing the expansion tank cap (2.0L engine).

2c. Expansion tank for 2.4 l engine.


2c. Expansion tank for 2.4 l engine.

3. Drain the coolant by removing the radiator cap or disconnecting the lower hose. If the coolant is in satisfactory condition, it can be collected in a container for further use. Otherwise, it must be disposed of properly.

Flushing


1. Once the system is completely drained, flush the radiator with clean water from a garden hose until clean water comes out of the drain hole or bottom hose. If the radiator is badly rusted, damaged or leaking, it should be removed (see chapter Cooling and heating systems) and send it to a repair shop to a radiator specialist.


2. The flush described above will remove various deposits from the radiator, but will not remove rust and scale from the engine surfaces and cooling pipes. All this can be removed with a chemical cleaner. To perform this procedure, follow the cleaner manufacturer's instructions. Before flushing the engine, open the drain plug of the cylinder block.

3. On suitably equipped models, remove the overflow hose from the expansion tank. Dry the tank, rinse it with clean water and connect the hose.

Filling


To prevent air from entering, fill the system with coolant as follows:

1. Set the heater control lever to the "Heiss" ("Hot") position.

2. Connect the lower hose to the radiator.

3. Make up a coolant from antifreeze and water in a ratio corresponding to the operating temperature of the vehicle (see chapter Cooling and heating systems). Separate filling of water and antifreeze is not allowed, as this will not ensure the required quality of the mixture.

4. Pour liquid into the expansion tank up to the top edge and tighten the cap.

5. Start the engine and let it run until the fan comes on (at about 90°C). It is recommended to let the engine cool down completely again after this.

6. Check the coolant level in the expansion tank. If the level does not reach the "Kalt" ("Cold") mark, you need to add fluid. The air comes out of the system itself, i.e. there is no need to open any plug for this.

Adding plain water to the system is not allowed.


This article is available at russian, bulgarian, belarusian, ukrainian, serbian, croatian, romanian, polish, slovak, hungarian
Checking the article: Meshcheryakov Damir

Share information:

Previous articles
Opel Frontera A: Maintenance
Next articles

Checking the condition and replacing the windshield wipers
Check the brake system and replace the brake fluid with subsequent bleeding
Checking the condition of the protective covers of the front wheel drive shafts
Checking the condition of suspension and steering components
Checking the condition of the exhaust system
Checking the functioning of the cooling system
Replacing the fuel filter
Replacing transmission oil in manual transmission and transfer case
Replacing the differential lubricant of the front and rear axles
Replacing the engine timing belt


See similar ones from other Opel car manuals:
▶ Draining and filling the system with coolant Opel Astra H (2004-2009)
▶ Maintenance of the cooling system (emptying, flushing and… Opel Corsa B (1993-2000)
▶ Draining and filling the cooling system Opel Insignia A (2008-2017)
▶ Cooling system — filling Opel Omega A (1986-1993)
▶ Cooling system — filling Opel Vectra A (1988-1995, petrol)
Link to this page in different formats

Visitor comments


No comments yet


How much will 40 + 38 =


Vivaro A (2001-2014) 
  • General information
  • User manual
  • Power unit
  • Petrol engine F4R
  • Diesel engine F9Q
  • Diesel engine G9U
  • Transmission
  • Clutch and drive shafts
  • Manual gearbox
  • Chassis
  • Front suspension
  • Rear suspension
  • Brake system
  • Body
  • Exterior
  • Interior
  • Electrical equipment
  • Heating and ventilation
  • Air conditioner
  • Equipment and devices
  • Electrical diagrams
Ascona C (1981-1988) 
  • General information
  • Maintenance
  • Power unit
  • Gasoline engines
  • Diesel engines
  • Cooling system
  • Fuel and exhaust system
  • Contact ignition system
  • Contactless ignition system
  • Transmission
  • Clutch
  • Mechanical gearbox
  • Automatic gearbox
  • Drive shafts
  • Chassis
  • Steering
  • Brake system
  • Car suspension
  • Body
  • Exterior
  • Interior
  • Doors and windows
  • Electrical equipment
  • Equipment and devices
  • Power devices
  • Electrical circuits
Frontera B (1998-2004) 
  • General information
  • User manual
  • Maintenance
  • Power unit
  • Petrol engines 2.2 l
  • Petrol engines 3.2 l
  • Diesel engines 2.2 l
  • Cooling system
  • Fuel system (petrol)
  • Fuel system (diesel)
  • Ignition system
  • Transmission
  • Clutch
  • Manual gearbox MUA5C
  • Automatic gearbox 4L30E
  • Chassis
  • Suspension and axles
  • Steering
  • Brake system
  • Body
  • Exterior
  • Interior
  • Doors, locks and windows
  • Heating and air conditioning
  • Electrical equipment
  • Power devices
  • Equipment and devices
  • Lighting and signaling
  • Electrical diagrams
Frontera A (1991-1998, petrol) 
  • General information
  • Introduction to guide
  • User manual
  • Maintenance
  • Power unit
  • Engine repair
  • Lubrication system
  • Cooling system
  • Power and exhaust system
  • Engine electrics
  • Transmission
  • Clutch
  • Mechanical gearbox
  • Cardan shafts
  • Chassis
  • Brake system
  • Front suspension
  • Rear suspension
  • Steering
  • Body
  • Repair and care
  • Electrical equipment
  • Equipment and devices
  • Electrical circuits
OpelBook.ru © 2017–2026 · Mobile version · · Sitemap: EN BG BY UA RS HR RO PL SK HU · Feedback · Site search
Astra F, petrol · Astra G, petrol · Astra G · Astra H · Astra J, petrol · Corsa B · Corsa C, petrol · Corsa C · Insignia A · Kadett D · Kadett E · Omega A · Omega B · Omega B2 · Vectra A, petrol · Vectra A · Vectra B, petrol · Vectra B · Vectra C · Zafira A, petrol · Frontera A, petrol · Frontera B · Ascona C · Vivaro A ·
We want your visit to be comfortable 🤝! We use cookies 🍪 to make that happen.