
OpelBook.ru
Cars AvtoVAZ Cars Mitsubishi Cars BMW Cars Mercedes Cars Nissan Cars Toyota Cars Chevrolet
English Русский
Български
Беларускі
Український
Српски
Hrvatski
Română
Polski
Slovenský
Magyar
 |  Sitemap  |  Contacts  |    


Main Astra Corsa Insignia Kadett Omega Vectra Zafira Others Articles
Omega A (1986-1993) Omega B (1993-1999) Omega B2 (1999-2003)
  • Main
  • Omega
  • Omega A
  • Power unit
  • Cooling system
  • Cooling system — filling

Cooling system — filling (Opel Omega A)

            0

1. Connect the hoses and tighten the clamps. Install and tighten the cylinder block drain plug.

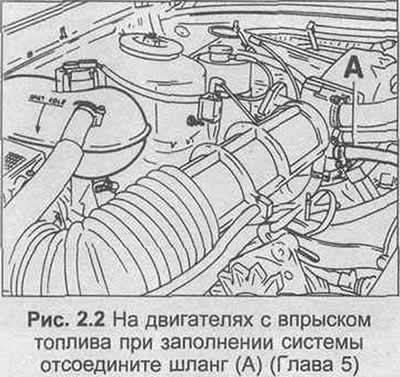
2. On carbureted engines, disconnect the warm air duct to gain access to the thermostat housing.
2. On carbureted engines, disconnect the warm air duct to gain access to the thermostat housing.


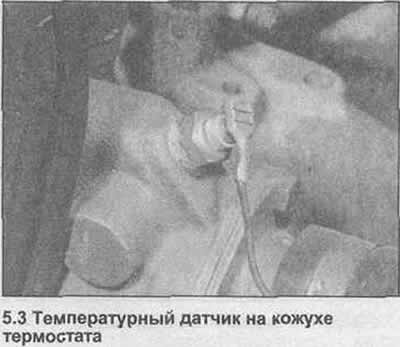
3. Disconnect the electrical wiring, unscrew the temperature sensor on the thermostat housing at the top (photo).

4. On fuel injected engines, also disconnect the coolant hose from the base of the throttle body.

5. Pour coolant into the radiator or expansion tank (if any), until it flows out of the temperature sensor hole, then install and tighten the sensor and connect the wiring.

[Material published on the website: www.opelbook.ru]

6. Install a warm air duct on carbureted engines.

7. On fuel injected engines, continue adding coolant until coolant begins to flow from the throttle body hose, then connect the hose.

8. On all engines, continue adding coolant until the level reaches the "cold" mark. On the radiator, this is indicated on the level plate in the filler neck or 50.0 mm below the top of the filler neck. The separately installed expansion tank has its own "cold" level mark.

9. Install the filler cap.


10. Start the engine and let it run at high idle until it reaches normal operating temperature, indicated by the thermostat opening and the upper hose becoming warm.

11. Stop the engine, let it cool for two to three hours, then recheck the coolant level and, if necessary, top up to the cold level as described in step 8. Replace the filler cap.
11. Stop the engine, let it cool for two to three hours, then recheck the coolant level and, if…


This article is available at russian, bulgarian, belarusian, ukrainian, serbian, croatian, romanian, polish, slovak, hungarian
Checking the article: Zinoviev Kirill

Share information:

Previous articles
Opel Omega A: Cooling system
Next articles

Cooling system — flushing
Cooling system — draining fluid
Routine maintenance
General description
Cooling system specifications
Antifreeze mixture — general description
Radiator — removal and installation
Radiator — inspection and repair
Thermostat — removal and installation
Thermostat — Test
Thermally Viscous Cooling Fan — Removal and Installation


See similar ones from other Opel car manuals:
▶ Maintenance of the cooling system (emptying, flushing and… Opel Astra G (1998-2004)
▶ Maintenance of the cooling system (emptying, flushing and… Opel Corsa B (1993-2000)
▶ Draining and filling the cooling system Opel Insignia A (2008-2017)
▶ Cooling system — filling Opel Vectra A (1988-1995, petrol)
▶ Filling the cooling system coolant Opel Frontera A (1991-1998, petrol)
Link to this page in different formats

Visitor comments


No comments yet


How much will 23 + 21 =


Omega B2 (1999-2003) 
  • General information
  • User manual
  • Maintenance
  • Troubleshooting
  • Power unit
  • Petrol 4-cylinder
  • Petrol 6-cylinder
  • Engine overhaul
  • Diesel engines 2.0 l
  • Diesel engines 2.5 l
  • Cooling and heating
  • Injection system (gasoline)
  • Fuel system (diesel)
  • Fuel system
  • Exhaust system
  • Ignition system
  • Transmission
  • Clutch
  • Mechanical gearbox
  • Automatic gearbox
  • Main gear and shafts
  • Chassis
  • Brake system
  • Car suspension
  • Steering
  • Body
  • Body elements
  • Electrical equipment
  • Equipment and devices
  • Electrical circuits
Omega B (1993-1999) 
  • General information
  • User manual
  • Tips for the car owner
  • Maintenance (gasoline)
  • Maintenance (diesel)
  • Power unit
  • Petrol engine SOHC 2.0 l
  • Petrol engine DOHC 2.0 l
  • Petrol engines 2.5 and 3.0 l
  • Repair of gasoline engines
  • Diesel engine 2.0 l
  • Diesel engine repair 2.0 l
  • Diesel engine 2.5 l
  • Cooling and heating
  • Power system (petrol)
  • Emission reduction
  • Fuel system (diesel 2.0 l)
  • Fuel system (diesel 2.5 l)
  • Launch system
  • Ignition system
  • Transmission
  • Clutch
  • Mechanical gearbox
  • Automatic gearbox
  • Drive shafts
  • Chassis
  • Brake system
  • Wheel suspension
  • Steering
  • Body
  • Exterior
  • Interior
  • Doors and windows
  • Electrical equipment
  • Equipment and devices
  • Wiring diagrams (early)
  • Wiring diagrams (late)
Omega A (1986-1993) 
  • General information
  • User manual
  • Maintenance
  • Changes and additions
  • Troubleshooting
  • Power unit
  • Gasoline engines
  • Diesel engines
  • Cooling system
  • Fuel system (gasoline)
  • Fuel system (diesel)
  • Ignition system
  • Transmission
  • Clutch
  • Mechanical gearbox
  • Automatic gearbox
  • Cardan shaft
  • Drive shafts
  • Chassis
  • Brake system
  • Car suspension
  • Steering
  • Body
  • Exterior
  • Interior
  • Electrical equipment
  • Power devices
  • Lighting and appliances
  • Electrical circuits
OpelBook.ru © 2017–2026 · Mobile version · · Sitemap: EN BG BY UA RS HR RO PL SK HU · Feedback · Site search
Astra F, petrol · Astra G, petrol · Astra G · Astra H · Astra J, petrol · Corsa B · Corsa C, petrol · Corsa C · Insignia A · Kadett D · Kadett E · Omega A · Omega B · Omega B2 · Vectra A, petrol · Vectra A · Vectra B, petrol · Vectra B · Vectra C · Zafira A, petrol · Frontera A, petrol · Frontera B · Ascona C · Vivaro A ·
We want your visit to be comfortable 🤝! We use cookies 🍪 to make that happen.