
2. Checking the cooling system should be carried out with a cold engine, so it is best to do it before the first trip of the day or no earlier than three hours after turning off the engine.
3. Slowly, being careful in case the engine is still warm, remove the radiator cap. Rinse thoroughly inside and out with clean water. Also clean the radiator filler neck. The presence of corrosion in the filler neck means that the coolant should be replaced (see Section Fuel filter replacement). The cooler inside the radiator should be relatively clean and transparent. If it is brownish, drain the system and refill with new coolant.
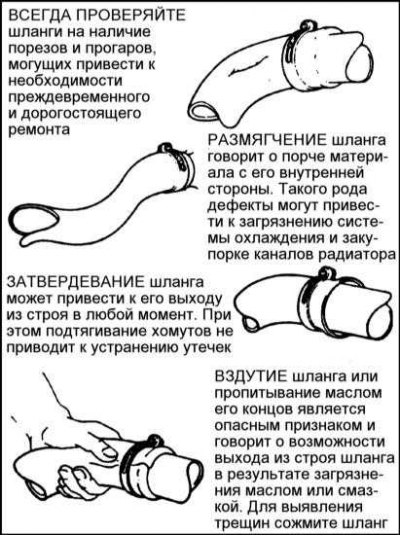
Hoses, as well as drive belts, tend to fail at the most inopportune moment - in order to avoid troubles associated with rupture of radiator or heater hoses, carefully inspect them, as shown in the figure.
4. Carefully check the radiator hoses, as well as the heater hoses, which have a smaller diameter. Check the entire length of the cooling system hoses, replacing any cracked, swollen or worn hose. Cracks are easier to find if the hose is squeezed by hand. Pay special attention to the clamps holding the hoses to the cooling system components. These clamps can cut or puncture hoses, causing coolant to leak.
5. Make sure all hose connections are secure. Refrigerant leaks usually show up as white or rusty deposits in the seal failure area. If your car uses wire-type clamps, then it may make sense to replace them with screw-type clamps.
6. Use compressed air or a soft brush to clean the front of the radiator (as well as the air conditioning condenser, where present). Remove all insects, leaves and other foreign objects that have fallen on the radiator fins. Be very careful not to damage the ribs or cut your fingers on them.
7. If the coolant level keeps dropping and you don't find any leaks, pressure check the radiator cap and the entire cooling system.
Visitor comments