
Removing
The pressure reducing valve can be removed without first dismantling the pump assembly.
1. Remove the timing belt (see Section Removing and installing timing belt).
2. Remove the crankshaft and camshaft gears, as well as the timing belt tensioner (see Section Removal and installation of timing gears).
3. Turn out bolts of fastening of a back cover of a drive of GRM from a head of cylinders and the case of the oil pump, remove a cover from the engine.
4. Remove the oil pan and oil pickup (see Section Removal and installation of the oil pan).
5. Disconnect the electrical wiring from the emergency oil pressure sensor.
6. Turn out a bolt of fastening of the gauge of position of a cranked shaft, take away the gauge from the pallet.
7. Turn out bolts of fastening of the case of the oil pump. Extremely carefully remove the pump housing from the crankshaft trunnion - try not to let the guide bushings fall out. Remove the body seal. The gasket can be thrown away - during assembly it must be replaced without fail.
Service
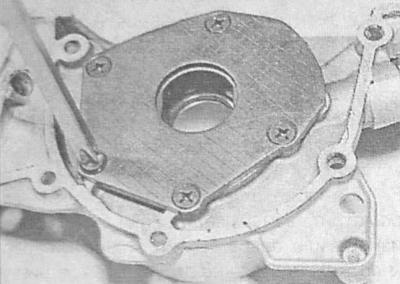
1. Remove the fixing screws and remove the back cover of the pump.
Removing the screws securing the oil pump cover
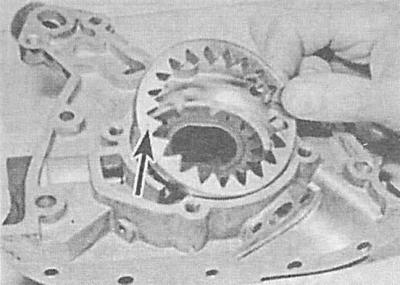
2. Marker (in no case not with a center punch and not a chisel!) mark the installation position of the inner and outer gears of the pump - during assembly, the components must be installed in exactly the same way.
3. Remove the inner and outer gears from the pump assembly housing.
Removing pump gears
4. Unscrew the reducing valve plug from the assembly housing, remove the spring and plunger from the seat, - try to remember the installation position of the components. Remove the sealing washer from the plug.
Pressure reducing valve components
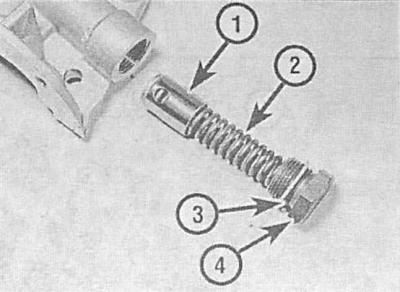
1 - Plunger
2 - Spring
3 - Sealing washer
4 - Plug
The valve can be dismantled without first dismantling the pump.
5. Thoroughly clean all components and carefully inspect them for signs of excessive wear, chips, nicks or other mechanical damage. Replace damaged elements. In case of defects in the gears or housing, the entire pump assembly must be replaced.
6. The pump is assembled in the reverse order. Pay attention to the following points:
- Make sure both gears are installed correctly (see markings made during disassembly);
- Do not forget to replace the copper sealing washer of the pressure reducing valve plug, - tighten the plug itself with the required force;
- Before screwing, clean the threaded part of the mounting bolts and apply a layer of fresh sealant to it, make sure that all fasteners are tightened with the required force;
- Upon completion of assembly, fill the pump with fresh engine oil by manually rotating its internal gear.
Installation
1. Before installing the pump, remove the crankshaft oil seal from the pump housing by carefully prying it off with a suitable slotted screwdriver. Fill a new epiploon with sealing sponges in the engine.
2. Press the stuffing box with a cylindrical mandrel flush with the pump casing. Make sure that the mandrel rests only on the hard outer edge of the stuffing box.
Fitting the crankshaft oil seal into the oil pump housing
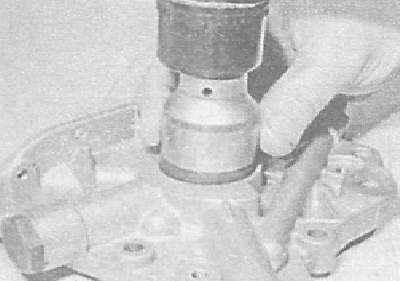
As a mandrel, you can use an interchangeable socket head of a suitable size or a piece of pipe of the appropriate diameter. Having planted an epiploon, grease its sealing sponges with pure motive oil.
3. Make sure that the mating surfaces of the pump housing and block are absolutely clean and dry. Make sure that the guide bushings are in their regular places.
4. Install a new gasket on the cylinder block.
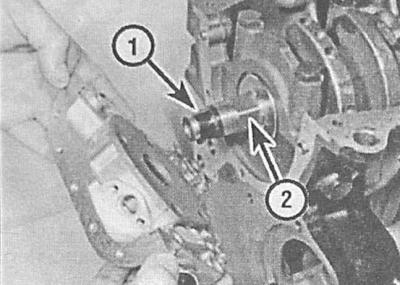
5. Carefully install the pump in place - make sure that the internal gear is correctly entered into engagement with the chamfers of the crankshaft. Place the pump assembly onto the guide bushings with extreme care, being careful not to damage the stuffing box lips.
When landing the pump assembly, make sure that the stuffing box is not damaged by the protrusions (1) and chamfers (2) crankshaft trunnions
6. Screw in the pump housing mounting bolts and tighten them to the required torque.
7. Connect the electrical wiring to the oil pressure sensor sensor. Reinstall the crankshaft position sensor in the pump housing (CKP), screw in and tighten with the required force the bolt of its fastening.
8. Install oil pickup and oil pan (see Section Removal and installation of the oil pan).
9. Install the rear timing cover on the engine - make sure that the mounting bolts are tightened with the required force.
10. Install the gears and timing belt tensioner (see Section Removal and installation of timing gears). Install timing belt (see Section Removing and installing timing belt).
11. Finally, change the oil filter (see chapter Vehicle settings and routine maintenance) .
Visitor comments