
OpelBook.ru
Cars AvtoVAZ Cars Mitsubishi Cars BMW Cars Mercedes Cars Nissan Cars Toyota Cars Chevrolet
English Русский
Български
Беларускі
Український
Српски
Hrvatski
Română
Polski
Slovenský
Magyar
 |  Sitemap  |  Contacts  |    


Main Astra Corsa Insignia Kadett Omega Vectra Zafira Others Articles
Omega A (1986-1993) Omega B (1993-1999) Omega B2 (1999-2003)
  • Main
  • Omega
  • Omega A
  • Power unit
  • Cooling system
  • Water pump — removal and installation

Water pump — removal and installation (Opel Omega A)

            0

1. Remove the thermal-viscous cooling fan (Chapter 11) and the generator/fan drive belt (Chapter 13).

2. Remove the radiator (Chapter 7).

3. Remove the drive belt pulley from the cooling fan hub (four screws).

4. Unfasten and remove the timing belt covers.

5. Turn the engine with a wrench on the crankshaft pulley bolt until the mark on the camshaft sprocket aligns with the pointer on the top of the rear timing belt cover. Also align the notch in the crankshaft pulley with the pointer on the bottom of the rear timing belt cover.

6. Loosen the three bolts securing the water pump to the block.

7. Loosen and remove the bolt securing the water pump portion of the drive cover to the oil pump housing.

8. Turn the water pump housing counterclockwise. Remove the toothed drive belt from the water pump sprocket, tie it aside.

9. Unscrew and remove the three clamp bolts and washers, remove the water pump from the block (photo).
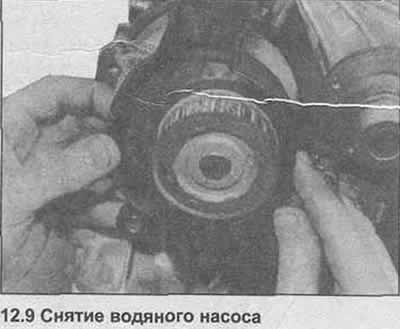
9. Unscrew and remove the three clamp bolts and washers, remove the water pump from the block…


10. Remove the rubber O-ring from the groove in the water pump (photo).
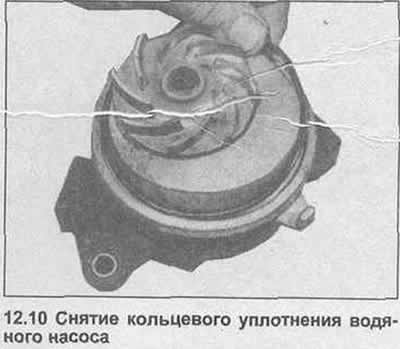
10. Remove the rubber O-ring from the groove in the water pump (photo).


11. If a new water pump is being installed, transfer the drive cover portion to the new pump (photo). Install the cover on the new water pump in the same manner.
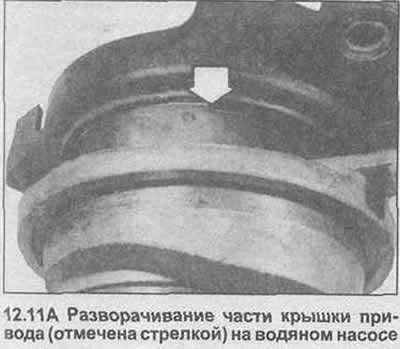
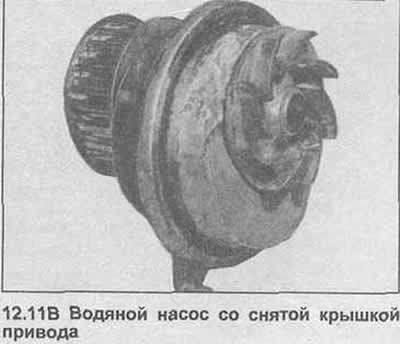

11. If a new water pump is being installed, transfer the drive cover portion to the new pump…


11. If a new water pump is being installed, transfer the drive cover portion to the new pump…


12. Begin installation by lubricating the water pump contact surface with silicon grease or equivalent. If this precaution is not taken, the water pump may seize in the block.

13. Apply grease to the rubber O-ring and place it in the groove.

14. Position the water pump in the block. Insert the clamp bolts and washers.

15. Install the timing belt onto the water pump sprocket. Rotate the water pump clockwise and tighten the belt. Complete the tensioning procedure as described in Section 1, making sure the timing marks are aligned correctly. Tighten the water pump bolts to the specified torque Specification.

16. Insert and tighten the bolt securing the drive cover to the oil pump housing.

(Material copied from this resource: «www.opelbook.ru»)


17. Install the timing belt covers.

18. Install the drive belt pulley onto the cooling fan hub and tighten the screws.

19. Install the radiator (Chapter 7).

20. Install the alternator/fan drive belt (Chapter 13) and a thermo-viscous cooling fan (Chapter 11).


This article is available at russian, bulgarian, belarusian, ukrainian, serbian, croatian, romanian, polish, slovak, hungarian
Checking the article: Zinoviev Kirill

Share information:

Previous articles
Opel Omega A: Cooling system
Next articles

Thermally Viscous Cooling Fan — Removal and Installation
Thermostat — Test
Thermostat — removal and installation
Radiator — inspection and repair
Radiator — removal and installation
Antifreeze mixture — general description
Generator/fan drive belt — replacement and adjustment
Expansion tank — removal and installation
Temperature gauge sensor — removal and installation


See similar ones from other Opel car manuals:
▶ Removal and installation the water pump Opel Astra H (2004-2009)
▶ Checking the condition of the water pump Opel Corsa B (1993-2000)
▶ Replacing the secondary drive chain (drive chain of the… Opel Insignia A (2008-2017)
▶ Replacing the water pump Opel Kadett E (1984-1995)
▶ Water pump Opel Vectra B (1995-2002, petrol)
Link to this page in different formats

Visitor comments


No comments yet


How much will 19 + 35 =


Omega B2 (1999-2003) 
  • General information
  • User manual
  • Maintenance
  • Troubleshooting
  • Power unit
  • Petrol 4-cylinder
  • Petrol 6-cylinder
  • Engine overhaul
  • Diesel engines 2.0 l
  • Diesel engines 2.5 l
  • Cooling and heating
  • Injection system (gasoline)
  • Fuel system (diesel)
  • Fuel system
  • Exhaust system
  • Ignition system
  • Transmission
  • Clutch
  • Mechanical gearbox
  • Automatic gearbox
  • Main gear and shafts
  • Chassis
  • Brake system
  • Car suspension
  • Steering
  • Body
  • Body elements
  • Electrical equipment
  • Equipment and devices
  • Electrical circuits
Omega B (1993-1999) 
  • General information
  • User manual
  • Tips for the car owner
  • Maintenance (gasoline)
  • Maintenance (diesel)
  • Power unit
  • Petrol engine SOHC 2.0 l
  • Petrol engine DOHC 2.0 l
  • Petrol engines 2.5 and 3.0 l
  • Repair of gasoline engines
  • Diesel engine 2.0 l
  • Diesel engine repair 2.0 l
  • Diesel engine 2.5 l
  • Cooling and heating
  • Power system (petrol)
  • Emission reduction
  • Fuel system (diesel 2.0 l)
  • Fuel system (diesel 2.5 l)
  • Launch system
  • Ignition system
  • Transmission
  • Clutch
  • Mechanical gearbox
  • Automatic gearbox
  • Drive shafts
  • Chassis
  • Brake system
  • Wheel suspension
  • Steering
  • Body
  • Exterior
  • Interior
  • Doors and windows
  • Electrical equipment
  • Equipment and devices
  • Wiring diagrams (early)
  • Wiring diagrams (late)
Omega A (1986-1993) 
  • General information
  • User manual
  • Maintenance
  • Changes and additions
  • Troubleshooting
  • Power unit
  • Gasoline engines
  • Diesel engines
  • Cooling system
  • Fuel system (gasoline)
  • Fuel system (diesel)
  • Ignition system
  • Transmission
  • Clutch
  • Mechanical gearbox
  • Automatic gearbox
  • Cardan shaft
  • Drive shafts
  • Chassis
  • Brake system
  • Car suspension
  • Steering
  • Body
  • Exterior
  • Interior
  • Electrical equipment
  • Power devices
  • Lighting and appliances
  • Electrical circuits
OpelBook.ru © 2017–2026 · Mobile version · · Sitemap: EN BG BY UA RS HR RO PL SK HU · Feedback · Site search
Astra F, petrol · Astra G, petrol · Astra G · Astra H · Astra J, petrol · Corsa B · Corsa C, petrol · Corsa C · Insignia A · Kadett D · Kadett E · Omega A · Omega B · Omega B2 · Vectra A, petrol · Vectra A · Vectra B, petrol · Vectra B · Vectra C · Zafira A, petrol · Frontera A, petrol · Frontera B · Ascona C · Vivaro A ·
We want your visit to be comfortable 🤝! We use cookies 🍪 to make that happen.