
OpelBook.ru
Cars AvtoVAZ Cars Mitsubishi Cars BMW Cars Mercedes Cars Nissan Cars Toyota Cars Chevrolet
English Русский
Български
Беларускі
Український
Српски
Hrvatski
Română
Polski
Slovenský
Magyar
 |  Sitemap  |  Contacts  |    


Main Astra Corsa Insignia Kadett Omega Vectra Zafira Others Articles
Insignia A (2008-2017)
  • Main
  • Insignia
  • Insignia A
  • Power unit
  • Petrol engines 2.0 l
  • Replacing the secondary drive chain (drive chain of the water pump and balance shafts)

Replacing the secondary drive chain (drive chain of the water pump and balance shafts) (Opel Insignia A)

            0

Contents: Removal ⬇ Installation ⬇

Removal


1. Remove the timing chain tensioner:
  • Loosen the balance shaft drive chain tensioner bolts.
  • Remove the balance shaft drive chain tensioner (1).
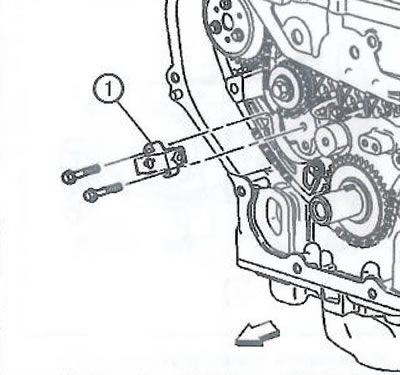
Remove the balance shaft drive chain tensioner (1).


2. Loosen the mounting bolt and remove the balance shaft drive chain tensioner shoe (1).

Article posted on an online resource OPELBOOK.ru
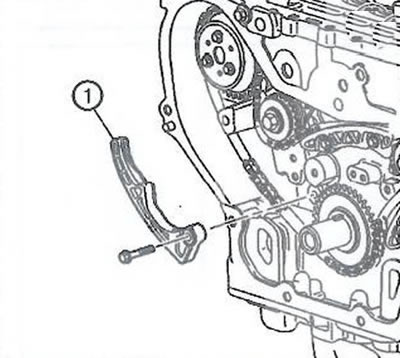
2. Loosen the mounting bolt and remove the balance shaft drive chain tensioner shoe (1).


3. Loosen the bolts and remove the smaller balance shaft drive chain guide (1).
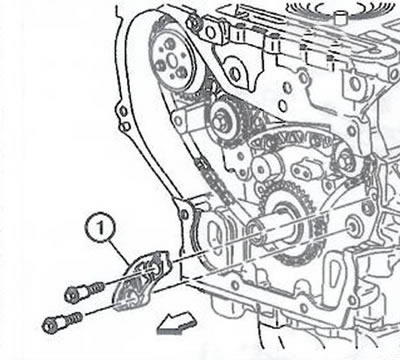
3. Loosen the bolts and remove the smaller balance shaft drive chain guide (1).


4. Loosen the mounting bolts and remove the upper balance shaft drive chain guide (1).
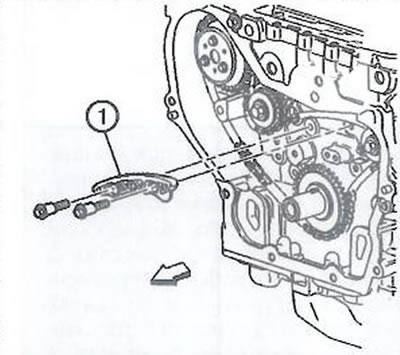


4. Loosen the mounting bolts and remove the upper balance shaft drive chain guide (1).


Note: Removing all the guides makes it easier to remove the drive chain by allowing it to hang between the sprockets.


5. Remove the chain (1) of the balance shaft and water pump drive.
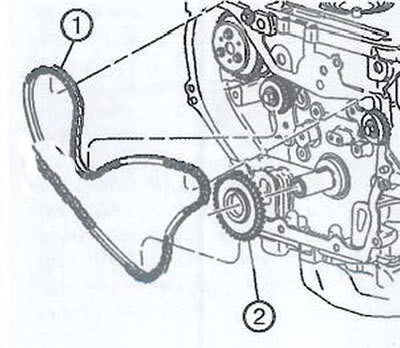
5. Remove the chain (1) of the balance shaft and water pump drive.


6. Remove the drive sprocket (2) of the balance shafts and water pump.

Installation


1. Install the drive sprocket of the balance shafts and water pump with the key.

Note: If the balance shafts are not adjusted correctly, the engine will vibrate and make abnormal noise.


2. Install the balance shaft drive chain so that the colored links align with the marks on the balance shaft and crankshaft sprockets. There are three colored links on the chain, two of the same color and one different color. Perform the following procedure to align the links with the marks on the sprockets:


  • Position the chain so that the colored links are visible.
  • Position the link of a different colour (1) so that it aligns with the mark on the balance shaft sprocket on the intake side.
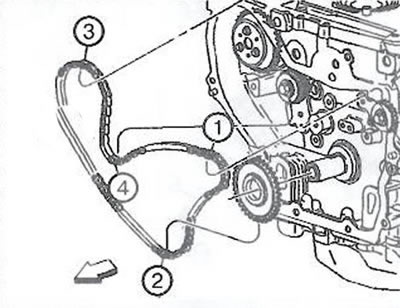
Position the link of a different colour (1) so that it aligns with the mark on the balance shaft…

  • Moving clockwise along the chain, align the first link of the same colour (2) with the mark on the crankshaft sprocket - approximately at the 6 o'clock position of the crankshaft sprocket.
  • Place the chain (3) on the water pump drive sprocket. The alignment of the links is not important.
  • Align the last coloured link (4) with the mark on the balance shaft sprocket on the exhaust side.

Note: Do not rotate the chain after installation.


3. Install the lower drive chain guide (1) and tighten the mounting bolts to a torque of 12 Nm.
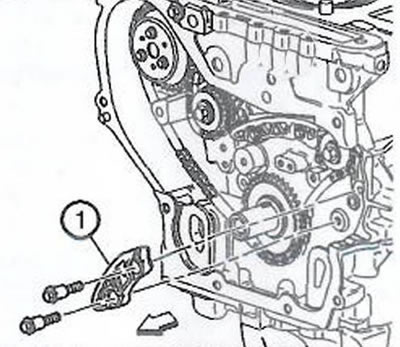
3. Install the lower drive chain guide (1) and tighten the mounting bolts to a torque of 12 Nm.


4. Install the upper drive chain guide (1) and tighten the mounting bolts to a torque of 12 Nm.
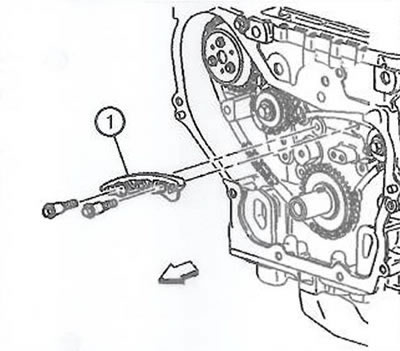


4. Install the upper drive chain guide (1) and tighten the mounting bolts to a torque of 12 Nm.


5. Install the drive chain tensioner shoe (1) and tighten the bolt to 10 Nm.
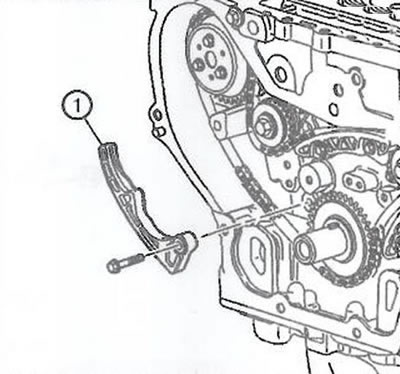
5. Install the drive chain tensioner shoe (1) and tighten the bolt to 10 Nm.


6. Reset the balance shaft drive chain tensioner (1) as follows:
  • Turn the plunger in the tensioner hole by 90° and squeeze.
  • Turn the plunger back to its original 12 o'clock position and insert the paper retainer (2) into the plunger through the hole in the housing.
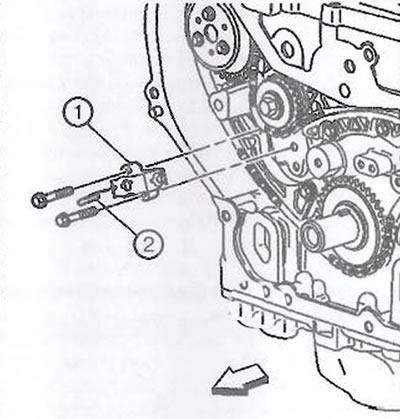
Turn the plunger back to its original 12 o'clock position and insert the paper retainer (2) into…


7. Install the balance shaft drive chain tensioner.


8. Install the tensioner bolts and tighten to 10 Nm.

9. Remove the paper retainer from the tensioner.


This article is available at russian, bulgarian, belarusian, ukrainian, serbian, croatian, romanian, polish, slovak, hungarian
Checking the article: Zinoviev Kirill

Share information:

Previous articles
Opel Insignia A: Petrol engines 2.0 l
Next articles

Adjusting the primary drive chain (camshaft drive chain)
Replacing the primary drive chain (camshaft drive chain)
Gas distribution mechanism drive
Installing the cylinder head cover
Removal the cylinder head cover
Replacing the drive belt tensioner for ancillary equipment
Cylinder head structure
Replacing the cylinder head
Construction of the cylinder block and crank mechanism
Disassembly and assembly of the cylinder head
Cleaning and checking the technical condition of the cylinder head
Replacing the crankshaft pulley


See similar ones from other Opel car manuals:
▶ Single-row fuel injection pump drive chain Opel Frontera B (1998-2004)
▶ Removal and installation the drive chain Opel Kadett E (1984-1995)
▶ Seals (drive shafts) on the differential side Opel Astra F (1991-1998, petrol)
▶ Checking the condition and replacing the auxiliary drive… Opel Corsa B (1993-2000)
▶ Main gear and drive shafts Opel Omega A (1986-1993)
Link to this page in different formats

Visitor comments


No comments yet


How much will 37 + 12 =


Insignia A (2008-2017) 
  • General information
  • Repair on the road
  • Daily checks
  • Operation and maintenance
  • Safety and tool
  • Power unit
  • Petrol engines 1.6 l
  • Petrol engines 2.0 l
  • Diesel engines 2.0 l
  • Diesel engines 2.8 l
  • Cooling system
  • Lubrication system
  • Supply system
  • Engine management
  • Intake and exhaust system
  • Engine electrical equipment
  • Transmission
  • Clutch
  • Mechanical gearbox
  • Automatic gearbox
  • Transfer case
  • Drive shafts
  • Chassis
  • Wheel suspension
  • Brake system
  • Steering
  • Body
  • Exterior
  • Interior
  • Passive safety
  • Heater and air conditioner
  • Electrical equipment
  • Electrical circuits
OpelBook.ru © 2017–2026 · Mobile version · · Sitemap: EN BG BY UA RS HR RO PL SK HU · Feedback · Site search
Astra F, petrol · Astra G, petrol · Astra G · Astra H · Astra J, petrol · Corsa B · Corsa C, petrol · Corsa C · Insignia A · Kadett D · Kadett E · Omega A · Omega B · Omega B2 · Vectra A, petrol · Vectra A · Vectra B, petrol · Vectra B · Vectra C · Zafira A, petrol · Frontera A, petrol · Frontera B · Ascona C · Vivaro A ·
We want your visit to be comfortable 🤝! We use cookies 🍪 to make that happen.