
The check is carried out every year.
Examination
The drive, or as it is sometimes called, V-belt is located at the front of the power unit and is used to drive auxiliary units such as the generator, steering pump and A/C compressor. Over time, the belt wears out and should be regularly inspected in accordance with the vehicle's routine maintenance schedule in order to avoid serious engine failures, the correction of the consequences of which can cost the car owner a pretty penny. On models equipped with K / V or power steering, a reinforced (ribbed) belt.
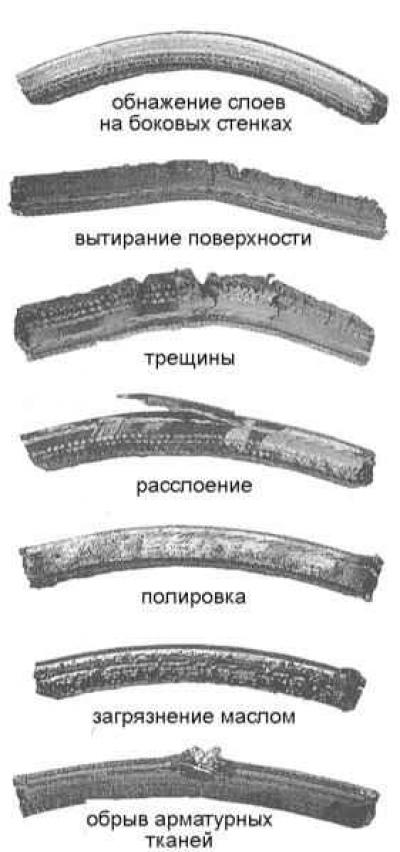
1. Stop the engine, open the hood and locate the drive belt at the front of the power unit. Lighting yourself with a flashlight, feel the belt along its entire length with your fingers, checking for cracks and delaminations. The presence of abrasions, areas polished to a shine and other obvious defects on the belt is also unacceptable. Inspect the belt on both sides, for which twist them. A worn or damaged belt must be replaced.
Typical wear patterns for V-belts
2. Check belt tension.
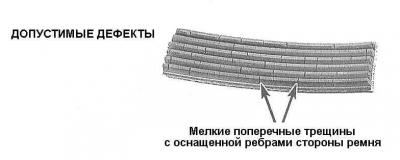
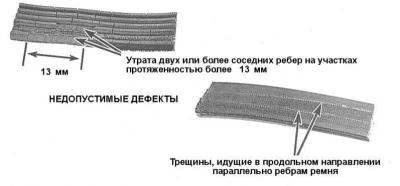
Typical wear patterns for ribbed drive belts
The tension of the reinforced belt should only be adjusted after it has been removed. Tension checks are not carried out as part of maintenance.
Replacement
V-belt for models with 1.2 and 1.4 l OHC engines without power steering or K / V and diesel engines
1. On petrol models remove the air cleaner with intake ducts.
2. Car with diesel engine jack up and place on stands.
3. On gasoline engines until 08.1994, issue. loosen the tensioner mounting bolt and tilt the alternator towards the engine. This loosens the drive belt tension. Loosen the lower alternator bracket bolt if necessary.
Bolt of fastening of a tension level
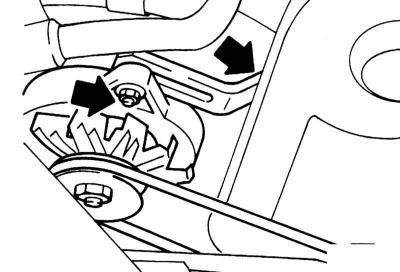
4. On gasoline engines since 09.1994, issue. remove the bolt (1) alternator bracket/inlet piping. Give the bolts (2) fastening the tension bar of the generator. Give a bolt of fastening of the lower support of the generator (3). Give tension bolt (4) drive belt.
Belt Tension Components
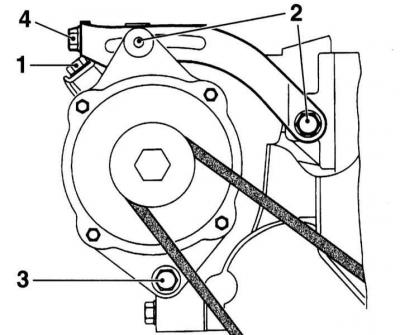
1 — Bolt of an arm of the generator
2 — Bolt of fastening of a tension level
3 — Bolt of the lower support of the generator
4 — a tension bolt of a driving belt
5. Remove the drive belt.
6. Install a new drive belt.
7. On gasoline engines until 08.1994, issue. push the generator away from the engine with a pry bar. Attach the tension bar. On engines from 09.1994, issue. tighten the tension bolt until the correct belt tension is achieved. Tighten the alternator bracket bolts.
8. On a diesel engine, press the generator out of the engine with a four-sided wrench and secure the tension bar.
9. Check belt tension with your thumb. At the point where the tension is checked with a special device, the belt must have a deflection 5 mm. However, at the next maintenance, it is necessary to check the belt tension at the service station, because. If not adjusted correctly, the belt may slip.
The correct tension of the V-belt has a significant impact on its service life. To check the belt tension, it is recommended to use a special tool KM-128-A. Without the specified tool, it is impossible to correctly adjust and check the belt tension, because. The new drive belt has a large pre-tension.
10. As a test surface, if possible, choose the middle between the two pulleys. On a diesel engine, the belt tension should be checked from below.
11. Install the tester on the drive belt so that the belt passes through the guides.
12. Press the lever so that the pin of the microswitch (at the bottom of the instrument) touched the drive belt. When touched, a beep sounds.
Checking the belt tension with a special tool
13. Read the value on the scale of the device and multiply it by 100. The resulting value corresponds to the tensile force of the belt in Newtons.
14. Belt tension should be 250 ÷ 300 N and should never be less than 250 N.
When installing a new drive belt, it must be tensioned with a force of 450 N. If the belt tension is outside the specified limits, it is necessary to tighten the belt.
14. On gasoline engines tighten bolts of fastening of a tension level and the generator with effort 25 Nm. Install the air cleaner with intake ducts.
15. On diesel engine tighten bolts of fastening of a tension level with effort 25 Nm and generator bracket with force 50 Nm. Lower the car to the ground.
Engines OHC 1.2 and 1.4 l with power steering and DOHC 1.4 and 1.6 l
1. Remove the air cleaner with intake ducts (see chapter Power supply systems, release and reduction of toxicity of exhaust gases).
2. If the drive belt is deemed fit for further use, mark the original direction of its movement with paint or a marker. Try to remember the order in which the belt is laid around the pulleys.
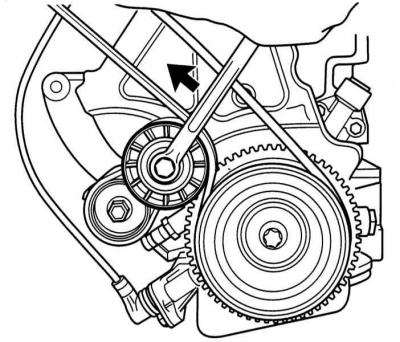
3. On DOHC engine without power steering loosen the belt tension by turning the tensioner counterclockwise by the central bolt.
Loose belt tension on a DOHC engine without power steering
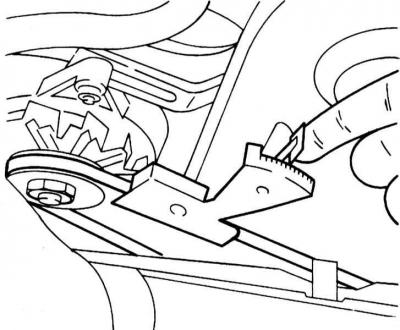
4. On an OHC engine with power steering turn the tension roller clockwise with a wrench so that the holes in the holder and the tension roller coincide; fix the tension roller in this position with the appropriate rod or pin and remove the belt.
Tension roller fixation
5. Put the belt on the pulleys. If a previously used belt is installed, pay attention to the direction of its movement.
6. On DOHC engines tighten the roller with a wrench.
7. On OHC engines slightly turn the tension roller to the right, remove the pin from the locking holes and slowly unload the belt.
8. Release the tension roller, and the desired tension is automatically set.
9. Check that the belt is correctly routed on the pulleys. The belt must not protrude from the side of the pulleys.
10. Install the air cleaner with intake ducts (see chapter Power supply systems, release and reduction of toxicity of exhaust gases).
Engines 1.2, 1.4 and 1.6 l with power steering and K / V
1. Disconnect the negative cable from the battery.
2. Remove the air cleaner with air ducts and MAF sensor (engine 1.6 l) (see chapter Power supply systems, release and reduction of toxicity of exhaust gases).
3. Raise the engine using the OPEL KM-263-B tool.
If the specified device is not available, place the appropriate pipe on the wooden spacers on the wings, pass the chain through the engine lugs, connect it to the pipe and tension the chain.
4. Turn the tension roller clockwise with a ring wrench so that the holes of the holder and the tension roller coincide (A) In this position, fix the tension roller with the appropriate hook (WITH).
Tension roller fixation
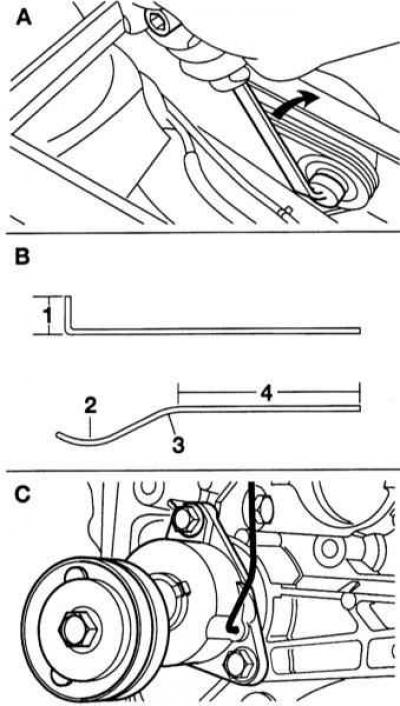
1 - 30 mm
2 - Radius 30 mm
3 - Radius 35 mm
4 - 150 mm
Hook can be made by yourself (IN) from a wire with a diameter of 4 mm. The total wire length is approximately 280 mm.
5. Turn out bolts of fastening and disconnect the holder of the power unit from a damping support of the engine.
Fixture of the holder of the power unit to a damping support

6. Turn out on three bolts of fastening with a fillet in front on the right and at the left and remove drafts with the holder from a front suspension cross member.
7. Lower the engine by about 5 cm, unscrew the mounting bolts and disconnect the holder of the power unit from the holder of the power steering pump and the K / V compressor and remove it down.
8. Remove the drive belt.
9. Put on a new drive belt.
10. Install the holder of the power unit on the holder of the power steering pump and the K / V compressor and tighten the fasteners with force 60 Nm.
11. Raise the power unit and tighten the fasteners of its holder to the damping support with a force 60 Nm.
12. Fix the holder of drafts in front at the left and on the right at a crossbar new bolts. Torque the bolts 50 Nm and then turn the corner 90 ÷ 105 deg.
13. If the KM-263-B fixture was installed, remove it.
14. On the engine 1.6 l connect the MAF sensor connector.
1.0 and 1.2 L DOHC engines
1. If the drive belt is deemed fit for further use, mark the original direction of rotation with paint or a marker. Try to remember the order in which the belt is laid around the pulleys.
2. Remove the air cleaner with intake ducts (see chapter Power supply systems, release and reduction of toxicity of exhaust gases).
3. Raise the engine slightly with a hoist and remove the crankcase protection.
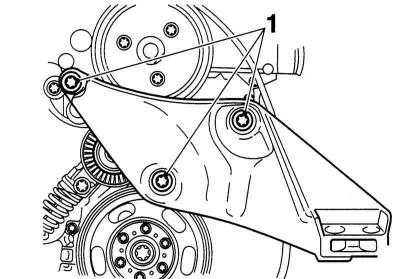
4. Detach the engine mount at the front right of the damping mount (refer to illustration).
5. Detach the engine mount at the front right of the engine (1).
Engine holder fixture
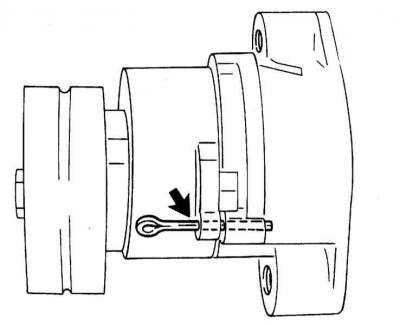
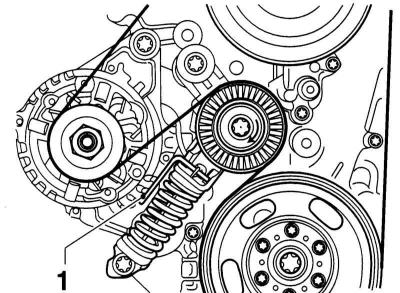
6. Turn the tension roller by the central bolt in a clockwise direction. Fix the tensioner with a suitable rod.
Tensioner fixing point
7. Remove the drive belt and replace it.
8. Lightly tension the tensioner, remove the lock pin and slowly loosen the tensioner. At the same time, make sure that the belt is correctly positioned in the grooves of the pulleys.
9. Tighten the bolts securing the engine holder to the engine and damping support with a force 60 Nm. Remove the engine lift.
10. Replace the air filter.
Visitor comments