
Examination
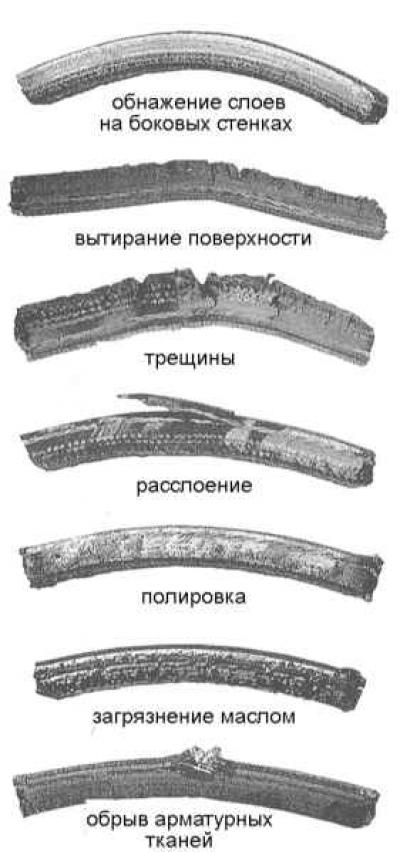
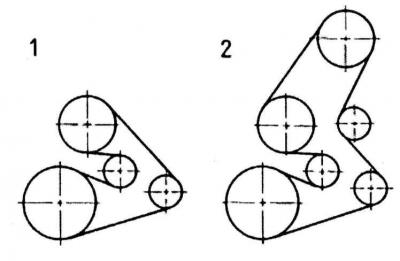
Typical wear patterns for V-belts
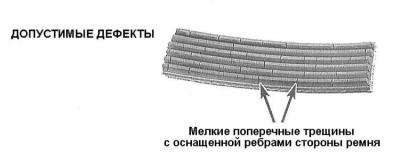
Typical wear patterns for multi-ribbed belts
Drive, or as they are sometimes called, V-belts are located in front of the power unit and play an important role in the operation of the engine and many other vehicle systems. Belts wear out over time and should be regularly inspected as part of the vehicle's routine maintenance schedule to avoid serious engine failures that can cost the owner a lot of money to fix.
Multi-ribbed belts also belong to the V-shaped family.
The number of drive belts used on the engine depends on the vehicle equipment. Belts are used to drive accessories such as generator, steering and water pumps, air conditioner compressor, etc. Depending on the pulley layout, more than one unit can be driven by one belt.
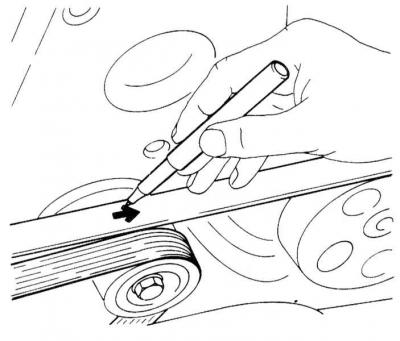
Stop the engine, open the hood and look for the drive belts at the front of the power unit. Lighting yourself with a flashlight, feel the belts along their entire length with your fingers, checking for cracks and delaminations. The presence of scuffs, polished areas and other obvious defects on the belt is also unacceptable (see illustrations Typical wear patterns for V-belts and Typical wear patterns for multi-ribbed belts). Inspect the belts on both sides, for which twist them. A worn or damaged belt must be replaced.
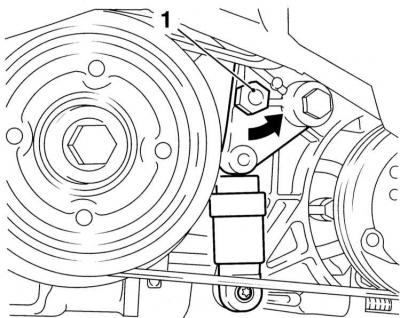
Check the position of the belt tensioner lever - it should move freely and occupy a position between the stops on the base plate. If the tensioner lever is pressed against the stop, both the belt and tensioner should be replaced.
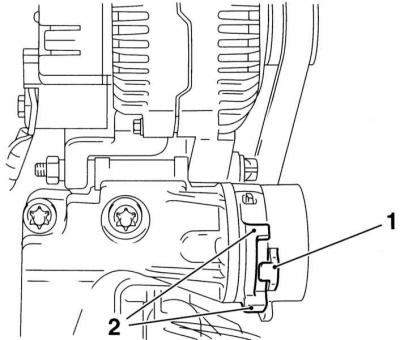
Auxiliary drive belt tensioner lever layout (1) and his emphasis (2) - models without K/V
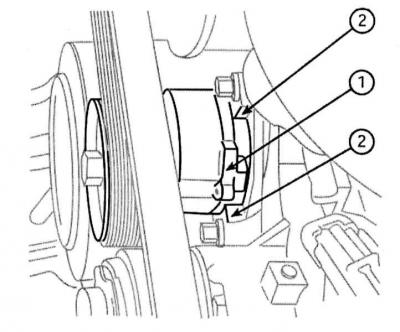
Auxiliary drive belt tensioner lever layout (1) and his emphasis (2) - models with A/C
Replacement
Petrol models
1. Remove the air cleaner with intake ducts and air flow sensor (see chapter Power and exhaust systems).
2. If the drive belt is deemed fit for further use, mark the original direction of rotation with paint or a marker. Try to remember the order in which the belt is laid around the pulleys.

3. To loosen the belt tension, turn the tensioner counterclockwise by the central bolt. Remove the belt from the pulleys, before removing the belt from the engine, carefully release the tensioner.
4. Replace failed components (see above Examination), - a description of the procedures for removing and installing the tensioner is given in Chapter Engine electrical equipment.
5. Install the belt on the motor (if a used belt is installed, make sure that the original direction of rotation is observed), - follow the correct laying of the belt ribs in the grooves of the pulleys. Release the tensioner and once again make sure that the belt is installed and routed correctly.
6. Overcoming the resistance of the spring, wring out the tension roller with a suitable lever and also check that the belt is laid correctly - release the tensioner smoothly.
7. Replace the air cleaner with accessories (see chapter Power and exhaust systems).
Diesel models
Models with 1.7L SOHC engine
1. Remove the air cleaner with air ducts and air flow sensor (see chapter Power and exhaust systems).
2. If the drive belt is deemed fit for further use, mark the original direction of rotation with paint or a marker. Try to remember the order in which the belt is laid around the pulleys.
3. On models equipped with an air conditioning system, use a socket wrench to loosen the tensioner and slip the multi-ribbed belt off the pulleys.
4. Turn out fixing bolts and remove a basic arm of the generator.
5. Loosen the fixing bolt, then, by turning the tensioner nut, loosen the belt tension and throw off the latter from the drive pulleys.
6. Install the belt on the motor (if a used belt is installed, make sure that the original direction of rotation is observed), - follow the correct laying of the belt ribs in the grooves of the pulleys. Applying a force of 450 N to the tensioner nut (new belt) / 250—400 N (used belt), tighten the fixing bolt.
7. Establish a basic arm of the generator and tighten bolts of its fastening.
8. On models equipped with K / V, take the tensioner away with the socket wrench and lay the belt on the pulleys - see the notes above. Finally, release the tensioner.
9. Replace the air cleaner with accessories (see chapter Power and exhaust systems).
Models with 1.7L DOHC engine
1. Remove the air cleaner with air ducts and air flow sensor (see chapter Power and exhaust systems).
2. If the drive belt is deemed fit for further use, mark the original direction of rotation with paint or a marker. Try to remember the order in which the belt is laid around the pulleys.
3. Turn the tensioner counterclockwise at the center bolt, loosen the belt tension and slip it off the drive pulleys.
4. Install a new belt on the engine. Release the tensioner, then re-check that the belt is correctly positioned.
5. Replace the air cleaner with accessories (see chapter Power and exhaust systems).
Models with 2.0L engines
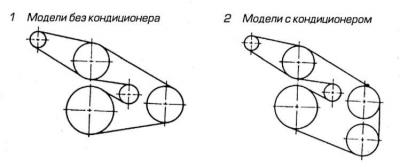
Auxiliary drive belt routing diagram on 2.0L engines
1. Remove the air cleaner along with the air ducts and air flow sensor.
2. Apply the parking brake, jack up the front of the vehicle and place it on jack stands. If equipped, remove the crankcase protection.
3. Mark the position of the balance weight (vibration damper) on the right drive shaft. Loosen the fixing bolts and remove the load (see chapter Clutch and drive shafts).
4. Carefully mark the installation position of the right power unit suspension support relative to the subframe. Support the engine with a trolley jack (in order to distribute the load, lay a block of wood between the head of the jack and the engine sump).
5. If the belt installed on the engine is recognized as fit for further use, then before removing the support, mark the original direction of its rotation. Try to remember the order of laying the belt on the pulleys (see illustration Auxiliary drive belt routing diagram on 2.0L engines).
6. To loosen the belt tension, turn the tensioner counterclockwise by the bolt. Remove the belt from the pulleys, before removing the belt from the engine, carefully release the tensioner.
7. While holding the tensioner in the retracted position, fit the replacement belt onto the pulleys.
8. Install the vibration damper on the right drive shaft and tighten the bolts of its fastening with the required force (see chapter Clutch and drive shafts).
9. If equipped, reinstall the crankcase and lower the vehicle to the ground.
10. Replace the air cleaner with accessories (see chapter Power and exhaust systems).
Visitor comments