
OpelBook.ru
Cars AvtoVAZ Cars Mitsubishi Cars BMW Cars Mercedes Cars Nissan Cars Toyota Cars Chevrolet
English Русский
Български
Беларускі
Український
Српски
Hrvatski
Română
Polski
Slovenský
Magyar
 |  Sitemap  |  Contacts  |    


Main Astra Corsa Insignia Kadett Omega Vectra Zafira Others Articles
Astra F (1991-1998, petrol) Astra G (1998-2004, petrol) Astra G (1998-2004) Astra H (2004-2009) Astra J (2009-2015, petrol)
  • Main
  • Astra
  • Astra G
  • General information
  • Maintenance
  • Checking the condition of the tires and their inflation pressure, rotating the wheels

Checking the condition of the tires and their inflation pressure, rotating the wheels (Opel Astra G)

            0

Contents: Examination ⬇ Wheel rotation ⬇

Examination


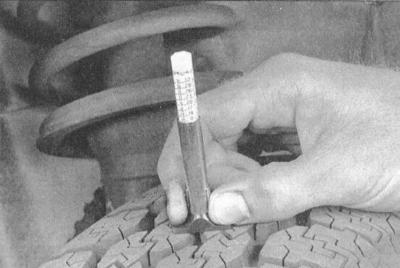
A conscientious attitude to regular tire checks will allow the driver to avoid annoying delays associated with a tire failure while driving. In addition, the nature of the tread wear can be used to identify early developing defects in the suspension and steering components.
A conscientious attitude to regular tire checks will allow the driver to avoid annoying delays…


The standard equipment of the cars considered in this Manual includes wheels equipped with special indicator strips, which are about 12 mm wide and appear on the tread pattern when the latter is worn to the permissible limit. The minimum permissible tread depth is 1.6 mm. You can assess the degree of tread wear using a special inexpensive device - ask in car accessory stores.

Pay attention to any signs of uneven tread wear. Local defects such as cupping, flattening, etc. usually result from incorrect front wheel alignment or wheel balancing. To identify and eliminate faults, the car should be taken to a specialized car service workshop or service station.
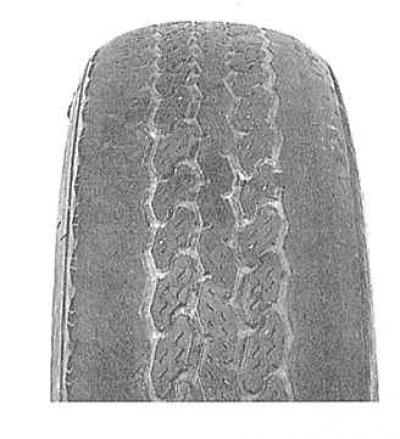
Insufficient tire inflation pressure
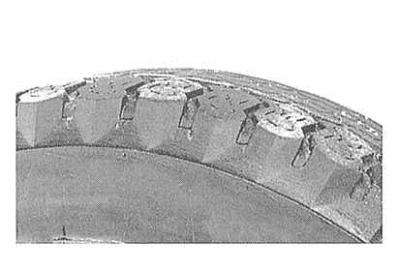


Cup-shaped defects
Cup-shaped defects


The following are possible reasons for the formation of cup-shaped defects:
  • The tires are underinflated or there is a mechanical deviation (wheel imbalance or disc deformation).
  • The steering rods or steering pendulum arm have become loose, or the listed components are worn out.
  • Front suspension components are damaged, worn, or loose
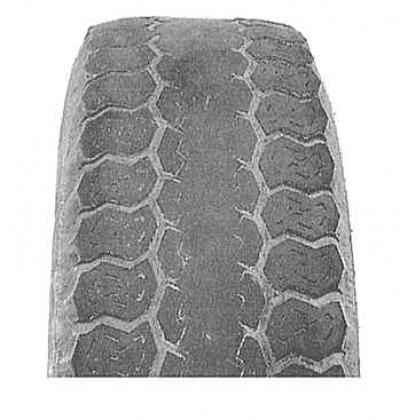
Tire inflation pressure too high
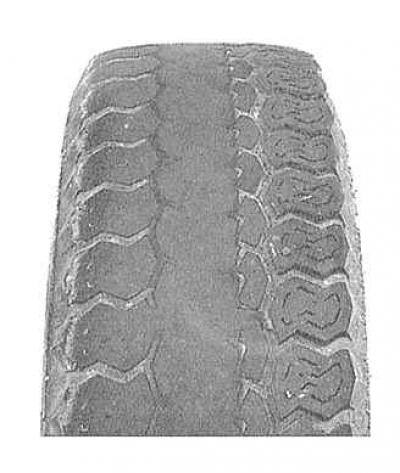


The toe-in adjustment is out of adjustment or the wheel camber is too great
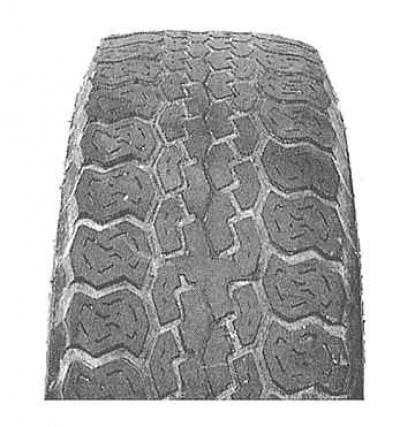


Flaky tread wear caused by wheel misalignment


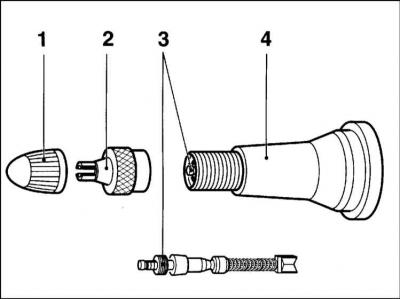
1. Carefully inspect the tires of all wheels for cuts, punctures, and foreign objects stuck in the grooves of the tread pattern. Sometimes a punctured tire continues to hold air inside for some time because the object that punctured the tire continues to remain stuck in it. A defective tire inflation valve nipple may be the cause of a slow tire deflation - check the condition of the nipple.
1. Carefully inspect the tires of all wheels for cuts, punctures, and foreign objects stuck in the…


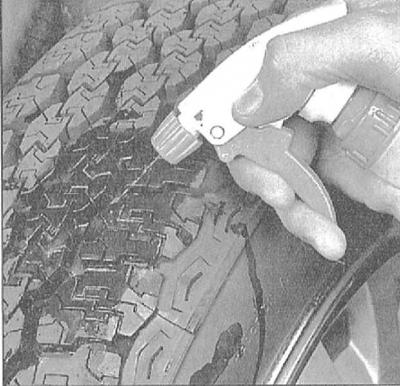
2. Carefully inspect the tread for foreign objects stuck in it and signs of a leak in the seal of the repair "plugs" used to repair small punctures in the tire. It is quite easy to verify the presence of a puncture - just wet the suspected area of the tire surface with a solution of soapy water - if there is a puncture, the solution will begin to bubble. Small punctures are usually easily repaired in tire repair shops.


2. Carefully inspect the tread for foreign objects stuck in it and signs of a leak in the seal of…


3. Carefully inspect the inner walls of the tires of all four wheels for any signs of brake fluid leakage. If any are found, immediately check the condition of the corresponding brake mechanisms and the hydraulic lines connected to them.

4. Maintaining the required tire inflation pressure will significantly extend the service life of the wheels, and will also provide maximum comfort when driving and will not reduce the car's controllability. Remember that it is almost impossible to correctly determine the tire pressure by eye, especially when it comes to radial tires. It is necessary to always have a suitable pressure gauge at hand - the readings of the compressor inflation gauges at gas stations and service stations should not be trusted.

5. Check the tire inflation pressure when the wheels are cold - this means that the car has driven no more than one mile in the last three hours. Remember that an increase in pressure by 0.3-0.6 kgf/cm² as a result of the wheel warming up is a completely natural phenomenon.

6. Remove the protective cap from the tire inflation valve and press the pressure gauge nozzle tightly to the valve outlet, squeezing the nipple stem. Read the reading and compare it with the standard data, adjust the pressure if necessary. Checking the tire inflation pressure weekly will extend the service life of the wheels (don't forget about the spare tire)
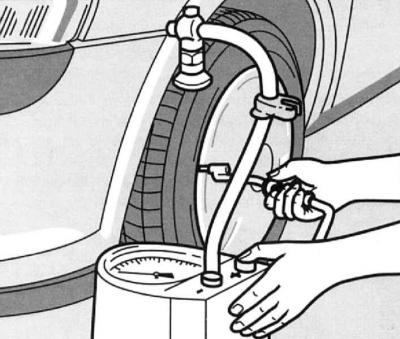


6. Remove the protective cap from the tire inflation valve and press the pressure gauge nozzle…


7. Don't forget to screw the valve cap back on to prevent moisture and dirt from getting into the valve. Check the pressure in all wheels, including the spare.

The inflation pressure of a compact type spare tire is usually significantly higher than that of conventional tires.


Wheel rotation


Wheel rotation should be performed regularly in accordance with the vehicle's routine maintenance schedule, and whenever signs of uneven tread wear are detected. The vehicle should be raised off the ground when rotating - take this opportunity to also check the condition of the brake system components (see Checking the brake system).

The authors of this Manual recommend rotating wheels equipped with radial tires in accordance with the proposed schemes. Most models are equipped with tires with a directional tread - directional tires are easily distinguished by the presence of an arrow on the sidewall indicating the correct direction of rotation of the wheel. The set should include two tires with a right-hand rotation direction and two with a left-hand rotation.

Original source on the website www.opelbook.ru
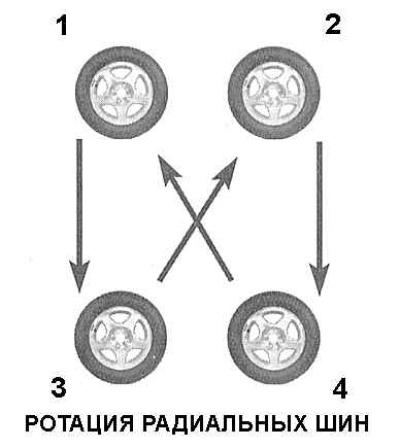


The authors of this Manual recommend rotating wheels equipped with radial tires in accordance with…


Recommended rotation order for wheels fitted with NON-DIRECTIONAL tread tyres

1 - LEFT FRONT

2 - RIGHT FRONT
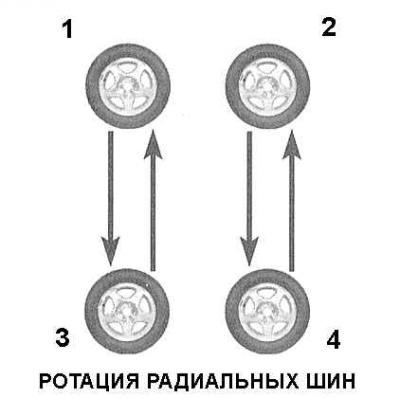
2 - RIGHT FRONT


Recommended rotation order for wheels equipped with DIRECTIONAL tread tires

3 - LEFT REAR

4 - REAR RIGHT

For a detailed description of the wheel changing procedure, see. Jacking and towing. Make sure that the vehicle is securely fixed in the raised position.

The best thing to do is to raise the entire car off the ground - under no circumstances should you use less than four supports to secure the car in a raised position!

After completing the rotation, check the tire inflation pressure and adjust it according to regulatory requirements. Make sure the wheels are securely fastened with nuts (ideally, wheel bolts should be tightened with a torque wrench and rechecked after 40 km of driving).

More detailed information on wheels and tires is provided in Chapter Suspension and steering.


This article is available at russian, bulgarian, belarusian, ukrainian, serbian, croatian, romanian, polish, slovak, hungarian
Checking the article: Pavlovsky Nikolay

Share information:

Previous articles
Opel Astra G: Maintenance
Next articles

Checking fluid levels
General information about settings and adjustments
Routine Maintenance Specifications
Schedule of current maintenance
General information about maintenance
Changing engine oil and oil filter
Checking the condition and replacing the auxiliary drive belt
Removal sediment from a diesel engine fuel filter
Checking the condition and replacing the hoses located in the engine compartment
Checking the condition of the cooling system components
Checking, servicing and charging the battery


See similar ones from other Opel car manuals:
▶ Checking the condition of the tires and their inflation… Opel Corsa B (1993-2000)
▶ Checking the condition of tires, inflation pressure, wheel… Opel Vectra C (2002-2008)
▶ Checking the condition of the tires and their pressure Opel Frontera A (1991-1998, petrol)
▶ Wheels, tires and hubs — technical condition check Opel Zafira A (1999-2005, petrol)
▶ Cleaning and checking the technical condition of the… Opel Insignia A (2008-2017)
Link to this page in different formats

Visitor comments


No comments yet


How much will 12 + 34 =


Astra J (2009-2015, petrol) 
  • General information
  • Vehicle device
  • User manual
  • Faults en route
  • Maintenance
  • Power unit
  • Engine repair
  • Cooling and lubrication system
  • Engine power system
  • Exhaust system
  • Transmission
  • Clutch
  • Car gearbox
  • Drive shafts
  • Chassis
  • Front suspension
  • Rear suspension
  • Steering
  • Brake system
  • Wheels and tires
  • Body
  • Exterior
  • Interior
  • Doors and windows
  • Body Care
  • Heating and air conditioning
  • Security systems
  • Electrical equipment
  • Equipment and devices
  • Lighting and signaling
  • Power devices
  • Electrical circuits
Astra H (2004-2009) 
  • General information
  • Introduction to the guide
  • Troubleshooting
  • User manual
  • Maintenance
  • Power unit
  • Engine repair
  • Cooling and heating
  • Power and exhaust system
  • Ignition system
  • Launch and charge system
  • Transmission
  • Mechanical gearbox
  • Automatic gearbox
  • Drive shafts
  • Chassis
  • Brake system
  • Car suspension
  • Steering
  • Body
  • Interior
  • Exterior
  • Electrical equipment
  • Equipment and devices
  • Electrical circuits
Astra G (1998-2004) 
  • General information
  • Introduction to manual
  • User manual
  • Maintenance
  • Power unit
  • SOHC gasoline engines
  • DOHC gasoline engines
  • Diesel engines 1.7 and 2.0
  • Engine repair
  • Cooling system
  • Supply system
  • Injection system (gasoline)
  • Injection system (diesel)
  • Exhaust system
  • Charge and launch system
  • Ignition system (gasoline)
  • Preheat system (diesel)
  • Transmission
  • Manual gearbox
  • Automatic gearbox
  • Clutch
  • Drive shafts
  • Chassis
  • Brake system
  • Wheel suspension
  • Steering
  • Body
  • Exterior
  • Interior
  • Doors and windows
  • Ventilation and heating
  • Electrical equipment
  • Equipment and devices
  • Electrical circuits
Astra G (1998-2004, petrol) 
  • General information
  • User manual
  • Car care
  • Maintenance
  • Power unit
  • Single shaft engines
  • Twin shaft engines
  • Engine repair
  • Cooling and heating
  • Fuel and exhaust systems
  • Starting and charging system
  • Ignition system
  • Transmission
  • Clutch
  • Mechanical gearbox
  • Automatic gearbox
  • Drive shafts
  • Chassis
  • Brake system
  • Car suspension
  • Steering
  • Body
  • Interior
  • Exterior
  • Electrical equipment
  • Equipment and devices
  • Wiring diagrams Opel Astra
  • Wiring diagrams Opel Zafira
Astra F (1991-1998, petrol) 
  • General information
  • Maintenance
  • Power unit
  • Engine in car
  • Engine removed
  • Cooling system
  • Heating and ventilation
  • Fuel supply (carburetor)
  • Fuel supply (injector)
  • Emission control
  • Ignition system
  • Transmission
  • Clutch
  • Mechanical gearbox
  • Automatic gearbox
  • Drive shafts
  • Chassis
  • Brake system
  • Car suspension
  • Steering
  • Body
  • Exterior
  • Interior
  • Electrical equipment
  • Equipment and devices
  • Electrical circuits
OpelBook.ru © 2017–2026 · Mobile version · · Sitemap: EN BG BY UA RS HR RO PL SK HU · Feedback · Site search
Astra F, petrol · Astra G, petrol · Astra G · Astra H · Astra J, petrol · Corsa B · Corsa C, petrol · Corsa C · Insignia A · Kadett D · Kadett E · Omega A · Omega B · Omega B2 · Vectra A, petrol · Vectra A · Vectra B, petrol · Vectra B · Vectra C · Zafira A, petrol · Frontera A, petrol · Frontera B · Ascona C · Vivaro A ·
We want your visit to be comfortable 🤝! We use cookies 🍪 to make that happen.