
OpelBook.ru
Cars AvtoVAZ Cars Mitsubishi Cars BMW Cars Mercedes Cars Nissan Cars Toyota Cars Chevrolet
English Русский
Български
Беларускі
Український
Српски
Hrvatski
Română
Polski
Slovenský
Magyar
 |  Sitemap  |  Contacts  |    


Main Astra Corsa Insignia Kadett Omega Vectra Zafira Others Articles
Frontera A (1991-1998, petrol) Frontera B (1998-2004) Ascona C (1981-1988) Vivaro A (2001-2014)
  • Main
  • Opel
  • Frontera A
  • General information
  • Maintenance
  • Checking the condition of the tires and their pressure

Checking the condition of the tires and their pressure (Opel Frontera A)

            0

Regularly checking the condition of your tires will help you avoid the hassle of being stopped on the road due to a flat tire. Additionally, these checks provide valuable information about potential steering and suspension problems before serious damage occurs.

1. The tyres are equipped with built-in tread wear indicator strips which become exposed when the tread depth drops to 1.6 mm, after which the tyres are considered worn out. This value represents the minimum permissible tread depth; in most cases, it is recommended to replace tires with a tread depth of 2 mm or less. Tread depth can also be determined using a simple and inexpensive device known as a tread depth gauge.

2. Pay attention to any unusual wear on the treads. Tread defects such as cavities, bulges, flattening and more severe wear on one side indicate a violation of the front wheel alignment angles and/or wheel balancing. If any of the listed defects are detected, you should contact a tire repair shop to have them corrected.
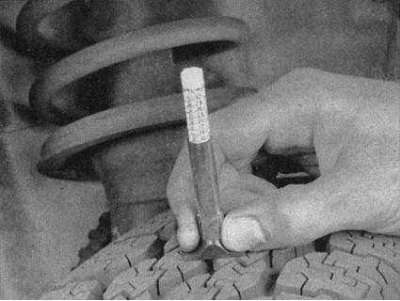
To determine tire wear, use a tread depth gauge - they are sold at auto accessory stores and…

To determine tire wear, use a tread depth gauge - they are sold at auto accessory stores and service stations and are very inexpensive.
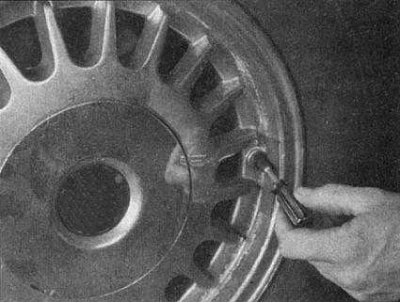


3a. Check the tire carefully for cuts, punctures, and stuck nails or tacks. Sometimes after a tire…


3a. Check the tire carefully for cuts, punctures, and stuck nails or tacks. Sometimes after a tire is punctured with a nail, it still holds pressure for some time or deflates very slowly. If you suspect that you have such a "slow puncture", first check the tightness of the inflation valve nipple.
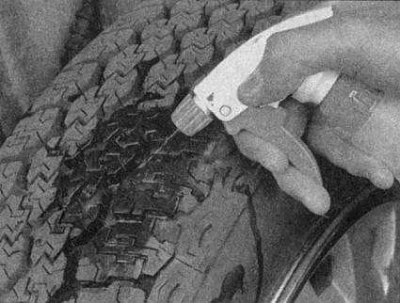
3b. Then inspect the tread for any foreign objects stuck in it or previously repaired punctures…


3b. Then inspect the tread for any foreign objects stuck in it or previously repaired punctures that have started to leak air again. If you suspect that there is a puncture, you can verify its presence by wetting the suspected area with soapy water. If there is a leak, the solution will begin to bubble. If the puncture is not too big, the tire can usually be repaired at any tire shop.

4. Carefully inspect the inside sidewalls of the tires for signs of brake fluid leakage. If any are present, have the brake system checked immediately.


5. Maintaining proper tire pressure increases tire life, helps save fuel and improves overall ride quality. To check the pressure, a special pressure gauge is required.

Recommendations. Always keep an accurate pressure gauge in your glove compartment. Pressure gauges built into air hose nozzles at service stations are often inaccurate.


6. Always check tire pressure when tires are cold (i.e. before traveling by car). Checking the pressure on warm or hot tires will result in an overestimation of the pressure gauge reading due to thermal expansion of the tires. In this case, you should never release the pressure, because after the tire cools down, it will be below normal.
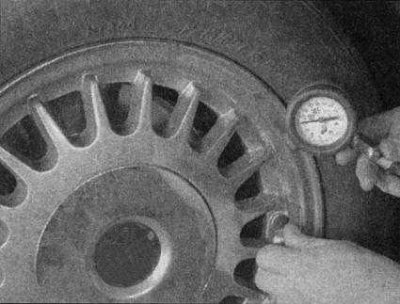
7. Unscrew the protective cap from the inflation valve protruding from the wheel rim or hub cap,…


7. Unscrew the protective cap from the inflation valve protruding from the wheel rim or hub cap, then press the pressure gauge nozzle firmly onto the valve. Read the instrument readings and compare them with those recommended in the Specifications. Be sure to replace the protective cap to prevent dirt and moisture from entering the valve mechanism. Check the pressure in all four tires and inflate them to the recommended pressure if necessary.


8. Don't forget to maintain the required pressure in the spare tire.

Examples of typical tire tread wear


Lateral wear
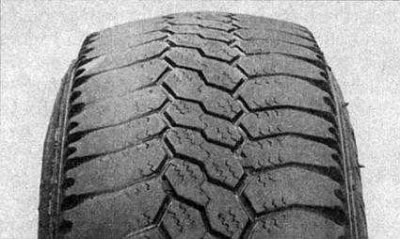


Insufficient pressure (wear on both sides)


Insufficient pressure (wear on both sides)

Underinflation of the tyre causes it to overheat while driving due to excessive deflection, resulting in the tread not being pressed sufficiently against the road surface. This results in loss of traction and excessive tread wear, not to mention the risk of tyre failure due to overheating.

1. Check and adjust pressure.

Incorrect wheel alignment (wear on one side)

1. Repair or replace suspension parts.

Too sharp turns

Slow down!

Central wear
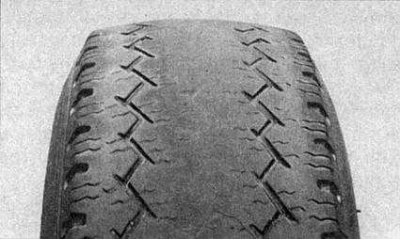


Excessive pressure


Excessive pressure

Overinflation of a tire results in accelerated wear of the center tread, reduced traction, harsher ride, and an increased risk of fatal tire damage.


1. Check and adjust pressure.

2. If you had to inflate your tires to the pressure specified for this purpose in order to transport heavy loads, Specifications pressure values, do not forget to release it after this when switching to normal operating mode.

Uneven wear
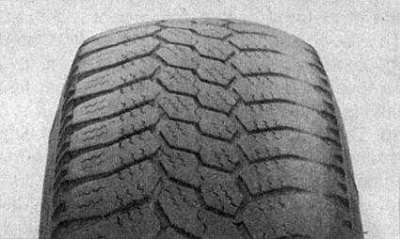


Front tires may wear unevenly due to improper wheel alignment. Most tire shops can check and adjust…


Front tires may wear unevenly due to improper wheel alignment. Most tire shops can check and adjust the alignment angles for a reasonable fee.

1. Incorrect camber or runout. Repair or replace suspension parts.

2. Suspension defect. Repair or replace suspension parts.

3. The wheels are out of balance. Perform wheel balancing.

4. Front wheel alignment is incorrectly set. Adjust the front wheel alignment angles.

Note: Frayed edges of the tread pattern, which is a sign of wear, are best detected by touch.


This article is available at russian, bulgarian, belarusian, ukrainian, serbian, croatian, romanian, polish, slovak, hungarian
Checking the article: Meshcheryakov Damir

Share information:

Previous articles
Opel Frontera A: Maintenance
Next articles

Checking fluid levels
Information about car setup
Routine car maintenance
Schedule of current maintenance
Maintenance Specifications
Changing engine oil and oil filter
Checking the power steering fluid level
Wheel rotation
Checking the condition and replacing the engine compartment hoses
Checking the condition, adjusting the tension and replacing the drive belt (only for engines with tension adjustment)
Checking and adjusting engine idle speed and CO levels


See similar ones from other Opel car manuals:
▶ Checking the condition of the tires and tire pressure Opel Astra G (1998-2004, petrol)
▶ Checking the condition of the tires and their inflation… Opel Corsa B (1993-2000)
▶ Checking the condition of tires, inflation pressure, wheel… Opel Vectra C (2002-2008)
▶ Cleaning and checking the technical condition of the… Opel Insignia A (2008-2017)
▶ Checking the technical condition of the oil pump Opel Kadett E (1984-1995)
Link to this page in different formats

Visitor comments


No comments yet


How much will 13 + 17 =


Vivaro A (2001-2014) 
  • General information
  • User manual
  • Power unit
  • Petrol engine F4R
  • Diesel engine F9Q
  • Diesel engine G9U
  • Transmission
  • Clutch and drive shafts
  • Manual gearbox
  • Chassis
  • Front suspension
  • Rear suspension
  • Brake system
  • Body
  • Exterior
  • Interior
  • Electrical equipment
  • Heating and ventilation
  • Air conditioner
  • Equipment and devices
  • Electrical diagrams
Ascona C (1981-1988) 
  • General information
  • Maintenance
  • Power unit
  • Gasoline engines
  • Diesel engines
  • Cooling system
  • Fuel and exhaust system
  • Contact ignition system
  • Contactless ignition system
  • Transmission
  • Clutch
  • Mechanical gearbox
  • Automatic gearbox
  • Drive shafts
  • Chassis
  • Steering
  • Brake system
  • Car suspension
  • Body
  • Exterior
  • Interior
  • Doors and windows
  • Electrical equipment
  • Equipment and devices
  • Power devices
  • Electrical circuits
Frontera B (1998-2004) 
  • General information
  • User manual
  • Maintenance
  • Power unit
  • Petrol engines 2.2 l
  • Petrol engines 3.2 l
  • Diesel engines 2.2 l
  • Cooling system
  • Fuel system (petrol)
  • Fuel system (diesel)
  • Ignition system
  • Transmission
  • Clutch
  • Manual gearbox MUA5C
  • Automatic gearbox 4L30E
  • Chassis
  • Suspension and axles
  • Steering
  • Brake system
  • Body
  • Exterior
  • Interior
  • Doors, locks and windows
  • Heating and air conditioning
  • Electrical equipment
  • Power devices
  • Equipment and devices
  • Lighting and signaling
  • Electrical diagrams
Frontera A (1991-1998, petrol) 
  • General information
  • Introduction to guide
  • User manual
  • Maintenance
  • Power unit
  • Engine repair
  • Lubrication system
  • Cooling system
  • Power and exhaust system
  • Engine electrics
  • Transmission
  • Clutch
  • Mechanical gearbox
  • Cardan shafts
  • Chassis
  • Brake system
  • Front suspension
  • Rear suspension
  • Steering
  • Body
  • Repair and care
  • Electrical equipment
  • Equipment and devices
  • Electrical circuits
OpelBook.ru © 2017–2026 · Mobile version · · Sitemap: EN BG BY UA RS HR RO PL SK HU · Feedback · Site search
Astra F, petrol · Astra G, petrol · Astra G · Astra H · Astra J, petrol · Corsa B · Corsa C, petrol · Corsa C · Insignia A · Kadett D · Kadett E · Omega A · Omega B · Omega B2 · Vectra A, petrol · Vectra A · Vectra B, petrol · Vectra B · Vectra C · Zafira A, petrol · Frontera A, petrol · Frontera B · Ascona C · Vivaro A ·
We want your visit to be comfortable 🤝! We use cookies 🍪 to make that happen.