
General information
1. The operations for removing and installing a multi-ribbed drive belt are in most cases similar for all engines, the differences are determined only by the layout options for the tension rollers and related features.
Note: A description of the operation to remove the tensioner/roller is given in Section 8.
2. The multi-ribbed belt is designed to drive auxiliary units such as generator, water pump and air conditioner pump assembly. Depending on the engine model and configuration, the number of drive units may be different, and accordingly the length of the belts will be different - be careful when buying a new belt for your car. Before removing the belt, it is recommended to draw a diagram of its tension.
3. If the belt is to be reused, mark with a marker before removing it from the pulleys (in the form of an arrow) to determine the direction of rotation of the multi-ribbed belt during subsequent installation.
Note: The belt rotates clockwise when looking at the engine from the belt drive side.
If a previously used belt is installed without observing the direction of rotation, it will be subject to increased wear and will quickly fail.
Engines Z10XE/Z10XEP/Z12XE/Z14XEP
1. Disconnect the wire from the negative terminal of the battery (see chapter 5), remove the air cleaner (see chapter 4) and the right front wheel.
2. Remove the multi-ribbed belt cover, on Corsa-Eco models, in addition, it is necessary to remove the engine crankcase protection (see Section 5).
3. Remove the right engine mount (see Section 5).
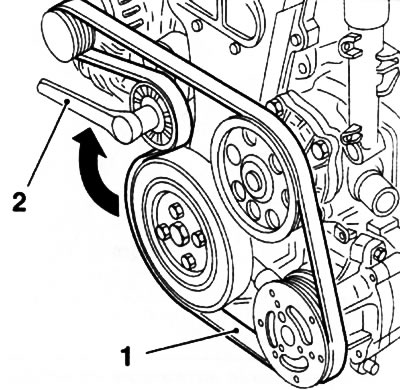
4. To loosen the multi-rib belt, use the central bolt of the idler pulley (see resist. illustration), for which, using a special key KM-6131, press the roller in the direction of the arrow and fix it with the locking rod KM-6130. Then remove the belt.

7.4. Loosening the tension of the multi-ribbed belt (on the example of the Z10XEP engine with A/C)
5. Install the multi-ribbed belt over the drive pulleys. Using a wrench, slightly press the tension roller in the direction of the arrow (see illustration 7.4) and remove the lock rod. Then slowly turn the key clockwise - the multirib belt will tighten.
6. Install all removed components and lower the vehicle onto its wheels.
Engines Z13DT/Z14XE/Z16XE/Z16SE/Z17DT/Z17DTL/Z17DTH/Z18XE
Note: On these engines, removal of the right engine mount, air cleaner and front wheel is not required.
7. On the Z18XE engine, first unscrew the 3 screws and remove the water guide sleeve, and then the multi-ribbed belt cover (see resist. illustration).
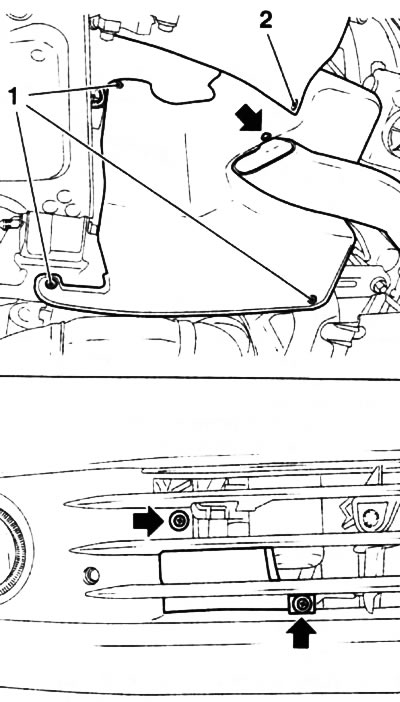
7.7. Mounting bolts (1) rivet (2) multirib belt covers and screws (indicated by arrows) fastening of the air guide sleeve on the Z18XE engine
8. On Z14XE/Z16XE/Z16SE/Z18XE/Z17DT/Z17DTL/Z17DTH engines, the idler roller center bolt is used to loosen the multirib belt (see resist. illustration), for which using a conventional wrench (15 mm) or the KM-913-A key, press the roller in the direction of the arrow and fix it with the KM-6130 locking rod. Then remove the belt.
7.8. Having pressed the tension roller with the key KM-913-A (2), fix the tensioner with a special tool KM-6130 (1) (on the example of the Z18XE engine)
Note: On some modifications of the engine with a working volume of 1.7 l, the fixation of the roller is not provided. After removing the belt, slowly release the roller tension and remove the key from the tensioner.
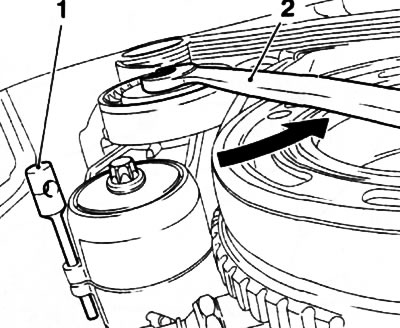
9. Removing the multirib belt on Z13DT engines is done in a similar manner, but a different special key is used to loosen (see illustration 7.9a). The method of fixing the roller using the KM-6130 rod is shown in illustration 7.9b.
7.9a. Loosening the tension of the multi-ribbed belt (1) diesel engine Z13DT: 2. Special key | 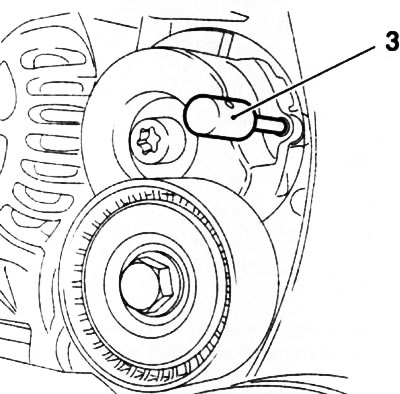
7.9b. Fixation of the tension roller of the multirib belt with the locking rod KM-6130 (3) on Z13DT engine |
10. See paragraphs 5 and 6 for how to install the multi-ribbed belt (see above).
Visitor comments