
OpelBook.ru
Cars AvtoVAZ Cars Mitsubishi Cars BMW Cars Mercedes Cars Nissan Cars Toyota Cars Chevrolet
English Русский
Български
Беларускі
Український
Српски
Hrvatski
Română
Polski
Slovenský
Magyar
 |  Sitemap  |  Contacts  |    


Main Astra Corsa Insignia Kadett Omega Vectra Zafira Others Articles
Corsa B (1993-2000) Corsa C (2000-2006, petrol) Corsa C (2000-2006)
  • Main
  • Corsa
  • Corsa C
  • Power unit
  • Engine repair
  • Removal and installation the multi-rib belt cover and engine crankcase protection

Removal and installation the multi-rib belt cover and engine crankcase protection (Opel Corsa C)

            0

1. This Section contains some preparatory operations that are required to be performed when performing various maintenance and engine repairs. As a rule, they are common to all engines described in this Manual. When first reading the book, you can skip the materials in this Section - refer to them only when you find the appropriate reference in other sections and chapters.

2. When performing many operations, it is necessary to remove the multi-rib belt cover to gain access to the relevant units (with appropriate equipment), and on Corsa-Eco models, engine crankcase protection.

3. First, you need to jack up and place the car on stands or lift it on a lift.

4. To remove the multi-rib belt cover, you need to unscrew 3 bolts and remove one expansion rivet (see accompanying illustration).
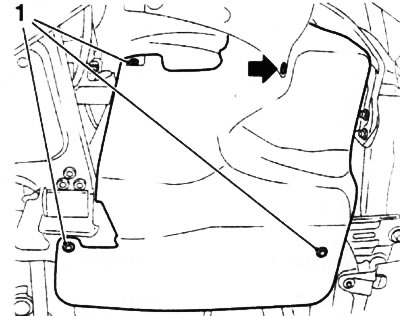
5.4. Fastening bolts (1) and expansion rivet (indicated by the arrow) multi-rib belt covers

5.4. Fastening bolts (1) and expansion rivet (indicated by the arrow) multi-rib belt covers


Note: In some cases it may be necessary to remove the right front wheel.


5. On Corsa-Eco models, the crankcase guard is secured with six bolts (see accompanying illustration). In addition, the guard is equipped with a service cover designed to provide access to the drain plug on the crankcase for draining engine oil - if necessary, unscrew the 4 mounting bolts and remove the cover.
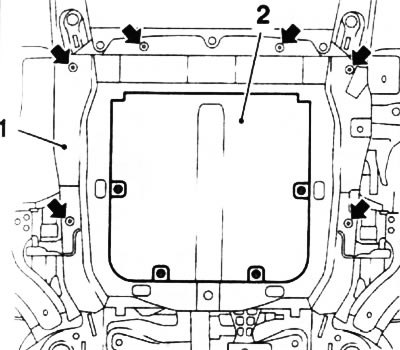


5.5. Mounting bolts (indicated by arrows) protection (1) of the engine crankcase: 2. Service cover

5.5. Mounting bolts (indicated by arrows) protection (1) of the engine crankcase: 2. Service cover


6. Installation is carried out in reverse order.


This article is available at russian, bulgarian, belarusian, ukrainian, serbian, croatian, romanian, polish, slovak, hungarian
Checking the article: Kornev Georgy

Share information:

Previous articles
Opel Corsa C: Engine repair
Next articles

Engine condition diagnostics using a vacuum gauge
Checking the compression pressure in the cylinders
Engine cover
List of works performed without removing the engine from the car
General information about engines
Specifications for engine repair
Removal the right engine mount
Removal and installation the crankshaft pulley
Removal and installation camshaft sprockets/wheels
Bringing the piston of the first cylinder to the top dead center (TDC) position
Removal and installation the accessory drive belt
Removal and installation the timing belt/chain


See similar ones from other Opel car manuals:
▶ Removal and installation mudguards and engine crankcase… Opel Astra J (2009-2015, petrol)
▶ Installing engine crankcase protection Opel Zafira A (1999-2005, petrol)
▶ Replacing the camshaft drive belt of a 16-valve engine Opel Kadett E (1984-1995)
▶ Toothed drive belt — replacement with engine in a car Opel Omega A (1986-1993)
▶ Timing Belt Cover Opening, 1.4L and 1.6L Models — General… Opel Vectra A (1988-1995, petrol)
Link to this page in different formats

Visitor comments


No comments yet


How much will 28 + 17 =


Corsa C (2000-2006) 
  • General information
  • Introduction to guide
  • Troubleshooting
  • Vehicle device
  • User manual
  • Maintenance
  • Power unit
  • Engine repair
  • Cooling system
  • Power and exhaust system
  • Control system
  • Engine electrical equipment
  • Transmission
  • Clutch
  • Mechanical gearbox
  • Automatic gearbox
  • Drive shafts
  • Chassis
  • Brake system
  • Wheel suspension
  • Steering
  • Body
  • Exterior
  • Interior
  • Doors and windows
  • Heating and air conditioning
  • Electrical equipment
  • Equipment and devices
  • Lamps and lighting
  • Electrical circuits
Corsa C (2000-2006, petrol) 
  • User manual
  • Car access
  • Governing bodies
  • Seat control
  • Heating and air conditioning
  • Driving and maintenance
  • Engines 1.0 and 1.2 l
  • Engine repair
  • Cooling and lubrication system
  • Injection system
  • Engines 1.4, 1.6 and 1.8 l
  • Engine repair
  • Cooling and lubrication system
  • Injection system
  • Transmission
  • Clutch
  • Mechanical gearbox
  • Automatic gearbox
  • Drive shafts
  • Chassis
  • Wheels and tires
  • Wheel suspension
  • Steering
  • Brake system
  • Body
  • Exterior
  • Doors and windows
  • Electrical equipment
  • Equipment and devices
  • Lighting system
  • Electrical circuits
Corsa B (1993-2000) 
  • General information
  • Introduction to guide
  • User manual
  • Maintenance
  • Power unit
  • SOHC gasoline engines
  • DOHC gasoline engines
  • Diesel engines
  • Engine repair
  • Cooling system
  • Supply system
  • Injection system (gasoline)
  • Injection system (diesel)
  • Exhaust systems
  • Control system (gasoline)
  • Preheat system (diesel)
  • Charge and launch system
  • Transmission
  • Mechanical gearbox
  • Automatic gearbox
  • Clutch and drive shafts
  • Chassis
  • Brake system
  • Front suspension
  • Rear suspension
  • Steering
  • Body
  • Ventilation and heating
  • Exterior
  • Interior
  • Doors and windows
  • Electrical equipment
  • Equipment and devices
  • Lamps and lighting
  • Electrical circuits
OpelBook.ru © 2017–2026 · Mobile version · · Sitemap: EN BG BY UA RS HR RO PL SK HU · Feedback · Site search
Astra F, petrol · Astra G, petrol · Astra G · Astra H · Astra J, petrol · Corsa B · Corsa C, petrol · Corsa C · Insignia A · Kadett D · Kadett E · Omega A · Omega B · Omega B2 · Vectra A, petrol · Vectra A · Vectra B, petrol · Vectra B · Vectra C · Zafira A, petrol · Frontera A, petrol · Frontera B · Ascona C · Vivaro A ·
We want your visit to be comfortable 🤝! We use cookies 🍪 to make that happen.