
2. When performing the check, do not allow debris to enter the cylinders. Start work by cleaning candle niches and adjacent surfaces (if equipped, remove the engine cover), then blow them out with compressed air.
Note: An ordinary bicycle pump is fine as a source of compressed air.
3. Warm up the engine to normal operating temperature (not less than 80°С), - the battery must be fully charged. An assistant will be required to complete the work.
4. On a gasoline engine, remove the ignition module and spark plugs (see Chapters 1 and 5).
Attention: Works are carried out on a hot engine - do not touch the hot parts of the engine with your hands, use special handles/bolts to remove the module!
On diesel engines, disconnect the lead wire from the glow plugs and remove the glow plugs (see chapter 5).
5. Using the OBD connector (see chapter 5) and device TECH - 2 (program «Compression test») open the engine throttle. On models not equipped with these connectors (earlier release years), relieve pressure in the supply system (see chapter 4) and de-energize it by removing it from the fuel pump relay mounting block installed in the luggage compartment (see chapter 12) and lock the throttle in the fully open position or have an assistant depress the gas pedal.
6. Install the compression gauge in the spark plug hole of the first cylinder (see resist. illustrations), using the appropriate adapter for this engine. Note: When installing the compression gauge, do not forget to check the presence of a sealing rubber gasket on the adapter. On the measuring device of the compression gauge, it is necessary to set the appropriate discharge for measurements - for gasoline engines 1750 kPa (17.5 bar). Diesel engines have a much higher compression ratio than gasoline engines, so a special compression gauge with a measurement range of 10 to 40 bar is required to check the pressure.
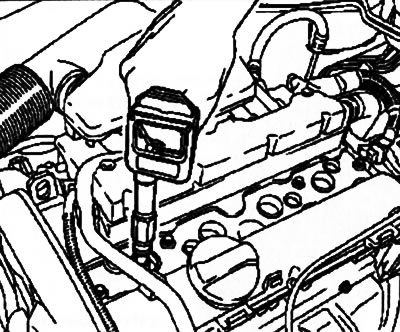
3.6a. Checking the compression pressure in the first cylinder of a gasoline engine (on the example of an engine Z14XE) | 
3.6b. Diesel Engine Compression Pressure Test (on the example of the Z17DTH engine) |
7. Crank the engine with the starter for about four seconds (use the help of an assistant) at the same time, the engine crankshaft rotation speed must be at least 300 rpm for gasoline and at least 150 rpm for diesel engines. Read and record the meter reading. Repeat the operation for the remaining cylinders. Compare readings with normative (see specs) - the pressure in any of the cylinders should not be less than 75% of the standard, while the pressure difference in different cylinders should not exceed 100 kPa (1 bar).
8. Equally low measurement results in all cylinders, as a rule, indicate wear of the compression rings in all cylinders and the need to replace them. An excessive drop in pressure in one or more cylinders indicates the occurrence of local problems. When low compression pressure is detected in the engine cylinders, a more thorough check is performed to accurately determine the cause that caused it - for example, a leak test (see below). Such a check is carried out, as a rule, in the conditions of a car service workshop.
9. There are several practical ways to more accurately determine the cause of a malfunction. For example, if you add 2-3 teaspoons of engine oil to a cylinder that has an excessively low pressure, an increase in pressure on re-measurement indicates worn piston rings. If the compression does not increase, the cause of the decrease is valve leaks or a leaking head gasket.
10. If the compression pressure is equally low in two adjacent cylinders, then with a high degree of probability we can talk about a violation of the integrity of the head gasket within its jumper between these cylinders. The presence of coolant in the engine oil will confirm this assumption.
11. At the end of the test, disconnect the compression tester and reinstall the removed components.
Checking the unit for leaks
12. During this test, the speed of exit from the cylinders of the compressed air pumped into them and the places of leaks are determined. This test is an alternative to the compression test. Moreover, from many points of view, it is much more effective, since it is easier to visually identify the source of the leak, but it requires a little more preparatory work and the use of a special device for measuring leaks, the handling of which requires certain skills, in addition, for the convenience of visual inspection, it is preferable use a special lift.
13. The equipment required to test for leaks is not publicly available, so it is recommended to entrust this test to the specialists of the service center. When performing work yourself, strictly follow the operating instructions supplied with the measuring instruments.
Visitor comments