
OpelBook.ru
Cars AvtoVAZ Cars Mitsubishi Cars BMW Cars Mercedes Cars Nissan Cars Toyota Cars Chevrolet
English Русский
Български
Беларускі
Український
Српски
Hrvatski
Română
Polski
Slovenský
Magyar
 |  Sitemap  |  Contacts  |    


Main Astra Corsa Insignia Kadett Omega Vectra Zafira Others Articles
Astra F (1991-1998, petrol) Astra G (1998-2004, petrol) Astra G (1998-2004) Astra H (2004-2009) Astra J (2009-2015, petrol)
  • Main
  • Astra
  • Astra H
  • Power unit
  • Engine repair
  • Removal and installation a multi-ribbed accessory drive belt

Removal and installation a multi-ribbed accessory drive belt (Opel Astra H)

            0

Contents: General information ⬇ Z16XEP Engine ⬇ Z18XE Engine ⬇ Engines Z20LE(L/R/H) ⬇ Engine Z22YH ⬇ Z14XEP Engine ⬇ Z13DTH Engine ⬇ Engine Z17DT ⬇ Z19DT(H) Engines ⬇

General information


1. The operations for removing and installing the multi-ribbed drive belt are in most cases similar for all engines, the differences are determined only by the variants of the tension roller arrangement and the related features. If the belt replacement procedure is not fully described in the descriptions below, you should focus on performing the operations for the Z16XEP gasoline engine.

2. The multi-rib belt is designed to drive auxiliary units such as the generator, water pump and air conditioning pump unit. Depending on the engine model and configuration, the number of drive units may vary, and accordingly the belt length will be different - be careful when buying a new belt for your car. Before removing the belt, it is recommended to draw a diagram of its tension.

3. If the belt is to be reused, mark it with a marker before removing it from the pulleys (in the form of an arrow) to determine the direction of rotation of the multi-rib belt during subsequent installation.

Note: The belt rotates clockwise when viewed from the belt drive side of the engine.


If a previously used belt is installed without observing the direction of rotation, it will be subject to increased wear and tear and will quickly fail.

Z16XEP Engine


Removal

4. Remove the air cleaner (see Section 4).


5. Apply a mark to determine the direction of rotation of the belt during installation.

6. Using a key (see accompanying illustration) by turning it in the direction indicated by the arrow, press the tension roller and fix it with a special rod, then remove the belt.
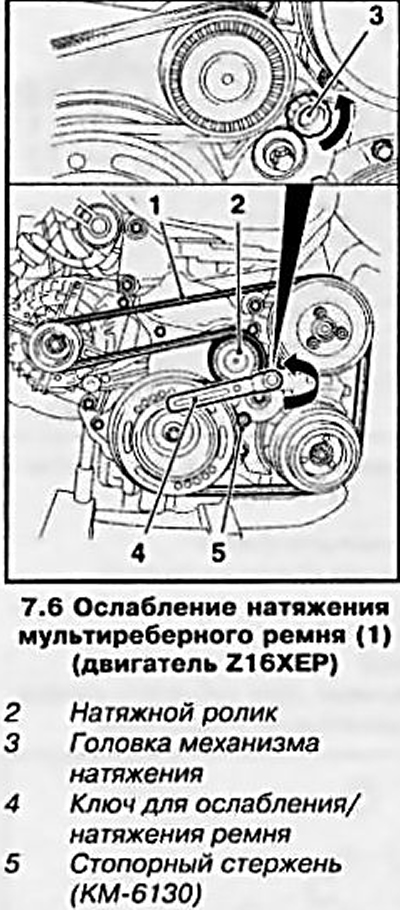
6. Using a key (see accompanying illustration) by turning it in the direction indicated by the…


Installation

7. Place the multi-ribbed belt on the drive pulleys.

8. Using the key, slightly push the tension roller in the direction of the arrow and remove the locking rod. Then slowly turn the key clockwise - the multi-rib belt will be tensioned.

9. Install the air cleaner.

Z18XE Engine


10. Before removing the air cleaner (see Chapter 4) it is necessary to remove the engine cover (see Section 2).

11. To loosen the multi-rib belt, use the center bolt of the tension roller (see accompanying illustration), for which, using a regular wrench (15 mm), press it in the direction of the arrow.
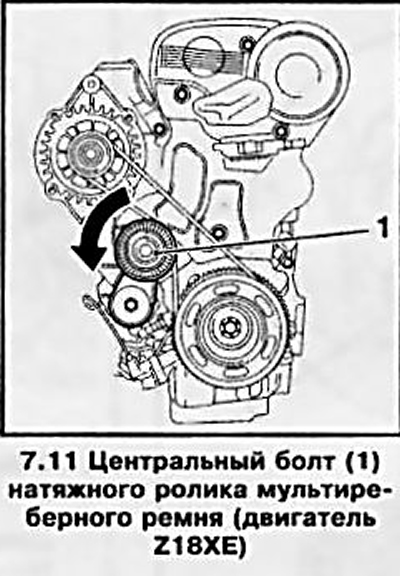
11. To loosen the multi-rib belt, use the center bolt of the tension roller (see accompanying…


Engines Z20LE(L/R/H)


12. The procedure for loosening the multi-rib belt is shown in the accompanying illustration (the key must be pressed in the direction of the arrow).
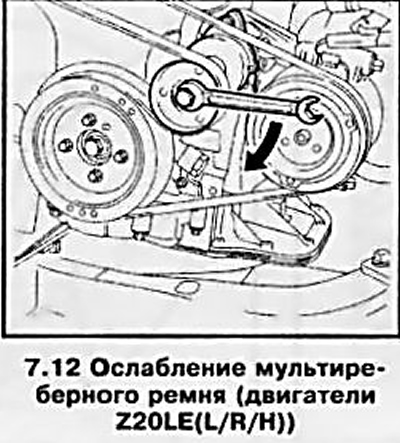
12. The procedure for loosening the multi-rib belt is shown in the accompanying illustration (the…


Engine Z22YH


13. The multi-rib belt on these models is removed from below, first remove the right engine boot (see Section 5).

14. Turn the tensioner (see accompanying illustration) by the bolt in the direction of the arrow and loosen the multi-rib belt.
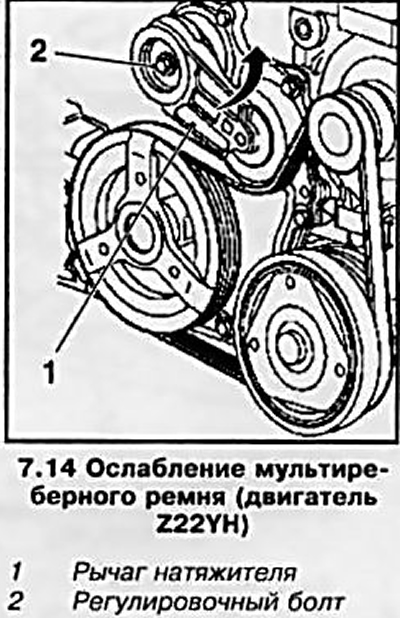
14. Turn the tensioner (see accompanying illustration) by the bolt in the direction of the arrow…


15. After installing the multi-rib belt, check the position of the tensioner lever (see accompanying illustration) — when the belt is tensioned, the control mark on the lever should be between the marks limiting the position of the lever.
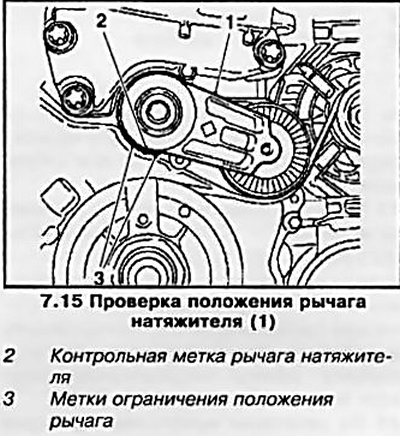
15. After installing the multi-rib belt, check the position of the tensioner lever (see…


16. Replace the boot and lower the vehicle onto its wheels.


Z14XEP Engine


17. A special feature of this engine is that to replace the multi-rib belt, it is necessary to remove the right engine support, for which you must first remove the right engine boot and install a special device (see Section 5).

18. After installing the device, lower the car, open the hood and remove the air cleaner (see Chapter 4).

19. Unscrew the bolts securing the right support (see accompanying illustration) and dismantle it.
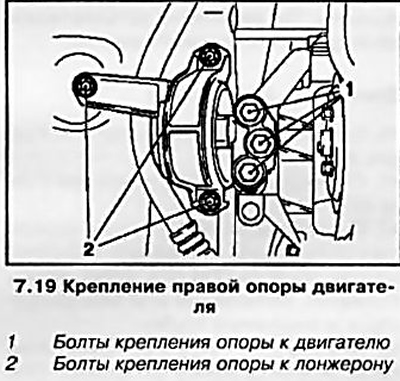
19. Unscrew the bolts securing the right support (see accompanying illustration) and dismantle it.


20. Using the special device KM-6131, press the tension roller in the direction indicated by the long arrow (see accompanying illustration), and fix it in this position. Remove the multi-rib belt.
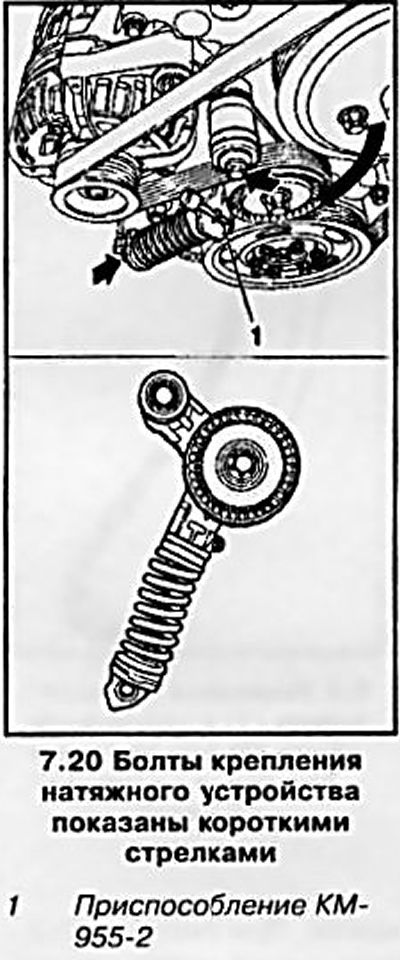
20. Using the special device KM-6131, press the tension roller in the direction indicated by the…


21. If it is necessary to replace/remove the tension roller, disconnect the right support mounting bracket from the engine block (see accompanying illustration), for which unscrew the 3 mounting bolts. Then press the tension roller again, remove the locking device KM-9S5-2 and release the roller. Unscrew the tensioner mounting bolts (see illustration 7.20) and remove it from the engine.
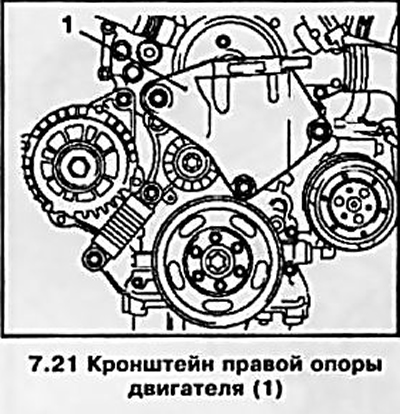


21. If it is necessary to replace/remove the tension roller, disconnect the right support mounting…


22. Installation of all removed components is carried out in the reverse order of removal.

Z13DTH Engine


23. The multi-rib belt on these models is removed from below. It is necessary to first remove the right engine boot (see Section 5).

24. Loosen the multi-rib belt by turning the tensioner with a special key (see accompanying illustration 7.24a) in the direction of the arrow and lock the tensioner in this position with the locking rod (see accompanying illustration 7.24b).
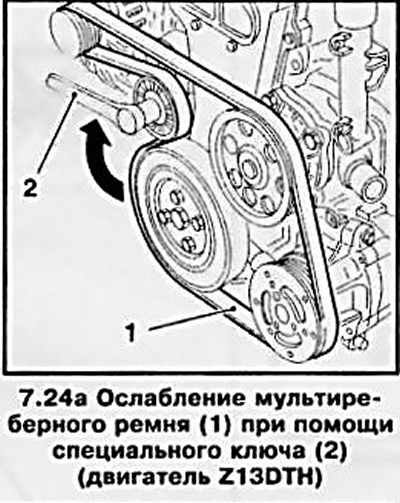
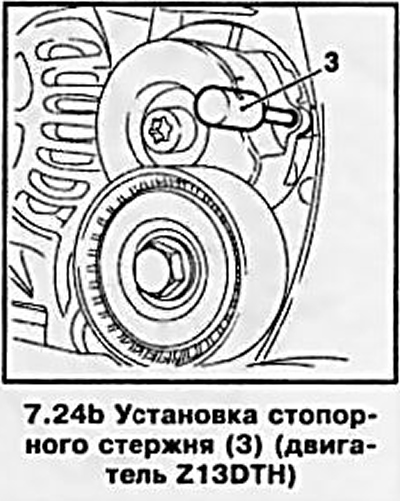
24. Loosen the multi-rib belt by turning the tensioner with a special key (see accompanying…


24. Loosen the multi-rib belt by turning the tensioner with a special key (see accompanying…


Note: At service stations, the KM-6130 device is used for this purpose.


Remove the belt.

Engine Z17DT


25. Loosen the multi-rib belt by turning the tensioner with a key on the central bolt of the tension roller (see accompanying illustration) in the direction of the arrow, and fix the tensioner in this position with the locking rod, then remove the belt.
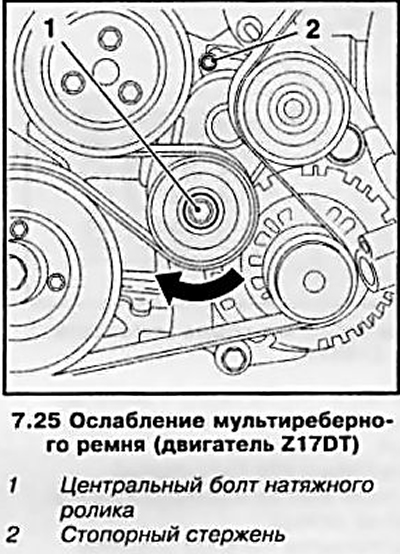
25. Loosen the multi-rib belt by turning the tensioner with a key on the central bolt of the…


Z19DT(H) Engines


26. First remove the engine crankcase guard (see Section 5).

27. Loosen the multi-rib belt by turning the tensioner with a special key (see accompanying illustration 7.27a) in the direction of the arrow and lock the tensioner in this position with the locking rod (see accompanying illustration 7.27b), then remove the belt.
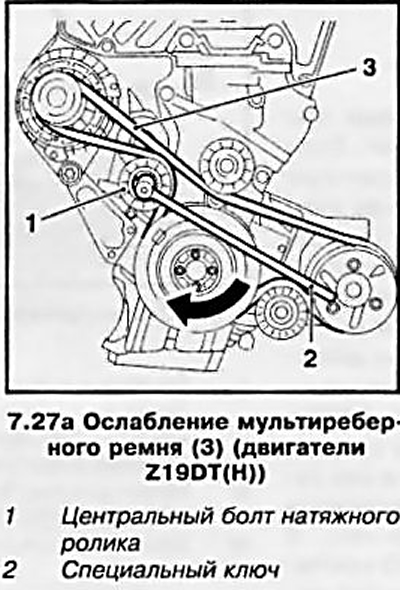
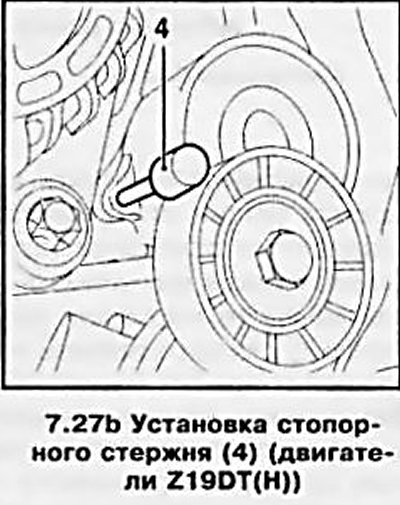
27. Loosen the multi-rib belt by turning the tensioner with a special key (see accompanying…

27. Loosen the multi-rib belt by turning the tensioner with a special key (see accompanying…


This article is available at russian, bulgarian, belarusian, ukrainian, serbian, croatian, romanian, polish, slovak, hungarian
Checking the article: Simonov Timofey

Share information:

Previous articles
Opel Astra H: Engine repair
Next articles

Bringing the piston of the first cylinder to the top dead center (TDC) position at the end of the compression stroke
Some preparatory operations
Engine condition diagnostics using a vacuum gauge
Checking the compression pressure in the cylinders
Engine cover
General information
Removal and installation the timing belt/chain (adjusting the valve timing)
Checking and adjusting the timing valves
Removal and installation of camshafts and valve lifters, checking the condition of components
Removal and installation the cylinder head
Removal and installation the oil pan
Removal and installation the oil pump


See similar ones from other Opel car manuals:
▶ Removal and installation a multi-ribbed accessory drive belt Opel Vectra C (2002-2008)
▶ Checking the condition and replacing the multi-rib drive… Opel Corsa C (2000-2006)
▶ Checking the tension of the accessory drive belt Opel Insignia A (2008-2017)
▶ V-ribbed auxiliary drive belt — removal and installation Opel Omega B2 (1999-2003)
▶ Accessory Drive Belt — Checking Condition and Replacing Opel Zafira A (1999-2005, petrol)
Link to this page in different formats

Visitor comments


No comments yet


How much will 15 + 26 =


Astra J (2009-2015, petrol) 
  • General information
  • Vehicle device
  • User manual
  • Faults en route
  • Maintenance
  • Power unit
  • Engine repair
  • Cooling and lubrication system
  • Engine power system
  • Exhaust system
  • Transmission
  • Clutch
  • Car gearbox
  • Drive shafts
  • Chassis
  • Front suspension
  • Rear suspension
  • Steering
  • Brake system
  • Wheels and tires
  • Body
  • Exterior
  • Interior
  • Doors and windows
  • Body Care
  • Heating and air conditioning
  • Security systems
  • Electrical equipment
  • Equipment and devices
  • Lighting and signaling
  • Power devices
  • Electrical circuits
Astra H (2004-2009) 
  • General information
  • Introduction to the guide
  • Troubleshooting
  • User manual
  • Maintenance
  • Power unit
  • Engine repair
  • Cooling and heating
  • Power and exhaust system
  • Ignition system
  • Launch and charge system
  • Transmission
  • Mechanical gearbox
  • Automatic gearbox
  • Drive shafts
  • Chassis
  • Brake system
  • Car suspension
  • Steering
  • Body
  • Interior
  • Exterior
  • Electrical equipment
  • Equipment and devices
  • Electrical circuits
Astra G (1998-2004) 
  • General information
  • Introduction to manual
  • User manual
  • Maintenance
  • Power unit
  • SOHC gasoline engines
  • DOHC gasoline engines
  • Diesel engines 1.7 and 2.0
  • Engine repair
  • Cooling system
  • Supply system
  • Injection system (gasoline)
  • Injection system (diesel)
  • Exhaust system
  • Charge and launch system
  • Ignition system (gasoline)
  • Preheat system (diesel)
  • Transmission
  • Manual gearbox
  • Automatic gearbox
  • Clutch
  • Drive shafts
  • Chassis
  • Brake system
  • Wheel suspension
  • Steering
  • Body
  • Exterior
  • Interior
  • Doors and windows
  • Ventilation and heating
  • Electrical equipment
  • Equipment and devices
  • Electrical circuits
Astra G (1998-2004, petrol) 
  • General information
  • User manual
  • Car care
  • Maintenance
  • Power unit
  • Single shaft engines
  • Twin shaft engines
  • Engine repair
  • Cooling and heating
  • Fuel and exhaust systems
  • Starting and charging system
  • Ignition system
  • Transmission
  • Clutch
  • Mechanical gearbox
  • Automatic gearbox
  • Drive shafts
  • Chassis
  • Brake system
  • Car suspension
  • Steering
  • Body
  • Interior
  • Exterior
  • Electrical equipment
  • Equipment and devices
  • Wiring diagrams Opel Astra
  • Wiring diagrams Opel Zafira
Astra F (1991-1998, petrol) 
  • General information
  • Maintenance
  • Power unit
  • Engine in car
  • Engine removed
  • Cooling system
  • Heating and ventilation
  • Fuel supply (carburetor)
  • Fuel supply (injector)
  • Emission control
  • Ignition system
  • Transmission
  • Clutch
  • Mechanical gearbox
  • Automatic gearbox
  • Drive shafts
  • Chassis
  • Brake system
  • Car suspension
  • Steering
  • Body
  • Exterior
  • Interior
  • Electrical equipment
  • Equipment and devices
  • Electrical circuits
OpelBook.ru © 2017–2026 · Mobile version · · Sitemap: EN BG BY UA RS HR RO PL SK HU · Feedback · Site search
Astra F, petrol · Astra G, petrol · Astra G · Astra H · Astra J, petrol · Corsa B · Corsa C, petrol · Corsa C · Insignia A · Kadett D · Kadett E · Omega A · Omega B · Omega B2 · Vectra A, petrol · Vectra A · Vectra B, petrol · Vectra B · Vectra C · Zafira A, petrol · Frontera A, petrol · Frontera B · Ascona C · Vivaro A ·
We want your visit to be comfortable 🤝! We use cookies 🍪 to make that happen.