
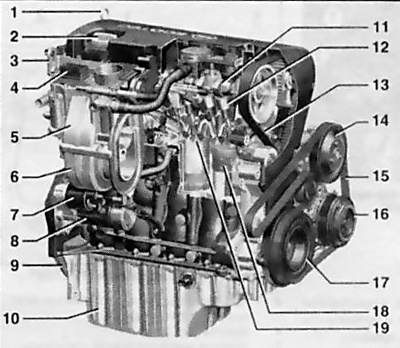
1.1a Petrol engine 1.6 l (77kw/105 hp)
1 Engine oil level gauge
2 Oil filler cap
3 lifting eye
4 Electronic module of the engine management system (ECM)
5 Upper part of the intake pipe
6 Lower part of the intake pipe
7 Starter pull relay
8 Starter
9 Flywheel
10 Oil pan
11 Inlet camshaft
12 Valve lifter
13 Toothed belt
14 Water pump pulley
15 Multi-rib accessory drive belt
16 A/C compressor pulley
17 Crankshaft pulley
18 Piston
19 intake valve
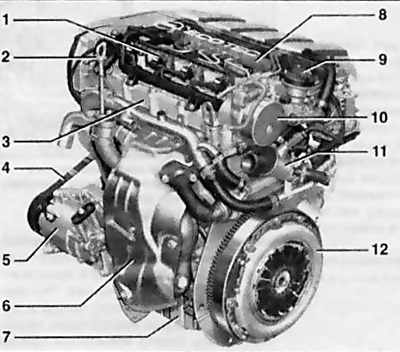
1.1b Diesel engine 1.9 l (110 kW/150 hp)
1 Nozzle
2 Engine oil level gauge
3 Cylinder head
4 Multirib belt
5 A/C system compressor
6 Exhaust manifold protection
7 Oil pan
8 Return line
9 Oil filler cap
10 Vacuum pump
11 Thermostat housing
12 Clutch basket
2. Opel continues to improve engine design. The new models provide for the installation of 4-cylinder in-line. 16-valve engines equipped with two overhead camshafts (DOHC), with improved mixture formation and increased cycle efficiency. The only exception is the Z19DT/J diesel engine. which has one camshaft and 2 valves per cylinder. The engine is mounted transversely in front of the vehicle. The drive is carried out on the front wheels by means of a transmission assembly fixed to the left of the engine.
3. Due to the limited space and stinginess of information sources, only modifications of engines of an earlier (2004) release and the most widely represented on the Russian market. For the rest of the engines, only some of their most important features are offered to the attention of readers.
4. To check the technical condition of the engine, carry out work on diagnosing systems and mechanisms of the engine, its maintenance and repair, a fairly large range of special devices and devices with a set of adapters is required, and a certain experience in working with such a tool is also required, therefore the compilers of this Guide strongly recommend contact for maintenance and repair at specialized service stations of official representatives of Opel. In addition, the format of this publication does not allow to fully describe in detail all the disassembly / assembly operations of the engines installed on the models described in this Manual. Therefore, the following sections provide a list and procedure for performing only the main, most often performed during maintenance and current repairs, operations. Some operations are quite simple and are constantly repeated during the execution of work - in some cases, their description is omitted.
Note: Due to the constant modification of the vehicle structure, in the so-called. and engines, some deviations from the procedures described below are possible. In this case, elementary ingenuity is required to dismantle / install parts or assemblies - carefully inspect them and determine which additional elements must first be disconnected or what prevents their dismantling. It is unlikely that the new options will be fundamentally different from those described.
The list of repair work performed without removing the engine from the car (Maintenance and current repairs)
5. The following repairs listed below can be carried out without removing the engine from the vehicle:
- a) Compression check;
- b) Removal and installation of the cover of the gas distribution mechanism;
- c) Removal and installation of the timing cover;
- d) Removal and installation of timing drive components (belt/chain, cogwheels/sprockets);
- e) Removal and installation of camshafts and pushers;
- f) Valve clearance adjustment (diesel engines 1.7 l DOHC and 1.9n SOHC, gasoline - 1.6 l)
- g) Removal and installation of the cylinder head;
- h) Removal and installation of the oil pan;
- i) Removal, refurbishment and installation of the oil pump;
- j) Removal and installation of the oil cooler (with appropriate equipment);
- k) Replacement of crankshaft and camshaft seals;
- l) Checking the condition and replacing the suspension mounts of the power unit;
- m) Removal, condition check and installation of a flywheel/drive disk.
6. Before starting work, thoroughly clean the engine compartment and exterior surfaces of the power unit using one of a wide range of special solvents. This treatment will prevent dirt from getting inside the engine.
7. If necessary, depending on the nature of the work ahead, the hood can be removed in order to provide freedom of access to the components to be serviced (see chapter 11) - in order to avoid accidental damage to the paintwork, cover the fenders of the car with special covers, or just old blankets.
Visitor comments