OpelBook.ru
Cars AvtoVAZ Cars Mitsubishi Cars BMW Cars Mercedes Cars Nissan Cars Toyota Cars Chevrolet
English Русский
Български
Беларускі
Український
Српски
Hrvatski
Română
Polski
Slovenský
Magyar
 |  Sitemap  |  Contacts  |    


Main Astra Corsa Insignia Kadett Omega Vectra Zafira Others Articles
Astra F (1991-1998, petrol) Astra G (1998-2004, petrol) Astra G (1998-2004) Astra H (2004-2009) Astra J (2009-2015, petrol)
  • Main
  • Astra
  • Astra H
  • Body
  • Exterior
  • Removal, installation and adjustment of the hood

Removal, installation and adjustment of the hood (Opel Astra H)

            0

Contents: Removal ⬇ Installation ⬇ Adjusting the bonnet gaps ⬇

Removal


1. Open the hood and disconnect the gas-filled telescopic strut from it by slightly lifting the locking bracket with a screwdriver and removing the strut from the upper spherical support.

2. For subsequent installation, use a marker to mark the position of the hinges on the hood.

3. Remove 4 mounting bolts (2 on each side), then with the help of an assistant, remove the hood and set it aside.

Installation


4. With the help of an assistant, install the hood, aligning the hinge strips with the marks made during dismantling, then tighten the mounting bolts by hand.

5. Close the hood and align it in the body opening (see Specifications).

6. After completing the adjustment, tighten the bolts and secure the upper end of the gas-filled strut to the hood.

Adjusting the bonnet gaps


7. Loosen the hood mounting bolts (if it has not been removed before).

8. Close the hood and make sure that the gaps between it and the right and left wings are the same, make the appropriate adjustments if necessary, then tighten the hood mounting bolts to the required force.

9. Adjust the height of the front edge of the hood by rotating the two damper stops installed on the hood lock holder bar. The front edge of the hood should rise above the surface of the wings by no more than 2 mm.

10. Install and adjust the hood latch (see below), then turn the rubber stop 1 turn. The deviation of the closed hood from the position "flush with the surface of the wings" should be no more than 1 mm.


Installing the safety hook and hood latch

Note: When installing a new hood, the hook and spindle must be reinstalled from the old one or purchased separately.


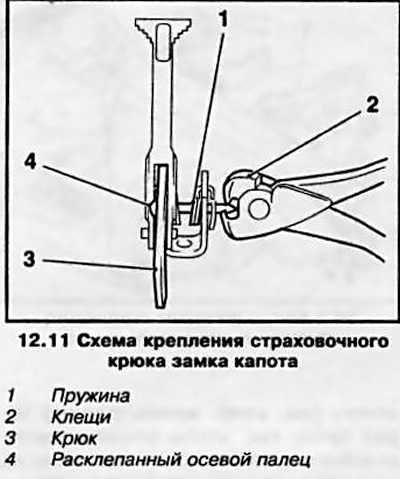
11. Install the safety hook with the spring and riveted axle pin on the hood, while making a notch on the end of the rivet with pliers and widening it (see accompanying illustration).

11. Install the safety hook with the spring and riveted axle pin on the hood, while making a notch…


12. Fasten the latch assembly to the hood (see accompanying illustration) and adjust the dimension "X", which should not exceed the range of 40 + 43 mm. The dimension "X" is measured from the surface of the hood to the edge of the washer. Then, holding the lock latch with a wrench, tighten the nut with a force of 22 Nm. Note: On Zafira models, the dimension "X" = 40 + 46 mm and is measured to the edge of the lock latch.
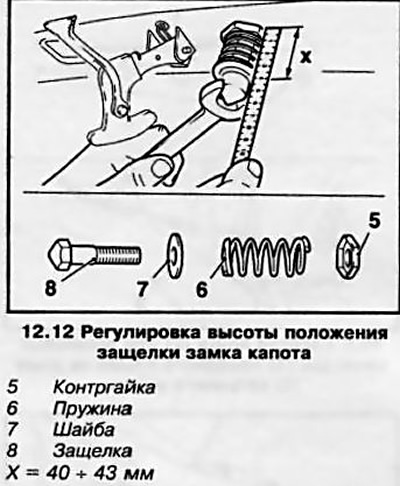
12. Fasten the latch assembly to the hood (see accompanying illustration) and adjust the dimension…


13. After completing the adjustment, lubricate the lock pin with universal grease.


This article is available at russian, bulgarian, belarusian, ukrainian, serbian, croatian, romanian, polish, slovak, hungarian
Checking the article: Simonov Timofey

Share information:

Previous articles
Opel Astra H: Exterior
Next articles

Removal and installation fixed glass of the A-pillar (Zafira models)
Removal and installation front fenders
Removal and installation the decorative radiator grille
Removal and installation the rear bumper/bumper trim
Removal and installation the front bumper/bumper trim
Removal and installation of wheel arch protection (lockers)
Removal and installation the hood latch release cable
Removal, installation and adjustment of the tailgate
Removal and installation the rear door trim
Removal and installation the tailgate lock
Removal, installation and adjustment of side doors
Removal and installation side door locks


See similar ones from other Opel car manuals:
▶ Removal, installation and adjustment of the hood Opel Corsa C (2000-2006)
▶ Hood lock — replacement and adjustment Opel Zafira A (1999-2005, petrol)
▶ Automatic dynamic headlight range adjustment Opel Insignia A (2008-2017)
▶ Engine hood Opel Kadett E (1984-1995)
▶ Valve clearances — checking and adjustment Opel Omega A (1986-1993)
Link to this page in different formats

Visitor comments


No comments yet


How much will 15 + 40 =


Astra J (2009-2015, petrol) 
  • General information
  • Vehicle device
  • User manual
  • Faults en route
  • Maintenance
  • Power unit
  • Engine repair
  • Cooling and lubrication system
  • Engine power system
  • Exhaust system
  • Transmission
  • Clutch
  • Car gearbox
  • Drive shafts
  • Chassis
  • Front suspension
  • Rear suspension
  • Steering
  • Brake system
  • Wheels and tires
  • Body
  • Exterior
  • Interior
  • Doors and windows
  • Body Care
  • Heating and air conditioning
  • Security systems
  • Electrical equipment
  • Equipment and devices
  • Lighting and signaling
  • Power devices
  • Electrical circuits
Astra H (2004-2009) 
  • General information
  • Introduction to the guide
  • Troubleshooting
  • User manual
  • Maintenance
  • Power unit
  • Engine repair
  • Cooling and heating
  • Power and exhaust system
  • Ignition system
  • Launch and charge system
  • Transmission
  • Mechanical gearbox
  • Automatic gearbox
  • Drive shafts
  • Chassis
  • Brake system
  • Car suspension
  • Steering
  • Body
  • Interior
  • Exterior
  • Electrical equipment
  • Equipment and devices
  • Electrical circuits
Astra G (1998-2004) 
  • General information
  • Introduction to manual
  • User manual
  • Maintenance
  • Power unit
  • SOHC gasoline engines
  • DOHC gasoline engines
  • Diesel engines 1.7 and 2.0
  • Engine repair
  • Cooling system
  • Supply system
  • Injection system (gasoline)
  • Injection system (diesel)
  • Exhaust system
  • Charge and launch system
  • Ignition system (gasoline)
  • Preheat system (diesel)
  • Transmission
  • Manual gearbox
  • Automatic gearbox
  • Clutch
  • Drive shafts
  • Chassis
  • Brake system
  • Wheel suspension
  • Steering
  • Body
  • Exterior
  • Interior
  • Doors and windows
  • Ventilation and heating
  • Electrical equipment
  • Equipment and devices
  • Electrical circuits
Astra G (1998-2004, petrol) 
  • General information
  • User manual
  • Car care
  • Maintenance
  • Power unit
  • Single shaft engines
  • Twin shaft engines
  • Engine repair
  • Cooling and heating
  • Fuel and exhaust systems
  • Starting and charging system
  • Ignition system
  • Transmission
  • Clutch
  • Mechanical gearbox
  • Automatic gearbox
  • Drive shafts
  • Chassis
  • Brake system
  • Car suspension
  • Steering
  • Body
  • Interior
  • Exterior
  • Electrical equipment
  • Equipment and devices
  • Wiring diagrams Opel Astra
  • Wiring diagrams Opel Zafira
Astra F (1991-1998, petrol) 
  • General information
  • Maintenance
  • Power unit
  • Engine in car
  • Engine removed
  • Cooling system
  • Heating and ventilation
  • Fuel supply (carburetor)
  • Fuel supply (injector)
  • Emission control
  • Ignition system
  • Transmission
  • Clutch
  • Mechanical gearbox
  • Automatic gearbox
  • Drive shafts
  • Chassis
  • Brake system
  • Car suspension
  • Steering
  • Body
  • Exterior
  • Interior
  • Electrical equipment
  • Equipment and devices
  • Electrical circuits
OpelBook.ru © 2017–2026 · Mobile version · · Sitemap: EN BG BY UA RS HR RO PL SK HU · Feedback · Site search
Astra F, petrol · Astra G, petrol · Astra G · Astra H · Astra J, petrol · Corsa B · Corsa C, petrol · Corsa C · Insignia A · Kadett D · Kadett E · Omega A · Omega B · Omega B2 · Vectra A, petrol · Vectra A · Vectra B, petrol · Vectra B · Vectra C · Zafira A, petrol · Frontera A, petrol · Frontera B · Ascona C · Vivaro A ·
We want your visit to be comfortable 🤝! We use cookies 🍪 to make that happen.