
Removal and installation
1. Disconnect the wire from the negative terminal of the battery (see chapter 5).
2. Open the tailgate and remove the luggage compartment shelf (with appropriate equipment).
3. Remove the upholstery of the tailgate at the window frame (see Section 15) and seal the edges of the tailgate with tape.
4. Disconnect the tailgate wiring connector and disconnect the rear window washer hose (see resist. illustration).

5. Pull out the wiring harness (see illustration 14.4) from the back door.
Note: To facilitate subsequent installation, attach a cord to the end of the wire, which, after pulling out the wires, will remain in the tailgate.
6. Slightly pry up the locking bracket with a small screwdriver (see resist. illustration) and disconnect alternately gas-filled stops from the upper spherical supports of the tailgate.

7. Remove the clips (see illustration 14.6) knock out the axial fingers of the hinges and, with the help of an assistant, remove the tailgate.
8. Installation is made in an order, the return to an order of removal. After installing the axial fingers of the door hinges, it is necessary to close the tailgate and adjust (see below)
Adjustment
9. Remove facing of a threshold of a door of a back (see respectively Section 43, 44, 45).
10. Turn out 2 bolts of fastening of a bracket of the lock on the bottom edge of a frame of a door of a back and remove bracket.
11. If necessary, remove the upholstery at the top of the rear pillars of the car (C or D - depending on the model), and on the Station wagon and Zafira models - a rear roof lining (see Section 44).
12. Gently pull down the headlining panel and loosen the door hinge screws.
Note: At the rear, the headlining is attached to the roof with «Velcro».
13. Close the tailgate and check the uniformity of the gap between adjacent body elements (see specs). The tailgate is adjusted correctly if there is an even gap around the entire perimeter in the closed position, and the tailgate is flush with the surrounding body surfaces.
14. If necessary, the gaps are adjusted by moving the tailgate in the appropriate direction.
15. To adjust the depth of the tailgate in the doorway, it is necessary to release the rubber dampers (see resist. illustration), by turning their locks 60 to 80°counterclockwise. Then install the dampers on both sides so that the tailgate in the closed position rests freely against them.
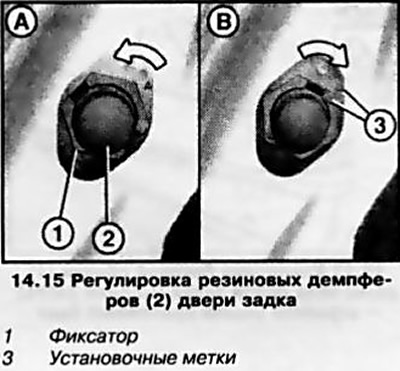
Note: To facilitate adjustment, apply a paste-like mass to the dampers - by the imprint on the mass, establish whether the door fits correctly.
16. At the end of the adjustment, return the latch to its original position - installation marks (see illustration 14.15) must match. Tighten the door hinge bolts to the required torque (see specs).
17. Reinstall the tailgate lock bracket and tighten the bolts of its fastening by hand. Carefully close the tailgate: the lock bracket will move to the desired position. Open the door and tighten the bracket mounting bolts to the required torque.
18. Close and open the tailgate several times and make sure that it is adjusted correctly and that the lock functions correctly, repeat the adjustment if necessary.
19. Establish an upholstery of a door of a back.
Visitor comments