
OpelBook.ru
Cars AvtoVAZ Cars Mitsubishi Cars BMW Cars Mercedes Cars Nissan Cars Toyota Cars Chevrolet
English Русский
Български
Беларускі
Український
Српски
Hrvatski
Română
Polski
Slovenský
Magyar
 |  Sitemap  |  Contacts  |    


Main Astra Corsa Insignia Kadett Omega Vectra Zafira Others Articles
Corsa B (1993-2000) Corsa C (2000-2006, petrol) Corsa C (2000-2006)
  • Main
  • Corsa
  • Corsa C
  • Body
  • Doors and windows
  • Removal, installation and adjustment of the tailgate (Corsa C/Meriva)

Removal, installation and adjustment of the tailgate (Corsa C/Meriva) (Opel Corsa C)

            0

Contents: Removal and installation ⬇ Adjustment ⬇

Removal and installation


1. Disconnect the cable from the negative terminal of the battery (see Chapter 5).

2. Remove the rear door trim (see Section 15).

3. Disconnect the wiring connectors of the windshield wiper, rear window defroster, high-level brake light and tailgate lock, and disconnect the rear window washer hose if necessary.

4. Press out the rubber guide bushing and pull the wiring harness out of the tailgate.

Note: To facilitate subsequent installation, attach a cord to the end of the wire, which will remain in the tailgate after the wires are pulled out.


5. Use a small screwdriver to slightly lift the locking clips (see accompanying illustration) and disconnect the gas-filled struts one by one from the upper spherical supports of the tailgate - you will need the help of an assistant to support the lid.
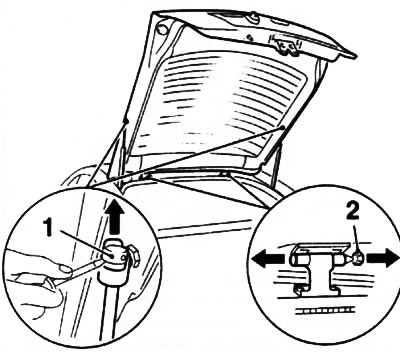
14.5. Fastening the tailgate: 1. Gas-filled strut retaining bracket; 2. Door hinge axis retainer

14.5. Fastening the tailgate: 1. Gas-filled strut retaining bracket; 2. Door hinge axis retainer


6. Remove the clamps (see illustration 14.5), Using a hammer and a drift, knock out the hinge pins and, with the help of an assistant, remove the tailgate.


7. Installation is performed in the reverse order of removal. After installing the door hinge pins, close the tailgate and make adjustments (see below)

Adjustment


8. Remove the screws securing the lock bracket on the lower edge of the rear door frame and remove the bracket.

9. If necessary, remove the trim at the top of the vehicle's rear pillars (C or D - depending on the model).

10. Carefully release the rear edge of the headliner from the holders and loosen the door hinge mounting screws.

11. Close the tailgate and check the uniformity of the gap between the adjacent body elements (see Specifications). The tailgate is adjusted correctly if, when closed, there is an even gap around the entire perimeter and the door is flush with the surrounding body surfaces.

12. If necessary, the gaps are adjusted by moving the tailgate in the appropriate direction.

13. To adjust the depth of the rear door in the door opening, it is necessary to install dampers (see accompanying illustration) on both sides so that the tailgate fits freely against them when closed.
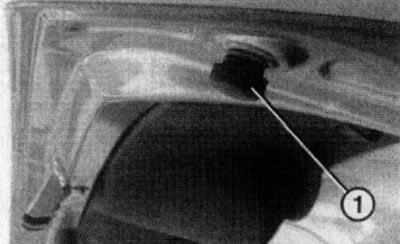
14.13. Adjustable rubber damper (1) of the tailgate

14.13. Adjustable rubber damper (1) of the tailgate


The article was published on the website (www.OPELBOOK.ru)

Note: To make adjustment easier, apply a paste-like mass to the dampers - use the imprint on the mass to determine whether the door is properly seated.


14. Tighten the door hinge mounting bolts to the required torque (see Specifications).

15. Replace the tailgate lock bracket and tighten the bolts by hand. Carefully close the tailgate: the lock bracket will take the desired position. Open the door and tighten the bracket mounting bolts to the required force.

16. Close and open the tailgate several times and make sure that it is adjusted correctly and that the lock is functioning properly; repeat the adjustment if necessary.


This article is available at russian, bulgarian, belarusian, ukrainian, serbian, croatian, romanian, polish, slovak, hungarian
Checking the article: Kornev Georgy

Share information:

Previous articles
Opel Corsa C: Doors and windows
Next articles

Removal and installation the rear door trim
Removal and installation the tailgate lock
Removal, installation and adjustment of side doors
Removal and installation side door locks
Removal and installation external side door handles
Removal and installation the lock cylinder


See similar ones from other Opel car manuals:
▶ Removal, installation and adjustment of the tailgate Opel Astra H (2004-2009)
▶ Tailgate Lock — Replacement and Adjustment Opel Zafira A (1999-2005, petrol)
▶ Automatic dynamic headlight range adjustment Opel Insignia A (2008-2017)
▶ Adjustment and check of carburetor Solex 35 PDSI Opel Kadett E (1984-1995)
▶ Trunk lid, tailgate Opel Omega A (1986-1993)
Link to this page in different formats

Visitor comments


No comments yet


How much will 42 + 46 =


Corsa C (2000-2006) 
  • General information
  • Introduction to guide
  • Troubleshooting
  • Vehicle device
  • User manual
  • Maintenance
  • Power unit
  • Engine repair
  • Cooling system
  • Power and exhaust system
  • Control system
  • Engine electrical equipment
  • Transmission
  • Clutch
  • Mechanical gearbox
  • Automatic gearbox
  • Drive shafts
  • Chassis
  • Brake system
  • Wheel suspension
  • Steering
  • Body
  • Exterior
  • Interior
  • Doors and windows
  • Heating and air conditioning
  • Electrical equipment
  • Equipment and devices
  • Lamps and lighting
  • Electrical circuits
Corsa C (2000-2006, petrol) 
  • User manual
  • Car access
  • Governing bodies
  • Seat control
  • Heating and air conditioning
  • Driving and maintenance
  • Engines 1.0 and 1.2 l
  • Engine repair
  • Cooling and lubrication system
  • Injection system
  • Engines 1.4, 1.6 and 1.8 l
  • Engine repair
  • Cooling and lubrication system
  • Injection system
  • Transmission
  • Clutch
  • Mechanical gearbox
  • Automatic gearbox
  • Drive shafts
  • Chassis
  • Wheels and tires
  • Wheel suspension
  • Steering
  • Brake system
  • Body
  • Exterior
  • Doors and windows
  • Electrical equipment
  • Equipment and devices
  • Lighting system
  • Electrical circuits
Corsa B (1993-2000) 
  • General information
  • Introduction to guide
  • User manual
  • Maintenance
  • Power unit
  • SOHC gasoline engines
  • DOHC gasoline engines
  • Diesel engines
  • Engine repair
  • Cooling system
  • Supply system
  • Injection system (gasoline)
  • Injection system (diesel)
  • Exhaust systems
  • Control system (gasoline)
  • Preheat system (diesel)
  • Charge and launch system
  • Transmission
  • Mechanical gearbox
  • Automatic gearbox
  • Clutch and drive shafts
  • Chassis
  • Brake system
  • Front suspension
  • Rear suspension
  • Steering
  • Body
  • Ventilation and heating
  • Exterior
  • Interior
  • Doors and windows
  • Electrical equipment
  • Equipment and devices
  • Lamps and lighting
  • Electrical circuits
OpelBook.ru © 2017–2026 · Mobile version · · Sitemap: EN BG BY UA RS HR RO PL SK HU · Feedback · Site search
Astra F, petrol · Astra G, petrol · Astra G · Astra H · Astra J, petrol · Corsa B · Corsa C, petrol · Corsa C · Insignia A · Kadett D · Kadett E · Omega A · Omega B · Omega B2 · Vectra A, petrol · Vectra A · Vectra B, petrol · Vectra B · Vectra C · Zafira A, petrol · Frontera A, petrol · Frontera B · Ascona C · Vivaro A ·
We want your visit to be comfortable 🤝! We use cookies 🍪 to make that happen.