
Removal and installation
1. Disconnect the wire from the negative terminal of the battery (see chapter 5).
2. Open the door and seal the edges of the door with tape.
3. Turn out a fixing bolt and disconnect the limiter (see resist. illustration) door travel from the body pillar.
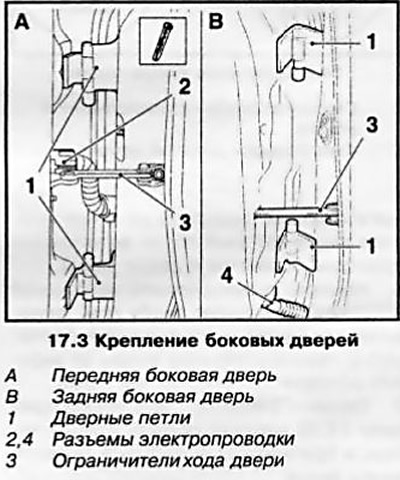
4. To disconnect the wiring connector (see illustration 17.3) front door, pull out the red lock bar while turning the connector counterclockwise, and on the rear door connector, push in the blue lock bar.
5. Remove the rubber caps from the door hinges, with the help of an assistant, knock out the axial fingers of the hinges and remove the door.
Note: The axle pins of the door hinges should protrude from the end where the cap was put on.
6. Installation is made in an order, the return to an order of removal. Lubricate the pivot pins of the door hinges with waterproof grease before installation. After installing the door on the hinges, make the appropriate adjustment (see below). Tighten the door hinge bolts to the required torque.
Adjustment
7. Remove the lock bracket (see illustration 17.1b to Chapter 1).
8. Alignment of the door in the body opening is carried out by bending the door hinges. This operation requires some experience - if you are not sure of your abilities, contact the service station. A special tool for bending buttonholes is commercially available, such as HAZET 1931 and HAZET 1973-1.
9. Close the door and check the gap between adjacent body elements (see specs). The tailgate is adjusted correctly if there is an even gap around the entire perimeter in the closed position, and the door is flush with the surrounding body surfaces
10. Adjust the door if necessary. The front edge of the rear door may be no more than 1 mm deeper than the rear edge of the front door.
11. Reinstall the side door lock bracket and tighten its fixing bolts by hand. Carefully close the side door so that the lock bracket is in the correct position. Open the door and tighten the bracket mounting bolts.
12. Close and open the door several times, check its position and ease of closing / opening, if necessary, repeat the adjustment and eliminate damage to the coating caused by bending the hinges.
Visitor comments