
OpelBook.ru
Cars AvtoVAZ Cars Mitsubishi Cars BMW Cars Mercedes Cars Nissan Cars Toyota Cars Chevrolet
English Русский
Български
Беларускі
Український
Српски
Hrvatski
Română
Polski
Slovenský
Magyar
 |  Sitemap  |  Contacts  |    


Main Astra Corsa Insignia Kadett Omega Vectra Zafira Others Articles
Kadett D (1979-1984) Kadett E (1984-1995)
  • Main
  • Kadett
  • Kadett D
  • Body
  • Doors and windows
  • Removal and installation front door trim

Removal and installation front door trim (Opel Kadett D)

            0

Contents: Removal ⬇ Installation ⬇

Removal
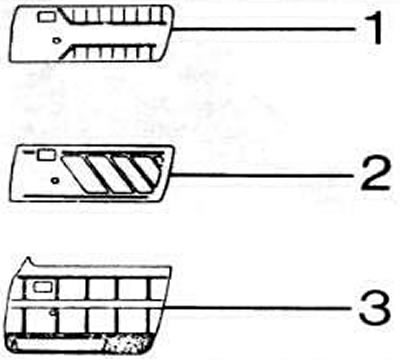


Door trim depends on the model: 1 - standard, 2 - luxury, 3 - Berlino

Door trim depends on the model: 1 - standard, 2 - luxury, 3 - Berlino


Using the window lifter, lift the glass up; the window lifter handle should be at an angle of 30°.
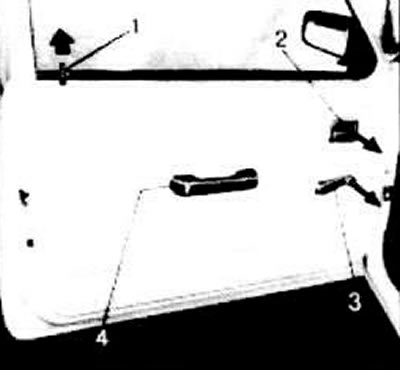
Using the window lifter, lift the glass up; the window lifter handle should be at an angle of 30°.


Unscrew the door lock button (1).

Remove the socket (2) with a screwdriver.

Remove the window lift handle using a special tool KM-317. If you do not have such a tool, you can do this using a regular screwdriver. To do this, press the trim and use a screwdriver to press the clamps forward in the direction of travel.

Unscrew the armrest (4).
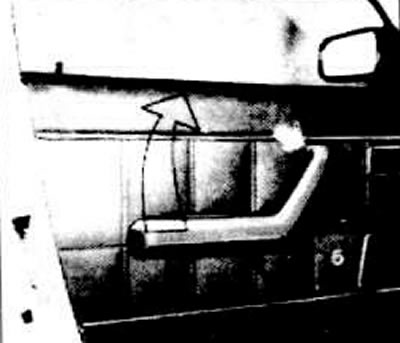
Unscrew the armrest (4).


In cars with special upholstery. Unscrew the armrest (5), turn it upwards and remove.


Unscrew the additional mounting screws at the front corner of the window.
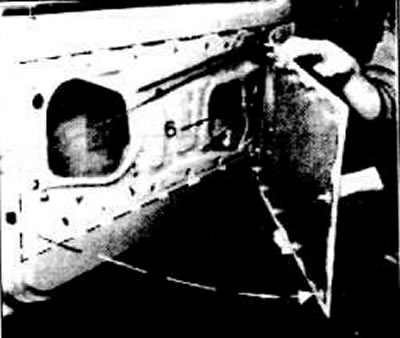
Unscrew the additional mounting screws at the front corner of the window.


Use a wooden or plastic wedge to push the trim away from the door.

Berlinia pull up.

Remove the window lifter handle pin compression spring.

Installation


Note: The protective film must be carefully glued to the holes in the door, otherwise there will be a draft.


Install the spring (6) on the window lift handle pin and press the trim with your hand.

Screw the armrest.

In cars with special upholstery, move the armrest up, install it, lower it down and secure it with two screws.

Screw in additional screws at the front corner of the window.

First press the clamps into the handle, install the window lift handle.

Screw on the door lock button (1).

Install a door opener socket.


This article is available at russian, bulgarian, belarusian, ukrainian, serbian, croatian, romanian, polish, slovak, hungarian
Checking the article: Kornev Georgy

Share information:

Previous articles
Opel Kadett D: Doors and windows
Next articles

Removal and installation rear door trim (sedan)
Removal and installation the window regulator
Removal and installation front door glass
Removal and installation glass in the rear doors
Removal and installation the outer front door handle
Removal and installation the front door lock cylinder


See similar ones from other Opel car manuals:
▶ Removal and installation the front door trim Opel Astra J (2009-2015, petrol)
▶ Removal and installation the front door interior trim Opel Corsa C (2000-2006, petrol)
▶ Front door trim — removal and installation Opel Vectra B (1995-2002)
▶ Front door trim Opel Frontera B (1998-2004)
▶ Front door adjustment Opel Insignia A (2008-2017)
Link to this page in different formats

Visitor comments


No comments yet


How much will 33 + 32 =


Kadett E (1984-1995) 
  • General information
  • Vehicle description
  • Operation and maintenance
  • OHV power unit
  • Engine design
  • Check and repair
  • Engine work
  • OHC power unit
  • Engine design
  • Engine repair
  • Ignition system
  • Cooling and lubrication
  • Supply system
  • Fuel injection «LE-Jetronic»
  • Fuel injection «LE3-Jetronic»
  • Motronic ML4.1 system
  • Motronic M1.5 system
  • Motronic M2.5 system
  • Transmission
  • Clutch
  • Gearbox F10 and F13
  • Gearbox F16 and F20
  • Automatic gearbox
  • Drive shafts
  • Chassis
  • Front suspension
  • Rear suspension
  • Steering
  • Brake system
  • Electrical equipment
  • Equipment and devices
  • Electrical circuits
Kadett D (1979-1984) 
  • General information
  • Car care
  • Maintenance
  • Power unit
  • Gasoline engines
  • Lubrication system
  • Cooling system
  • Power system (gasoline)
  • Carburetor Solex 35 PDSI
  • Carburetor Varajet II
  • Carburetor 1B1
  • Fuel injection (gasoline)
  • Diesel engines
  • Fuel system (diesel)
  • Transmission
  • Clutch
  • Manual gearbox
  • Chassis
  • Front suspension
  • Rear suspension
  • Steering
  • Brake system
  • Wheels and tires
  • Body
  • Body elements
  • Doors and windows
  • Electrical equipment
  • Equipment and devices
  • Lighting system
  • Power devices
  • Ignition system
  • Electrical circuits
OpelBook.ru © 2017–2026 · Mobile version · · Sitemap: EN BG BY UA RS HR RO PL SK HU · Feedback · Site search
Astra F, petrol · Astra G, petrol · Astra G · Astra H · Astra J, petrol · Corsa B · Corsa C, petrol · Corsa C · Insignia A · Kadett D · Kadett E · Omega A · Omega B · Omega B2 · Vectra A, petrol · Vectra A · Vectra B, petrol · Vectra B · Vectra C · Zafira A, petrol · Frontera A, petrol · Frontera B · Ascona C · Vivaro A ·
We want your visit to be comfortable 🤝! We use cookies 🍪 to make that happen.