
Works on OHV engine of car Opel Kadett E
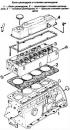
Removing the cylinder head
Put the car on a lift or on a viewing hole. Disconnect the wires from the battery terminals. Remove air filter. Loosen the exhaust manifold nuts and separate...
Put the car on a lift or on a viewing hole. Disconnect the wires from the battery terminals. Remove air filter. Loosen the exhaust manifold nuts and separate...

Installing the cylinder head
Make two mounting studs from two old cylinder head bolts and screw them into the cylinder block, install a new cylinder head gasket with the mark up. Install...
Make two mounting studs from two old cylinder head bolts and screw them into the cylinder block, install a new cylinder head gasket with the mark up. Install...

Disassembly of the cylinder head
Install the cylinder head on a stand for disassembly. Release the valves from crackers by compressing the valve springs with a special tool. Remove springs...
Install the cylinder head on a stand for disassembly. Release the valves from crackers by compressing the valve springs with a special tool. Remove springs...
Checking the cylinder head
Install the cylinder head on the surface plate and check with a ruler and a set of feelers for warping of the mating surface of the cylinder head, which should...
Install the cylinder head on the surface plate and check with a ruler and a set of feelers for warping of the mating surface of the cylinder head, which should...
Grinding valve seats and valves
When reusing valves, grind the chamfers of valves and seats using special equipment, observing the dimensions indicated in subsection « Design and...
When reusing valves, grind the chamfers of valves and seats using special equipment, observing the dimensions indicated in subsection « Design and...

Valve guide repair
Check the clearance between the valve guides and the valve stems with a dial gauge and micrometer. If necessary, expand the holes in the valve guide bushings...
Check the clearance between the valve guides and the valve stems with a dial gauge and micrometer. If necessary, expand the holes in the valve guide bushings...
Cylinder head assembly
Assembly of a head of cylinders is made in an order, the return to dismantling.
Assembly of a head of cylinders is made in an order, the return to dismantling.
Removal and installation of the engine
Removing Remove air filter. Disconnect the wires from the battery terminals. Pull the positive wire through the hole in the bulkhead and undock the connector....
Removing Remove air filter. Disconnect the wires from the battery terminals. Pull the positive wire through the hole in the bulkhead and undock the connector....

Engine disassembly
Install the washed and cleaned engine on a stand for disassembly. Remove the accessories installed on the engine. Drain engine oil. Loosen the rocker nuts a...
Install the washed and cleaned engine on a stand for disassembly. Remove the accessories installed on the engine. Drain engine oil. Loosen the rocker nuts a...
Engine Assembly
Before assembling the engine: replace all gaskets and seals; check the bearing surfaces of the gaskets, clean them and, if necessary, sand them; before...
Before assembling the engine: replace all gaskets and seals; check the bearing surfaces of the gaskets, clean them and, if necessary, sand them; before...
Installing the crankshaft
Check crankshaft parameters (see subsection « Design and specifications »). Install the liners in the block bed and main bearing caps. Lay the crankshaft in...
Check crankshaft parameters (see subsection « Design and specifications »). Install the liners in the block bed and main bearing caps. Lay the crankshaft in...
Checking the diametrical clearance between the liners and the crankshaft journals
In case of hard rotation of the crankshaft or if there is doubt about the correct clearances in the main and connecting rod bearings, check the clearance...
In case of hard rotation of the crankshaft or if there is doubt about the correct clearances in the main and connecting rod bearings, check the clearance...

Assembling the connecting rod and piston group
Connecting rod, pin and piston Select pistons according to the cylinder size category stamped on the block or based on the repair size obtained after reboring...
Connecting rod, pin and piston Select pistons according to the cylinder size category stamped on the block or based on the repair size obtained after reboring...

Checking and installing piston rings
Check the clearance in the piston ring lock with a set of feeler gauges, inserting the rings into the cylinder using the piston. Also check clearance between...
Check the clearance in the piston ring lock with a set of feeler gauges, inserting the rings into the cylinder using the piston. Also check clearance between...

Installation of pistons with connecting rods in cylinders
Warning. The connecting rods of one engine should not differ from each other in mass by more than 8 g. When replacing a connecting rod, weigh it and replace it...
Warning. The connecting rods of one engine should not differ from each other in mass by more than 8 g. When replacing a connecting rod, weigh it and replace it...
Installing the camshaft
Lubricate the guide bushings of the pushers with a thin layer of engine oil and, taking into account the markings made during disassembly, insert the pushers...
Lubricate the guide bushings of the pushers with a thin layer of engine oil and, taking into account the markings made during disassembly, insert the pushers...

Installing the camshaft drive
Reinstall the crankshaft and camshaft sprockets without putting on the chains, and turn them so that the marks on the sprockets are aligned as shown in the...
Reinstall the crankshaft and camshaft sprockets without putting on the chains, and turn them so that the marks on the sprockets are aligned as shown in the...
Replacement of pushers of the gas distribution mechanism
Due to the design features of the pushers, their replacement is carried out on a removed engine, from which the oil sump and camshaft are removed.
Due to the design features of the pushers, their replacement is carried out on a removed engine, from which the oil sump and camshaft are removed.

Replacement of camshaft bearing sleeves
Removing the camshaft Note. To remove the camshaft, remove the engine to prevent the tappets from falling into the engine. Drain engine oil. Remove the...
Removing the camshaft Note. To remove the camshaft, remove the engine to prevent the tappets from falling into the engine. Drain engine oil. Remove the...

Checking the technical condition of the oil pump
Remove the engine oil sump. Loosen the oil pump mounting bolts with a socket wrench and remove it. Dismantle the oil pump and pump pressure reducing valve and...
Remove the engine oil sump. Loosen the oil pump mounting bolts with a socket wrench and remove it. Dismantle the oil pump and pump pressure reducing valve and...
Oil pressure check
Unscrew the oil pressure warning light sensor located on the cylinder block next to the oil filter. Screw the fitting KM 135 into the hole with a pressure...
Unscrew the oil pressure warning light sensor located on the cylinder block next to the oil filter. Screw the fitting KM 135 into the hole with a pressure...

Coolant replacement
Disconnect the radiator inlet hose from the water pump and the outlet hose from the thermostat housing. Unscrew with a square head wrench «at 9» drain plug on...
Disconnect the radiator inlet hose from the water pump and the outlet hose from the thermostat housing. Unscrew with a square head wrench «at 9» drain plug on...

Thermostat replacement
Loosen the clamp and disconnect the hose from the nozzle 1 (see picture) water pump. Drain the coolant into a container. Use a screwdriver to remove the...
Loosen the clamp and disconnect the hose from the nozzle 1 (see picture) water pump. Drain the coolant into a container. Use a screwdriver to remove the...

Water pump replacement
The design of the water pump is non-separable and cannot be repaired. In case of malfunction, replace the water pump with a new one. Drain the coolant into a...
The design of the water pump is non-separable and cannot be repaired. In case of malfunction, replace the water pump with a new one. Drain the coolant into a...
This section is available on russian, bulgarian, belarusian, ukrainian, serbian, croatian, romanian, polish, slovak, hungarian
See similar ones from other Opel car manuals:
▶ Power unit: Engine repair Opel Astra G (1998-2004)
▶ Power unit: Engine repair Opel Corsa C (2000-2006)
▶ Power unit: Engine overhaul Opel Omega B2 (1999-2003)
▶ Power unit: Engine repair Opel Vectra C (2002-2008)
▶ Power unit: Engine repair Opel Zafira A (1999-2005, petrol)
▶ Power unit: Gasoline engines Opel Ascona C (1981-1988)
▶ Power unit: Engine repair Opel Astra G (1998-2004)
▶ Power unit: Engine repair Opel Corsa C (2000-2006)
▶ Power unit: Engine overhaul Opel Omega B2 (1999-2003)
▶ Power unit: Engine repair Opel Vectra C (2002-2008)
▶ Power unit: Engine repair Opel Zafira A (1999-2005, petrol)
▶ Power unit: Gasoline engines Opel Ascona C (1981-1988)
Share information:
- General information
- Vehicle description
- Operation and maintenance
- OHV power unit
- Engine design
- Check and repair
- Engine work
- OHC power unit
- Engine design
- Engine repair
- Ignition system
- Cooling and lubrication
- Supply system
- Fuel injection «LE-Jetronic»
- Fuel injection «LE3-Jetronic»
- Motronic ML4.1 system
- Motronic M1.5 system
- Motronic M2.5 system
- Transmission
- Clutch
- Gearbox F10 and F13
- Gearbox F16 and F20
- Automatic gearbox
- Drive shafts
- Chassis
- Front suspension
- Rear suspension
- Steering
- Brake system
- Electrical equipment
- Equipment and devices
- Electrical circuits
- General information
- Car care
- Maintenance
- Power unit
- Gasoline engines
- Lubrication system
- Cooling system
- Power system (gasoline)
- Carburetor Solex 35 PDSI
- Carburetor Varajet II
- Carburetor 1B1
- Fuel injection (gasoline)
- Diesel engines
- Fuel system (diesel)
- Transmission
- Clutch
- Manual gearbox
- Chassis
- Front suspension
- Rear suspension
- Steering
- Brake system
- Wheels and tires
- Body
- Body elements
- Doors and windows
- Electrical equipment
- Equipment and devices
- Lighting system
- Power devices
- Ignition system
- Electrical circuits
OpelBook.ru © 2017–2024 · Mobile version · · Sitemap: EN BG BY UA RS HR RO PL SK HU · Feedback · Site search
Astra F, petrol · Astra G, petrol · Astra G · Astra H · Astra J, petrol · Corsa B · Corsa C, petrol · Corsa C · Insignia A · Kadett D · Kadett E · Omega A · Omega B · Omega B2 · Vectra A, petrol · Vectra A · Vectra B, petrol · Vectra B · Vectra C · Zafira A, petrol · Frontera A, petrol · Ascona C ·
Astra F, petrol · Astra G, petrol · Astra G · Astra H · Astra J, petrol · Corsa B · Corsa C, petrol · Corsa C · Insignia A · Kadett D · Kadett E · Omega A · Omega B · Omega B2 · Vectra A, petrol · Vectra A · Vectra B, petrol · Vectra B · Vectra C · Zafira A, petrol · Frontera A, petrol · Ascona C ·