
OpelBook.ru
Cars AvtoVAZ Cars Mitsubishi Cars BMW Cars Mercedes Cars Nissan Cars Toyota Cars Chevrolet
English Русский
Български
Беларускі
Український
Српски
Hrvatski
Română
Polski
Slovenský
Magyar
 |  Sitemap  |  Contacts  |    


Main Astra Corsa Insignia Kadett Omega Vectra Zafira Others Articles
Kadett D (1979-1984) Kadett E (1984-1995)
  • Main
  • Kadett
  • Kadett E
  • OHV power unit
  • Engine work
  • Replacing camshaft bearing bushings

Replacing camshaft bearing bushings (Opel Kadett E)

            0

Contents: Removal the camshaft ⬇ Installing the camshaft ⬇

Removal the camshaft


Note: To remove the camshaft, remove the engine to prevent the tappets from falling into the engine.


Drain the oil from the engine.

Remove the cylinder head cover and back off the rocker arm adjusting nuts approximately 8 mm to release the pushrods from the valve springs and move them away from the camshaft.
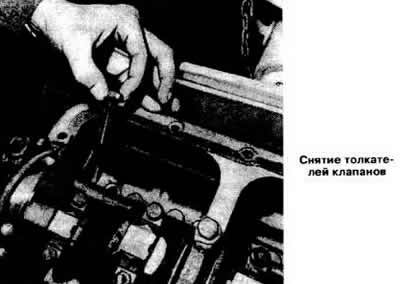
Remove the cylinder head cover and back off the rocker arm adjusting nuts approximately 8 mm to…


Remove the carburetor, turn the engine over and place it with the upper surface of the cylinder head on wooden pads.

Remove the crankshaft pulley.

Remove the camshaft drive cover and deflector.

Align the marks on the crankshaft and camshaft sprockets as shown in the photo, which will facilitate their subsequent installation.

Remove the camshaft drive chain tensioner.

Remove the camshaft sprocket mounting bolt.

Remove the sprocket and camshaft drive chain, having first applied a color alignment mark to the chain.

Remove the locking plate, mark its position and remove the camshaft forward.

After removing the camshaft, access to the tappets becomes available and can be replaced if necessary.

Bearing bushings are supplied as spare parts only for camshafts with journal diameter reduced by 0.5 mm (with allowance for processing). Therefore, they must be reamed to fit the diameters of the camshaft journals. Three holes must be reamed in a line at once using a combination reamer (see "Design and technical characteristics").


When pressing in new camshaft bearing bushings, make sure that their lubrication holes align with the oil passages in the cylinder head.

Warning: After reaming the bearing bushing holes, thoroughly clean the oil passages from metal chips.


Installing the camshaft


Lubricate the camshaft journals with molybdenum disulfide grease and install it in place.

Install the camshaft retaining plate in place.

In the future, install the shaft as indicated above in the section "Installing the camshaft drive".
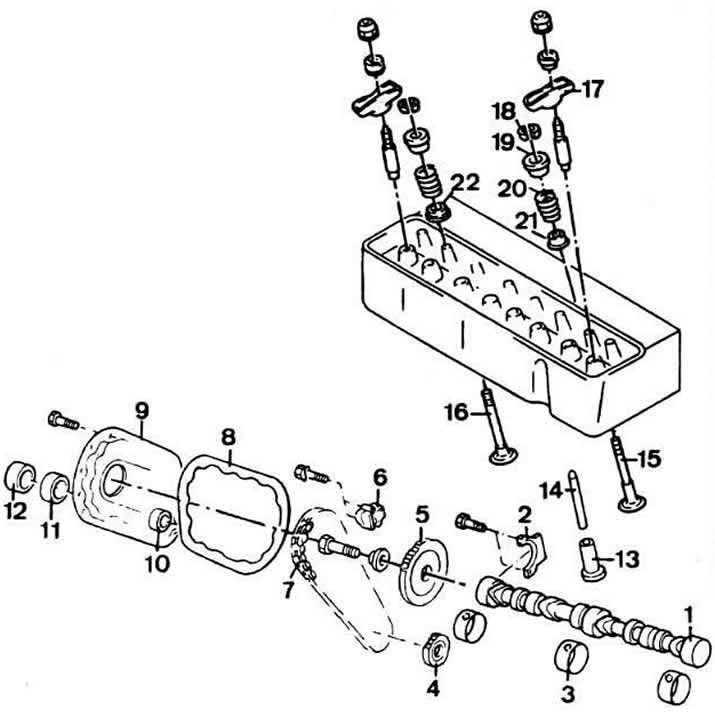
Details of the valve timing mechanism:

Details of the valve timing mechanism:
1 — camshaft;
2 - camshaft locking plate;
3 - bearing sleeve;
4 — crankshaft sprocket;
5 — camshaft sprocket;
6 - chain tensioner;
7 — camshaft drive chain;
8 — camshaft drive cover gasket;
9 — camshaft drive cover;
10 — inspection hatch;
11 — sealing ring;
12 — inspection hatch;
13 — pusher;
14 — rocker rod;
15 - exhaust valve;
16 — inlet valve;
17 — rocker arm;
18 - cracker;
19 — valve spring plate;
20 - valve spring;
21 — rotary device of the exhaust valve;
22 — oil deflector cap.


(Information taken from the website: OPELBOOK)


This article is available at russian, bulgarian, belarusian, ukrainian, serbian, croatian, romanian, polish, slovak, hungarian
Checking the article: Shapovalov Yaroslav

Share information:

Previous articles
Opel Kadett E: Engine work
Next articles

Replacing the valve timing tappets
Installing the camshaft drive
Installing the camshaft
Installing pistons with connecting rods into cylinders
Checking and installing piston rings
Assembly of the connecting rod and piston group
Checking the technical condition of the oil pump
Checking oil pressure
Replacing the coolant
Replacing the thermostat
Replacing the water pump


See similar ones from other Opel car manuals:
▶ Replacing camshaft seals Opel Astra H (2004-2009)
▶ Replacing camshaft seals Opel Corsa B (1993-2000)
▶ Replacing the primary drive chain (camshaft drive chain) Opel Insignia A (2008-2017)
▶ Replacing the camshaft sealing ring Opel Vectra B (1995-2002)
▶ Replacing the rear axle bearing Opel Frontera A (1991-1998, petrol)
Link to this page in different formats

Visitor comments


No comments yet


How much will 37 + 26 =


Kadett E (1984-1995) 
  • General information
  • Vehicle description
  • Operation and maintenance
  • OHV power unit
  • Engine design
  • Check and repair
  • Engine work
  • OHC power unit
  • Engine design
  • Engine repair
  • Ignition system
  • Cooling and lubrication
  • Supply system
  • Fuel injection «LE-Jetronic»
  • Fuel injection «LE3-Jetronic»
  • Motronic ML4.1 system
  • Motronic M1.5 system
  • Motronic M2.5 system
  • Transmission
  • Clutch
  • Gearbox F10 and F13
  • Gearbox F16 and F20
  • Automatic gearbox
  • Drive shafts
  • Chassis
  • Front suspension
  • Rear suspension
  • Steering
  • Brake system
  • Electrical equipment
  • Equipment and devices
  • Electrical circuits
Kadett D (1979-1984) 
  • General information
  • Car care
  • Maintenance
  • Power unit
  • Gasoline engines
  • Lubrication system
  • Cooling system
  • Power system (gasoline)
  • Carburetor Solex 35 PDSI
  • Carburetor Varajet II
  • Carburetor 1B1
  • Fuel injection (gasoline)
  • Diesel engines
  • Fuel system (diesel)
  • Transmission
  • Clutch
  • Manual gearbox
  • Chassis
  • Front suspension
  • Rear suspension
  • Steering
  • Brake system
  • Wheels and tires
  • Body
  • Body elements
  • Doors and windows
  • Electrical equipment
  • Equipment and devices
  • Lighting system
  • Power devices
  • Ignition system
  • Electrical circuits
OpelBook.ru © 2017–2026 · Mobile version · · Sitemap: EN BG BY UA RS HR RO PL SK HU · Feedback · Site search
Astra F, petrol · Astra G, petrol · Astra G · Astra H · Astra J, petrol · Corsa B · Corsa C, petrol · Corsa C · Insignia A · Kadett D · Kadett E · Omega A · Omega B · Omega B2 · Vectra A, petrol · Vectra A · Vectra B, petrol · Vectra B · Vectra C · Zafira A, petrol · Frontera A, petrol · Frontera B · Ascona C · Vivaro A ·
We want your visit to be comfortable 🤝! We use cookies 🍪 to make that happen.