
Parking brake adjustment
The process of adjusting the parking brake depends on the design of the service brake on the rear wheels. It is different for drum and disc brakes.
For drum brakes - up to mid-1995 release
Parking brake adjustment is provided by a self-adjusting service brake mechanism. Pulling the brake cable may increase the brake lever travel and require adjustment. To set the brake pads to their original position, press the brake pedal so that the automatic pad setting mechanism no longer clicks. Two people are required to carry out the adjustment.
1. Raise and place the rear of the vehicle on stands.
2. Fully release the parking brake.
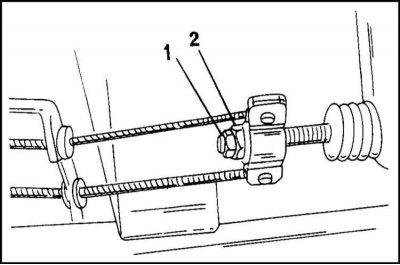
3. loosen the nut (1) adjusting rod and tighten the adjusting nut (2), to pull the rope. In this case, the brake pads should lightly touch the brake drum, i.e. the brake is just starting to work.
4. Apply the parking brake three or four times and check that the wheels are clamped if the brake lever is installed on the fourth tooth of the sector.
5. In this position, tighten the locknut to 12 Nm.
6. Release the parking brake and rotate the wheels. They must rotate freely. Check the rotation of both wheels, as When one wheel is spinning, the other may seize.
7. Move the parking brake lever 4 teeth again and check if the wheels are tight.
8. Check several times by applying and releasing the brake.
9. If the adjustment is successful, lower the vehicle to the ground.
10. Check brake action on a slope.
For disc brake - from mid 1995 release
Here the gap between the brake pads and the disc drum is adjusted from the inside of the drum. The specified gap must be adjusted before adjusting the drive cable tension.
1. Raise and place the rear of the vehicle on stands.

2. Remove the rubber plug from the adjustment hole on the back of the brake shield at the location shown in the illustration.
3. Insert a screwdriver into the hole and move the wheel of the adjusting bolt down so that the brake pads touch the drum.
4. From this position, gradually turning the wheel, bring the drum to a stationary state.
5. Turn the wheel of the adjusting bolt in the opposite direction so that the drum has the opportunity to start turning. Usually for this it is necessary to unscrew the wheel 7 - 8 teeth back.
6. Finally, rotate both wheels, making sure that the brake drums are not pinched.
7. Adjust the tension of the parking brake cables as described above. The difference in this case is that the brake lever must hold the wheels at its position between the 5th and 7th teeth of the sector.
For drum brakes
The drive consists of two cables that are attached on one side to the rear brake pads and on the other side to an equalizer located under the bottom of the car. Cables are replaced in pairs.
Removing
1. Raise and place the rear of the vehicle on stands.
2. Measure the length of the protruding threaded end of the adjusting rod with a ruler.
3. Record the size and unscrew the adjusting nut.
4. Disconnect both cables from the equalizer.
5. Remove the brake pads and disconnect the cables from them as described above.
6. Use pliers to remove the spring clip on each cable from the back of the brake shield (at the point of contact with the shield).
7. Disconnect the cables from the guides on the floor and wheel suspension. To do this, you may need to bend the holders. Remember the wiring diagram.
Installation
Cables are installed in the reverse order of removal.
1. Lay cables.
2. Install the brake pads as described in Section 3.
3. When assembling, maintain the protruding part of the control rod obtained earlier.
4. Adjust the parking brake as described above.
5. Lower the car onto its wheels.
6. Install the wheels and secure them.
With disc brakes
The cables are replaced in the same way as described above. The difference lies in the fact that it is not the brake drums that are removed here, but the disc ones.
Removing
1. Measure the protruding threaded end of the adjusting rod.
2. Loosen the nuts and remove the equalizer.
3. Disconnect the cables from the drive levers on the calipers.
4. Disconnect the cables from the rails on the floor and axle bracket.
Installation
Installation of a disk brake is carried out in sequence, return to removal. Pay attention to the correct laying of cables.
1. Bolts of fastening of holders of cables tighten the moment of 9 Nm.
2. Screw the adjusting nuts to the previously obtained size.
3. Adjust the cables as described above.
Visitor comments