
OpelBook.ru
Cars AvtoVAZ Cars Mitsubishi Cars BMW Cars Mercedes Cars Nissan Cars Toyota Cars Chevrolet
English Русский
Български
Беларускі
Український
Српски
Hrvatski
Română
Polski
Slovenský
Magyar
 |  Sitemap  |  Contacts  |    


Main Astra Corsa Insignia Kadett Omega Vectra Zafira Others Articles
Frontera A (1991-1998, petrol) Frontera B (1998-2004) Ascona C (1981-1988) Vivaro A (2001-2014)
  • Main
  • Opel
  • Frontera A
  • Chassis
  • Brake system
  • Bleeding the brake system

Bleeding the brake system (Opel Frontera A)

            0

Contents: Replacing brake fluid ⬇ Checking the tightness of the brake…⬇
It is necessary to remove air from the brake system if it has been opened at any point or air has entered the system in any other way.

Before removing air, it is necessary to wipe off dirt and foreign particles from the locations of the air removal fittings and the filler neck. If air is removed from the entire system, then it is necessary to start from the point furthest from the tank. If only one wheel cylinder or caliper was disconnected, it is sufficient to bleed the air from the circuit to which the specified element belongs.

In auto repair shops, air is removed from the brake system using a special device under pressure. The use of this device is not described here. A well-known method is described here, which consists of manually unscrewing the air bleed nipple.

1. Remove the protective cap from the corresponding air bleed nipple and place a transparent hose over it.

2. Place the other end of the hose into a container filled with some brake fluid.

3. Ask an assistant to press the brake pedal several times, pressing it to the floor.

4. Loosen the air bleed nipple half a turn when the pedal is close to the floor. The brake fluid will flow through the clear hose into the container.

5. As soon as the assistant says that the pedal is pressed to the floor, close the valve and slowly release the pedal.

6. Check and add fluid to the reservoir if necessary.

7. Repeat the above procedure until the liquid flowing into the container does not contain air bubbles.


8. Repeat the same on the other fittings in the indicated sequence. It is necessary to carefully monitor the fluid level in the tank. Reducing it below a certain level can lead to air being sucked into the system, which will require its removal again.

A few words about brake fluid. The brake fluid recommended by Opel should be used. Never use fluid that has been left unsealed for a long time. Brake fluid absorbs moisture.

Brake fluid contains some harmful substances that can harm human skin. If brake fluid comes into contact with your skin, wash the area immediately. If the liquid splashes into your eye, you should immediately consult a doctor. Brake fluid has a destructive effect on paintwork.

Replacing brake fluid


Please also contact Chapter 1.

For cars of the previous series, i.e. manufactured before mid-1995, the brake fluid should be changed once a year or every 15,000 km, depending on the intensity of use. New models of cars with rear disc brakes require replacement of brake fluid once every 2 years. However, for these cars the fluid level in the reservoir should be checked every 15,000 km.

Checking the tightness of the brake system


To check the tightness of the brake system, it must be held under pressure for 10 minutes.

Since holding the brake pedal for the specified time is quite a labor-intensive job, there is a special device for pressing the pedal.
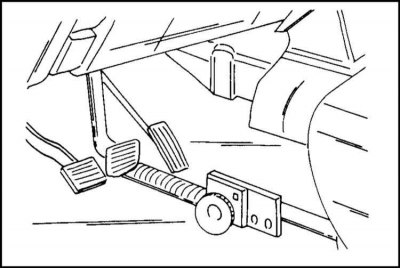
It is inserted between the brake pedal and the seat frame as shown in the illustration. If after…


It is inserted between the brake pedal and the seat frame as shown in the illustration. If after the specified time the device is still jammed, this indicates that there is pressure in the system. If the pressure drops, the device will also drop. In this case, you need to look for a leak in the system, a sign of which is brake fluid stains.


This article is available at russian, bulgarian, belarusian, ukrainian, serbian, croatian, romanian, polish, slovak, hungarian
Checking the article: Meshcheryakov Damir

Share information:

Previous articles
Opel Frontera A: Brake system
Next articles

Master Brake Cylinder — Removal and Installation
Replacing the parking brake pads
Replacing the rear brake disc cover
Removal, repair and installation of the rear caliper
Removal and installation rear brake pads
Removal and installation the rear brake shield
Vacuum brake booster — removal and installation
Parking brake — removal, installation and adjustment
Pressure regulator — removal and installation
Brake hoses for front and rear brake mechanisms
Anti-lock braking system (ABS) — removal and installation


See similar ones from other Opel car manuals:
▶ Bleeding the brake system Opel Astra J (2009-2015, petrol)
▶ Bleeding the brake system Opel Corsa B (1993-2000)
▶ Bleeding the brake system Opel Insignia A (2008-2017)
▶ Bleeding the brake hydraulic system without special… Opel Kadett E (1984-1995)
▶ Brake system — bleeding Opel Omega B2 (1999-2003)
Link to this page in different formats

Visitor comments


No comments yet


How much will 42 + 39 =


Vivaro A (2001-2014) 
  • General information
  • User manual
  • Power unit
  • Petrol engine F4R
  • Diesel engine F9Q
  • Diesel engine G9U
  • Transmission
  • Clutch and drive shafts
  • Manual gearbox
  • Chassis
  • Front suspension
  • Rear suspension
  • Brake system
  • Body
  • Exterior
  • Interior
  • Electrical equipment
  • Heating and ventilation
  • Air conditioner
  • Equipment and devices
  • Electrical diagrams
Ascona C (1981-1988) 
  • General information
  • Maintenance
  • Power unit
  • Gasoline engines
  • Diesel engines
  • Cooling system
  • Fuel and exhaust system
  • Contact ignition system
  • Contactless ignition system
  • Transmission
  • Clutch
  • Mechanical gearbox
  • Automatic gearbox
  • Drive shafts
  • Chassis
  • Steering
  • Brake system
  • Car suspension
  • Body
  • Exterior
  • Interior
  • Doors and windows
  • Electrical equipment
  • Equipment and devices
  • Power devices
  • Electrical circuits
Frontera B (1998-2004) 
  • General information
  • User manual
  • Maintenance
  • Power unit
  • Petrol engines 2.2 l
  • Petrol engines 3.2 l
  • Diesel engines 2.2 l
  • Cooling system
  • Fuel system (petrol)
  • Fuel system (diesel)
  • Ignition system
  • Transmission
  • Clutch
  • Manual gearbox MUA5C
  • Automatic gearbox 4L30E
  • Chassis
  • Suspension and axles
  • Steering
  • Brake system
  • Body
  • Exterior
  • Interior
  • Doors, locks and windows
  • Heating and air conditioning
  • Electrical equipment
  • Power devices
  • Equipment and devices
  • Lighting and signaling
  • Electrical diagrams
Frontera A (1991-1998, petrol) 
  • General information
  • Introduction to guide
  • User manual
  • Maintenance
  • Power unit
  • Engine repair
  • Lubrication system
  • Cooling system
  • Power and exhaust system
  • Engine electrics
  • Transmission
  • Clutch
  • Mechanical gearbox
  • Cardan shafts
  • Chassis
  • Brake system
  • Front suspension
  • Rear suspension
  • Steering
  • Body
  • Repair and care
  • Electrical equipment
  • Equipment and devices
  • Electrical circuits
OpelBook.ru © 2017–2026 · Mobile version · · Sitemap: EN BG BY UA RS HR RO PL SK HU · Feedback · Site search
Astra F, petrol · Astra G, petrol · Astra G · Astra H · Astra J, petrol · Corsa B · Corsa C, petrol · Corsa C · Insignia A · Kadett D · Kadett E · Omega A · Omega B · Omega B2 · Vectra A, petrol · Vectra A · Vectra B, petrol · Vectra B · Vectra C · Zafira A, petrol · Frontera A, petrol · Frontera B · Ascona C · Vivaro A ·
We want your visit to be comfortable 🤝! We use cookies 🍪 to make that happen.