
OpelBook.ru
Cars AvtoVAZ Cars Mitsubishi Cars BMW Cars Mercedes Cars Nissan Cars Toyota Cars Chevrolet
English Русский
Български
Беларускі
Український
Српски
Hrvatski
Română
Polski
Slovenský
Magyar
 |  Sitemap  |  Contacts  |    


Main Astra Corsa Insignia Kadett Omega Vectra Zafira Others Articles
Frontera A (1991-1998, petrol) Frontera B (1998-2004) Ascona C (1981-1988) Vivaro A (2001-2014)
  • Main
  • Opel
  • Frontera A
  • Chassis
  • Brake system
  • Brake discs — removal and installation

Brake discs — removal and installation (Opel Frontera A)

            0

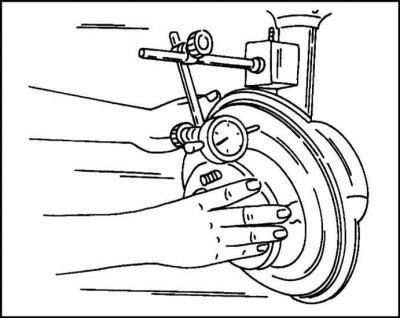
Before removing the brake disc, it must be checked for runout, as the disc may be deformed. The brake disc is secured with a Torx head bolt. However, the bolt does not fully press the disc to the wheel hub. To ensure a complete fit, one of the wheel mounting bolts is screwed with a spacer sleeve into the hub opposite the brake disc mounting bolt and clamps the hub. This ensures uniform fastening on the right and left.

1. Place the indicator with holder on the brake caliper and place the measuring tip approximately…


1. Place the indicator with holder on the brake caliper and place the measuring tip approximately in the middle of the friction surface of the disc as shown.

2. Slowly rotate the brake disc and measure the runout. It should not exceed 0.13 mm. The runout of the brake disc is not necessarily entirely the result of a defect in the disc itself, as it is partially added to the runout due to gaps in the wheel bearing.

3. When rotating the brake disc, it is necessary to check its braking surface for cracks, scoring, etc. If the above defects are present, the brake disc, as a rule, must be replaced.

Brake discs can be ground to restore functionality. The minimum permissible disc thickness is given in Specifications. In this case, it is necessary to ensure that the flatness of the disk is maintained.


The brake disc is removed as follows:

1. If the wheel has already been removed, as was done above, remove the wheel mounting bolt used to check the runout.

2. Remove the brake disc as described above.

3. Tie the caliper to the chassis with wire.
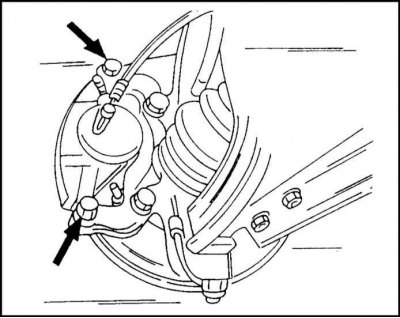
4. Remove both bolts shown and separate the guide from the brake disc.


4. Remove both bolts shown and separate the guide from the brake disc.

5. Use a special key to unscrew the mounting bolt on the end surface of the brake disc. The bolt has a Torx head.

6. Remove the brake disc from the wheel hub. If necessary, you can use a rubber mallet for this purpose.

7. Before installing the brake disc, clean the mating surfaces of the disc and wheel hub with fine sandpaper. If a new brake disc is installed, it must be cleaned of grease.

8. Install the brake disc and tap it with a rubber hammer.

9. Screw in and tighten the mounting bolt.

10. Check the brake disc for runout as described above. Unexpected beating may be a result of foreign particles getting between the mating planes of the disc and the hub. Then disassemble the connection again, clean and reassemble.

Source is on this resource OpelBook.ru

11. Install the brake shoe guide and tighten its mounting bolts to a torque of 212 Nm.


12. Install the brake pads as described above.

13. Lower the vehicle and tighten the wheel bolts to 110 Nm.

Please note! Light alloy wheels are fastened with a torque of 120 Nm.


Note: The thickness of the brake discs can be measured without removing them. This is done with a caliper. Please note the differences in execution.


Replacing the brake disc cover


If the casing is deformed, it can be replaced. To do this, you need to remove the caliper, brake disc and wheel hub. After this, you can unscrew the three mounting bolts and remove the casing. Tighten the bolts securing the new casing to a torque of 13 Nm.


This article is available at russian, bulgarian, belarusian, ukrainian, serbian, croatian, romanian, polish, slovak, hungarian
Checking the article: Meshcheryakov Damir

Share information:

Previous articles
Opel Frontera A: Brake system
Next articles

Removal, repair and installation of front brake calipers
Replacing the front brake pads
Brake system specifications
Brake system — general information
Removal and installation the rear brake drum
Replacing rear brake pads
Rear Wheel Cylinder — Removal and Installation
Removal and installation the rear brake shield
Removal and installation rear brake pads
Removal, repair and installation of the rear caliper


See similar ones from other Opel car manuals:
▶ Brake discs — inspection, removal and installation Opel Astra G (1998-2004, petrol)
▶ Checking the technical condition of the rear brake discs Opel Insignia A (2008-2017)
▶ Removal and installation brake discs Opel Kadett E (1984-1995)
▶ Checking the thickness of brake discs Opel Vectra A (1988-1995)
▶ Front brake discs — replacement Opel Zafira A (1999-2005, petrol)
Link to this page in different formats

Visitor comments


No comments yet


How much will 34 + 42 =


Vivaro A (2001-2014) 
  • General information
  • User manual
  • Power unit
  • Petrol engine F4R
  • Diesel engine F9Q
  • Diesel engine G9U
  • Transmission
  • Clutch and drive shafts
  • Manual gearbox
  • Chassis
  • Front suspension
  • Rear suspension
  • Brake system
  • Body
  • Exterior
  • Interior
  • Electrical equipment
  • Heating and ventilation
  • Air conditioner
  • Equipment and devices
  • Electrical diagrams
Ascona C (1981-1988) 
  • General information
  • Maintenance
  • Power unit
  • Gasoline engines
  • Diesel engines
  • Cooling system
  • Fuel and exhaust system
  • Contact ignition system
  • Contactless ignition system
  • Transmission
  • Clutch
  • Mechanical gearbox
  • Automatic gearbox
  • Drive shafts
  • Chassis
  • Steering
  • Brake system
  • Car suspension
  • Body
  • Exterior
  • Interior
  • Doors and windows
  • Electrical equipment
  • Equipment and devices
  • Power devices
  • Electrical circuits
Frontera B (1998-2004) 
  • General information
  • User manual
  • Maintenance
  • Power unit
  • Petrol engines 2.2 l
  • Petrol engines 3.2 l
  • Diesel engines 2.2 l
  • Cooling system
  • Fuel system (petrol)
  • Fuel system (diesel)
  • Ignition system
  • Transmission
  • Clutch
  • Manual gearbox MUA5C
  • Automatic gearbox 4L30E
  • Chassis
  • Suspension and axles
  • Steering
  • Brake system
  • Body
  • Exterior
  • Interior
  • Doors, locks and windows
  • Heating and air conditioning
  • Electrical equipment
  • Power devices
  • Equipment and devices
  • Lighting and signaling
  • Electrical diagrams
Frontera A (1991-1998, petrol) 
  • General information
  • Introduction to guide
  • User manual
  • Maintenance
  • Power unit
  • Engine repair
  • Lubrication system
  • Cooling system
  • Power and exhaust system
  • Engine electrics
  • Transmission
  • Clutch
  • Mechanical gearbox
  • Cardan shafts
  • Chassis
  • Brake system
  • Front suspension
  • Rear suspension
  • Steering
  • Body
  • Repair and care
  • Electrical equipment
  • Equipment and devices
  • Electrical circuits
OpelBook.ru © 2017–2026 · Mobile version · · Sitemap: EN BG BY UA RS HR RO PL SK HU · Feedback · Site search
Astra F, petrol · Astra G, petrol · Astra G · Astra H · Astra J, petrol · Corsa B · Corsa C, petrol · Corsa C · Insignia A · Kadett D · Kadett E · Omega A · Omega B · Omega B2 · Vectra A, petrol · Vectra A · Vectra B, petrol · Vectra B · Vectra C · Zafira A, petrol · Frontera A, petrol · Frontera B · Ascona C · Vivaro A ·
We want your visit to be comfortable 🤝! We use cookies 🍪 to make that happen.