
Removing
Before removing and repairing the caliper, make sure you have a repair kit.
1. Raise and place the front of the vehicle on stands.
2. Loosen the nuts and remove the wheels.
3. Remove the brake pads as described in the previous subsection.
4. To prevent leakage of fluid from the system, it is necessary to close the tank. The best way to do this is to unscrew the tank cap and close the hole with polyethylene. After that, the cork is wrapped again.
5. On the rear side of the caliper, unscrew the hollow bolt and remove the brake hose.
6. There are sealing washers on the left and right that need to be removed. In this case, a certain amount of liquid flows out. Plug the end of the hose (e.g. wrap with duct tape).
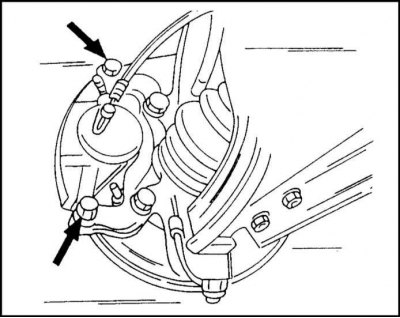
7. Loosen the two bolts and remove the caliper.
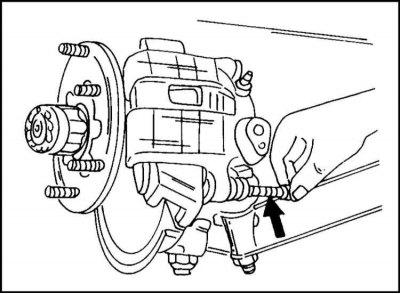
8. One of the bolts is shown in the illustration. There is a second bolt on the top side.
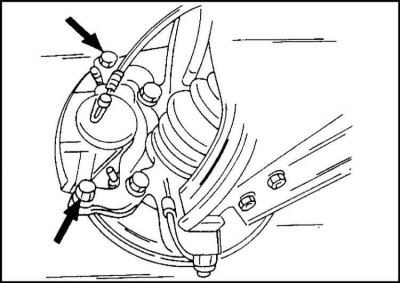
9. If necessary, remove the two steering knuckle bolts. Bolts are shown in the illustration.
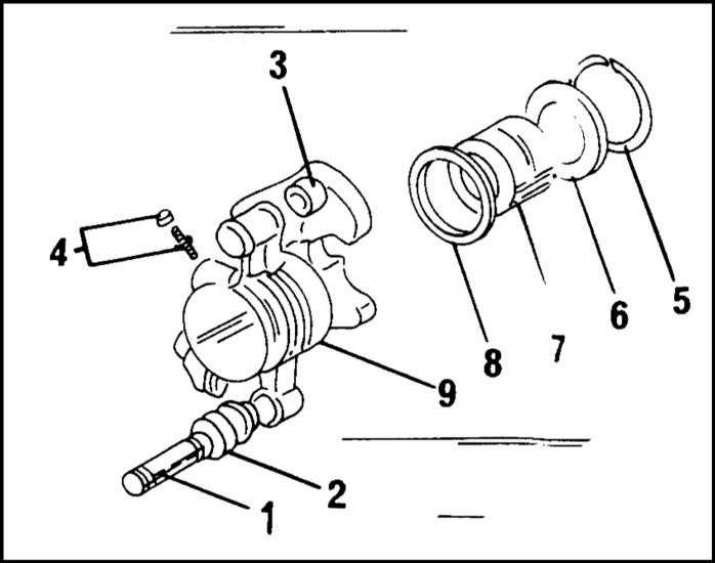
Details of the front brake caliper of a car up to the middle of 1995 of release: 1 - sliding sleeve; 2 - protective cover; 3 - protective cover; 4 - fitting for removing air; 5 - retaining ring; 6 - dustproof ring; 7 - piston; 8 - cuff; 9 - cylinder
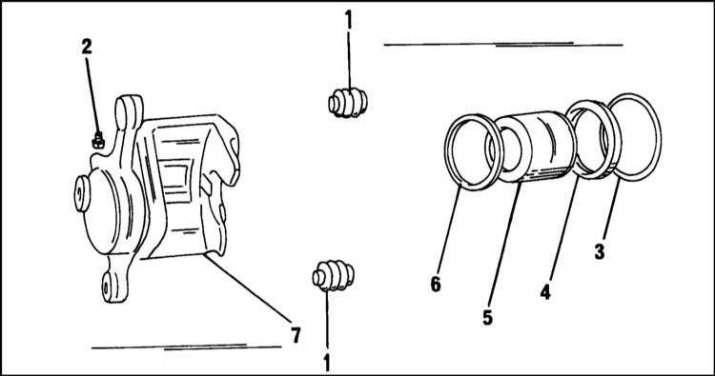
Parts of the front brake caliper of a car from the middle of 1995 of release 1 - protective cover; 2 - fitting for removing air; 3 - retaining ring; 4 - dustproof ring; 5 - piston; 6 - cuff; 7 - support
Repair
If, when replacing the brake pads, traces of fluid are found in the area of \u200b\u200bthe anthers of the wheel cylinder, the brake cuffs can be replaced.
1. Thoroughly clean the caliper and clamp it in a vise.
2. Carefully remove the protective caps from the end of the piston and from the caliper with a screwdriver. Be careful not to damage any parts.
3. Insert a wooden block into the hole in the caliper (in front of the piston) and supply compressed air to the hose connection.
4. Push the piston out of the cylinder. A foot operated pump can also be used for this purpose.
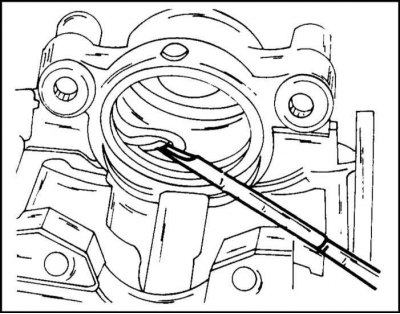
5. Remove with a non-sharp object (wooden or plastic) brake caliper from the cylinder as shown.
6. Details of the front wheel caliper of a car from the middle of 1995 are shown in the illustration Details of the front brake caliper of a car from the middle of 1995 of release.
An older car has bushings inserted inside the rubber boots. The new models have rubber covers that serve only as anthers.
7. Wash all parts thoroughly in brake fluid or alcohol.
8. If the inner surface of the cylinder shows signs of heavy wear, it is best to replace the caliper as a set.
9. The repair kit must be used in its entirety, including all parts.
10. First, insert the cuff into the groove and press firmly.
11. Lubricate the cuff with brake grease or brake fluid.
12. Insert the boot into the piston groove.
13. Wet the piston with brake fluid and insert it into the cylinder.
14. After the piston has partially entered the hole, install the boot into the caliper. Be careful not to damage the boot.
15. Move the piston deeper into the cylinder so that it is in the correct position. Make sure that the protective cap is correctly positioned.
16. If necessary, replace the protective boots with or without bushings, depending on the year of manufacture. Protective covers are installed with brake lubrication.
Caliper Cylinder Repair
1. After dismantling the cylinder cuff always replace.
2. Cylinders with signs of wear, scuffing and corrosion of the working surface should not be installed.
3. Use only approved brake fluid. Do not use liquid that has not been used for a long time.
4. Pistons and seals are lubricated with either clean brake fluid or brake grease.
For calipers of the considered design, the cylinder body moves on two sliding bushings. There is a piston inside the body. Despite the fact that the design of both calipers under consideration is different, their removal, repair and installation are carried out in the same way. The existing differences can be seen from the illustrations.
Caliper installation
If there are external defects in the brake hose o-rings, they should be replaced.
1. If the caliper guide has been removed, secure it to the steering knuckle and tighten both mounting bolts shown to 212 Nm.
2. Attach the hose to the caliper, making sure it is in the correct position. In this case, one guide pin must be inserted into the caliper.
3. Tighten the hollow bolt to 35 Nm.
4. Tighten the bleed fittings to 8 Nm and close with caps.
5. Install the brake pads as described above.
6. Remove the polyethylene from the tank cap.
7. Check fluid level. If necessary, top up and close the tank with a stopper.
8. Other work is performed in the reverse order of disassembly.
9. Bleed the system as described below.
10. Finally, check the system for leaks.
11. After completing all work, check the operation of the brake system while the vehicle is moving.
Visitor comments