
Remember that the dust generated during the operation of the brake mechanisms may contain asbestos, which is extremely harmful to human health. Never blow off dust with compressed air or inhale it - wear a protective mask or respirator when servicing mechanisms. Never use gasoline or petroleum-based solvents to clean brake system components - use only branded cleaners or methyl alcohol!
Both brake calipers on the same axle must be changed at the same time.
Removing
1. Remove the brake pads (see Section Replacing the pads of the disc brake mechanisms of the front wheels).
2. Remove the brake fluid reservoir cap.
3. Fill the reservoir with fresh brake fluid to the top. Close the lid and seal the vent hole.
4. Turn the steering wheel so that the brake caliper is turned outward.
5. Disconnect the pressure hose from the caliper. Do not lose the o-rings of the hollow bolt.
Caliper Pressure Hose Mount
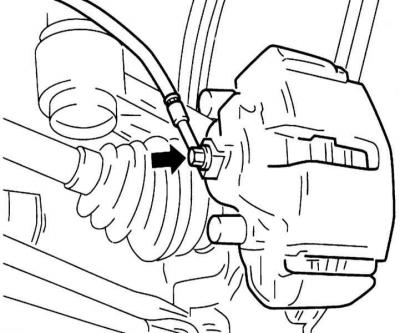
Keep clean around the brake hose and caliper. Dirt must not enter the brake system.
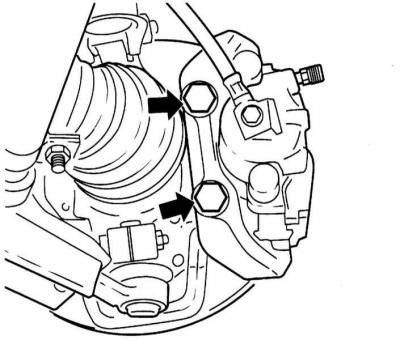
6. Turn out bolts of fastening and disconnect assemblage of a support then a rotary fist.
Bolts of fastening of a support to a rotary fist
Repair
Calipers used on diesel models 1.7 l and 2.0 l are not subject to refurbishment and, in case of malfunction, are replaced as an assembly.
1. Transfer the caliper to the workbench and carefully clean it of dirt and rust using a special cleaner or methyl alcohol.
Never use petroleum-based solvents to clean the brakes!
2. Remove the piston from the caliper cylinder and remove the boot. The piston must be freely removable by hand - if necessary, connect a source of compressed air with a low supply pressure to its fitting (best to use a foot pump) and lay a wooden block between the piston and the caliper bracket.
On models with a solid anchor bracket, the piston is made of plastic.
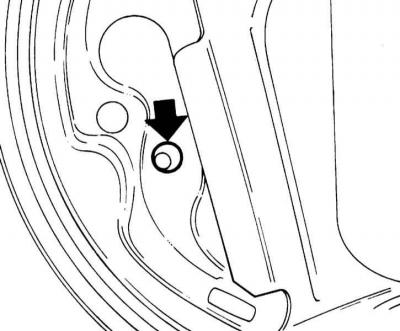
3. Using a plastic applicator, remove the piston cuff from the cylinder - try not to damage the cylinder mirror.
Removing the piston seal from the groove in the caliper cylinder
4. Press the guide bushings out of the caliper body.
5. Thoroughly wash all components with a special cleaner and dry them with compressed air - do not forget to wear safety goggles.
6. Replace damaged and worn parts. Carefully examine the condition of the working surfaces of the piston and cylinder, in case of defects, replace the corresponding components. Check the condition of the guide pins and the drillings for their fit - the pins should be free from damage and move easily enough in their seating slots. If you are not sure about the condition of the components, replace them.
7. If you intend to replace the old caliper, prepare all the necessary repair parts. Sealing cuffs and anthers of pistons are subject to replacement without fail.
8. Before assembly, make sure that all components are absolutely clean and dry.
9. Lower the piston and a new sealing cuff into a pure brake liquid, grease a cylinder mirror with it.
10. Use your fingers to fill the cuff into the groove of the cylinder - the use of any tools is fraught with damage to the working surface! Attach a new boot to the piston, turn it with the outer edge up, then fill the piston into the cylinder. Carefully drown the piston in the cylinder, in order to avoid distortions, making rotational and translational movements with it - the outer edge of the anther should fall into the receiving groove on the caliper.
11. Insert the guide bushings into the caliper body.
Installation
1. Install the caliper on the steering knuckle and tighten the mounting bolts with force 95 Nm.
2. Install the brake pads (see Section Replacing the pads of the disc brake mechanisms of the front wheels).
3. Tighten the hollow bolt of the brake hose with force 40 Nm.
4. Check up a possibility of movement of a support.
5. Remove air from the hydraulic path of the brake system (see Section Bleeding the brake system).
6. Install the front wheels so, lower the car to the ground and tighten the wheel bolts with force 110 Nm.
Visitor comments