
OpelBook.ru
Cars AvtoVAZ Cars Mitsubishi Cars BMW Cars Mercedes Cars Nissan Cars Toyota Cars Chevrolet
English Русский
Български
Беларускі
Український
Српски
Hrvatski
Română
Polski
Slovenský
Magyar
 |  Sitemap  |  Contacts  |    


Main Astra Corsa Insignia Kadett Omega Vectra Zafira Others Articles
Corsa B (1993-2000) Corsa C (2000-2006, petrol) Corsa C (2000-2006)
  • Main
  • Corsa
  • Corsa B
  • Chassis
  • Brake system
  • Removal, inspection and installation of the brake drum

Removal, inspection and installation of the brake drum (Opel Corsa B)

            0

Contents: Removal ⬇ Examination ⬇ Installation ⬇
Remember that the dust generated during operation of the brake mechanisms may contain asbestos, which is extremely harmful to human health. Never blow off dust with compressed air or inhale it - wear a protective mask or respirator when servicing the mechanisms. Never use gasoline or petroleum-based solvents to wipe brake system components - use only branded cleaning agents or methyl alcohol!


Removal


1. Unscrew the rear wheel mounting bolts, jack up the rear of the car and place it on supports. Remove the rear wheels.

2. Release the parking brake.

3. On models Corsa B and Tigra remove the hub cap with a screwdriver. Bend the locking pin with pliers and remove it, loosen the adjusting nut. Remove the brake drum. At the same time, make sure that the pressure washer and outer bearing do not fall.

4. On the model Combo loosen the brake drum lock screw and remove the drum. If the drum is firmly connected to the centering flange of the hub, lightly tap it with a plastic hammer. Wheel bearing model Combo is located in a separate hub, whereas on other models covered in this manual the wheel bearing is located directly in the brake drum.

Releasing the brake drum locking screw
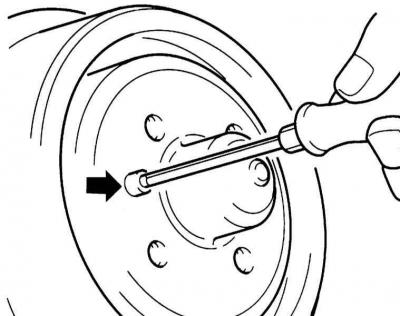
Releasing the brake drum locking screw


5. If the brake drum cannot be removed, remove the plug on the back of the brake shield and use a screwdriver to press the parking brake lever so that it rests against the wall of the brake shoe. This will allow the return spring to pull the brake shoes back and allow the brake drum to be removed. If necessary, disconnect the parking brake cable.


Pressing the parking brake lever with a screwdriver
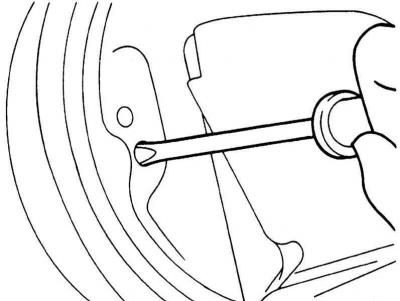
Pressing the parking brake lever with a screwdriver


Examination


1. Sweep away any dust that has accumulated on the surfaces of the brake components.

Remember that the dust generated during operation of the brake mechanisms may contain asbestos, which is extremely harmful to human health. Never blow off dust with compressed air or inhale it - wear a protective mask or respirator when servicing the mechanisms. Never use gasoline or petroleum-based solvents to wipe brake system components - use only branded cleaning agents or methyl alcohol!


2. Check the condition of the inner working surface of the drum; if grooves or deep scratches are found, replace the drums of both brake mechanisms.

3. Minor defects can be eliminated by turning the drum, provided that the maximum permissible value of its diameter is not exceeded.

Both drums must be resurfaced to the same depth. The authors of this Manual recommend replacing the brake shoes after resurfacing the drums.


Installation


1. On models Corsa B and Tigra replace the serviceable wheel bearings from the old brake drums to the new ones (see section Removal and installation brake shoes).


2. On models Corsa B and Tigra install the brake drums and adjust the wheel bearing clearance (see section Replacing brake linings of drum brakes).

3. On the model Combo clean the threaded hole for the locking screw and, if necessary, carefully tap it. Lubricate the locking screw with a locking sealant, such as OPEL 1510177. Install the brake drum on the hub so that the hole for the locking screw matches the hole in the hub. Screw in the locking screw and tighten it with force 4 Nm.

4. Apply a thin layer of grease to the centering belts of the brake drums. Install the rear wheels, lower the car to the ground and tighten the wheel mounting bolts crosswise with force 110 Nm.

5. Press the brake pedal approximately 20-25 times until the clicking of the adjusting lever is no longer heard. This indicates that the brake pads have taken their working position.

6. Adjust the parking brake (see section Adjusting the parking brake drive).

7. Check the brake fluid level in the reservoir and, if necessary, top it up to the MAX mark.


This article is available at russian, bulgarian, belarusian, ukrainian, serbian, croatian, romanian, polish, slovak, hungarian
Checking the article: Trifonova Emilia

Share information:

Previous articles
Opel Corsa B: Brake system
Next articles

Checking the condition, removing and installing the brake disc
Replacing brake linings of drum brakes
Removal and installation brake shoes
Replacing the front disc brake pads
Checking the condition and replacing brake lines and hoses
Bleeding the brake system
Removal, repair and installation of front wheel disc brake calipers
Removal, maintenance and installation of wheel cylinders of drum brake mechanisms of rear wheels
Checking the proper functioning and tightness of the brake booster
Replacing and checking the brake booster servo vacuum pump (diesel models)
Adjusting the parking brake drive
Removal and installation parking brake cables


See similar ones from other Opel car manuals:
▶ Rear Brake Drum — Removal, Checking and Installation Opel Astra F (1991-1998, petrol)
▶ Removal and installation of the wheel cylinder of the rear… Opel Kadett E (1984-1995)
▶ Replacing brake linings of drum brakes Opel Vectra A (1988-1995)
▶ Rear brake drums of the rear drum brake mechanism —… Opel Zafira A (1999-2005, petrol)
▶ Removal and installation the rear brake drum Opel Frontera A (1991-1998, petrol)
Link to this page in different formats

Visitor comments


No comments yet


How much will 11 + 26 =


Corsa C (2000-2006) 
  • General information
  • Introduction to guide
  • Troubleshooting
  • Vehicle device
  • User manual
  • Maintenance
  • Power unit
  • Engine repair
  • Cooling system
  • Power and exhaust system
  • Control system
  • Engine electrical equipment
  • Transmission
  • Clutch
  • Mechanical gearbox
  • Automatic gearbox
  • Drive shafts
  • Chassis
  • Brake system
  • Wheel suspension
  • Steering
  • Body
  • Exterior
  • Interior
  • Doors and windows
  • Heating and air conditioning
  • Electrical equipment
  • Equipment and devices
  • Lamps and lighting
  • Electrical circuits
Corsa C (2000-2006, petrol) 
  • User manual
  • Car access
  • Governing bodies
  • Seat control
  • Heating and air conditioning
  • Driving and maintenance
  • Engines 1.0 and 1.2 l
  • Engine repair
  • Cooling and lubrication system
  • Injection system
  • Engines 1.4, 1.6 and 1.8 l
  • Engine repair
  • Cooling and lubrication system
  • Injection system
  • Transmission
  • Clutch
  • Mechanical gearbox
  • Automatic gearbox
  • Drive shafts
  • Chassis
  • Wheels and tires
  • Wheel suspension
  • Steering
  • Brake system
  • Body
  • Exterior
  • Doors and windows
  • Electrical equipment
  • Equipment and devices
  • Lighting system
  • Electrical circuits
Corsa B (1993-2000) 
  • General information
  • Introduction to guide
  • User manual
  • Maintenance
  • Power unit
  • SOHC gasoline engines
  • DOHC gasoline engines
  • Diesel engines
  • Engine repair
  • Cooling system
  • Supply system
  • Injection system (gasoline)
  • Injection system (diesel)
  • Exhaust systems
  • Control system (gasoline)
  • Preheat system (diesel)
  • Charge and launch system
  • Transmission
  • Mechanical gearbox
  • Automatic gearbox
  • Clutch and drive shafts
  • Chassis
  • Brake system
  • Front suspension
  • Rear suspension
  • Steering
  • Body
  • Ventilation and heating
  • Exterior
  • Interior
  • Doors and windows
  • Electrical equipment
  • Equipment and devices
  • Lamps and lighting
  • Electrical circuits
OpelBook.ru © 2017–2026 · Mobile version · · Sitemap: EN BG BY UA RS HR RO PL SK HU · Feedback · Site search
Astra F, petrol · Astra G, petrol · Astra G · Astra H · Astra J, petrol · Corsa B · Corsa C, petrol · Corsa C · Insignia A · Kadett D · Kadett E · Omega A · Omega B · Omega B2 · Vectra A, petrol · Vectra A · Vectra B, petrol · Vectra B · Vectra C · Zafira A, petrol · Frontera A, petrol · Frontera B · Ascona C · Vivaro A ·
We want your visit to be comfortable 🤝! We use cookies 🍪 to make that happen.