
OpelBook.ru
Cars AvtoVAZ Cars Mitsubishi Cars BMW Cars Mercedes Cars Nissan Cars Toyota Cars Chevrolet
English Русский
Български
Беларускі
Український
Српски
Hrvatski
Română
Polski
Slovenský
Magyar
 |  Sitemap  |  Contacts  |    


Main Astra Corsa Insignia Kadett Omega Vectra Zafira Others Articles
Corsa B (1993-2000) Corsa C (2000-2006, petrol) Corsa C (2000-2006)
  • Main
  • Corsa
  • Corsa B
  • Chassis
  • Brake system
  • Checking the condition, removing and installing the brake disc

Checking the condition, removing and installing the brake disc (Opel Corsa B)

            0

Contents: Checking the status ⬇ Removal ⬇ Installation ⬇

Checking the status


Cars with engines up to 60 hp are equipped with solid brake discs at the front. Cars with more powerful engines are equipped with ventilated disc brakes.


1. Loosen the wheel bolts, jack up the car and place it on stands. Remove the wheel in question, then replace the pair of wheel bolts to secure the brake disc (if the disk mounting screw has not yet been unscrewed, there is no need to install bolts).

2. Remove the brake caliper (see section Removal, repair and installation of front wheel disc brake calipers) and tie it to the side with wire to the suspension element without disconnecting the brake hose.

3. Visually inspect the condition of the disc's working surface. Light defects can be removed using fine-grained sandpaper. To remove deep grooves, the disc should be subjected to turning. Remember that the disc should be inspected from both sides.

4. If pulsations of the foot brake pedal are noticed during braking, the lateral runout of the brake disc should be assessed. Attach a plunger-type dial gauge at a distance of approximately 13 mm from the outer edge of the disc. Zero the instrument and begin to rotate the disc. The measurement result should not go beyond the limits specified in the Specifications (Chapter Brake system) of the permissible range, otherwise the disk must be given for resurfacing.

Measuring the lateral runout of a brake disc
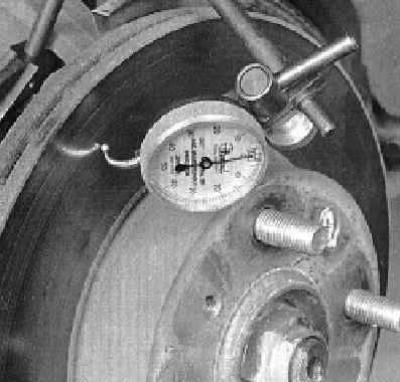
Measuring the lateral runout of a brake disc


The authors of this Manual recommend turning the disks regardless of their condition in order to remove all kinds of defects from the working surfaces. In extreme cases, you can limit yourself to processing the disk with fine-grained sandpaper.


5. When turning the disc, special attention should be paid to compliance with the requirements of the Specifications in Chapter Brake system to its minimum permissible thickness. The corresponding marking is provided on the end surface of the disk. The thickness of the disk is measured using a micrometer.

Measuring the thickness of the brake disc

(Source is on this resource: «opelbook.ru»)
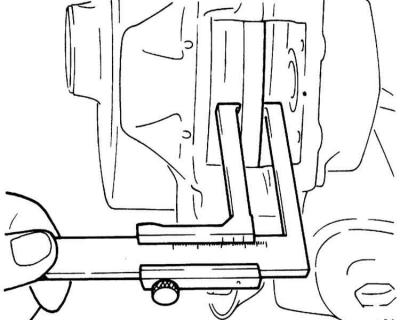
Measuring the thickness of the brake disc


Removal


1. Remove the wheel bolts installed during the disc inspection.

2. Remove the front caliper (see section Removal, repair and installation of front wheel disc brake calipers) with brake pads and mounting bracket and move it to the side, tying it to the stand.

Removal the caliper
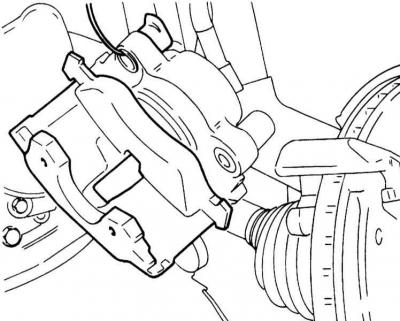
Removal the caliper


3. Loosen the mounting screw and remove the brake disc from the wheel hub.


Brake disc mounting screw loosening
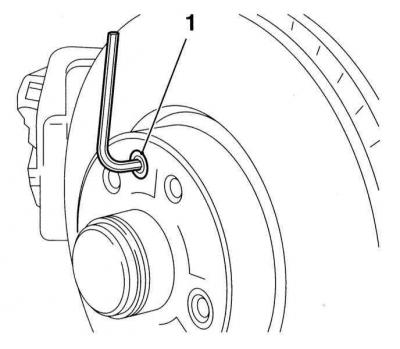
Brake disc mounting screw loosening


Installation


1. Installation is performed in the reverse order of dismantling the components. Before installation, make sure that the mating surfaces of the disc and hub are absolutely clean and dry. Lightly lubricate the threaded part of the disc mounting screw with a locking sealant.

2. Finally, install the brake pads and brake caliper (see sections Replacing the front disc brake pads and Removal, repair and installation of front wheel disc brake calipers).


This article is available at russian, bulgarian, belarusian, ukrainian, serbian, croatian, romanian, polish, slovak, hungarian
Checking the article: Trifonova Emilia

Share information:

Previous articles
Opel Corsa B: Brake system
Next articles

Replacing brake linings of drum brakes
Removal and installation brake shoes
Replacing the front disc brake pads
Checking the condition and replacing brake lines and hoses
Bleeding the brake system
Anti-lock Brake System (ABS) — General Information and Error Codes
Removal, inspection and installation of the brake drum
Removal, repair and installation of front wheel disc brake calipers
Removal, maintenance and installation of wheel cylinders of drum brake mechanisms of rear wheels
Checking the proper functioning and tightness of the brake booster
Replacing and checking the brake booster servo vacuum pump (diesel models)
Adjusting the parking brake drive


See similar ones from other Opel car manuals:
▶ Checking the condition, removing and installing the brake… Opel Astra G (1998-2004)
▶ Front Brake Pads — Checking, Removing and Installing Opel Omega B2 (1999-2003)
▶ Checking, removing and installing the brake light switch Opel Vectra A (1988-1995)
▶ Checking the technical condition of the rear brake caliper Opel Insignia A (2008-2017)
▶ Checking, removing and installing injection valves… Opel Kadett D (1979-1984)
Link to this page in different formats

Visitor comments


No comments yet


How much will 10 + 44 =


Corsa C (2000-2006) 
  • General information
  • Introduction to guide
  • Troubleshooting
  • Vehicle device
  • User manual
  • Maintenance
  • Power unit
  • Engine repair
  • Cooling system
  • Power and exhaust system
  • Control system
  • Engine electrical equipment
  • Transmission
  • Clutch
  • Mechanical gearbox
  • Automatic gearbox
  • Drive shafts
  • Chassis
  • Brake system
  • Wheel suspension
  • Steering
  • Body
  • Exterior
  • Interior
  • Doors and windows
  • Heating and air conditioning
  • Electrical equipment
  • Equipment and devices
  • Lamps and lighting
  • Electrical circuits
Corsa C (2000-2006, petrol) 
  • User manual
  • Car access
  • Governing bodies
  • Seat control
  • Heating and air conditioning
  • Driving and maintenance
  • Engines 1.0 and 1.2 l
  • Engine repair
  • Cooling and lubrication system
  • Injection system
  • Engines 1.4, 1.6 and 1.8 l
  • Engine repair
  • Cooling and lubrication system
  • Injection system
  • Transmission
  • Clutch
  • Mechanical gearbox
  • Automatic gearbox
  • Drive shafts
  • Chassis
  • Wheels and tires
  • Wheel suspension
  • Steering
  • Brake system
  • Body
  • Exterior
  • Doors and windows
  • Electrical equipment
  • Equipment and devices
  • Lighting system
  • Electrical circuits
Corsa B (1993-2000) 
  • General information
  • Introduction to guide
  • User manual
  • Maintenance
  • Power unit
  • SOHC gasoline engines
  • DOHC gasoline engines
  • Diesel engines
  • Engine repair
  • Cooling system
  • Supply system
  • Injection system (gasoline)
  • Injection system (diesel)
  • Exhaust systems
  • Control system (gasoline)
  • Preheat system (diesel)
  • Charge and launch system
  • Transmission
  • Mechanical gearbox
  • Automatic gearbox
  • Clutch and drive shafts
  • Chassis
  • Brake system
  • Front suspension
  • Rear suspension
  • Steering
  • Body
  • Ventilation and heating
  • Exterior
  • Interior
  • Doors and windows
  • Electrical equipment
  • Equipment and devices
  • Lamps and lighting
  • Electrical circuits
OpelBook.ru © 2017–2026 · Mobile version · · Sitemap: EN BG BY UA RS HR RO PL SK HU · Feedback · Site search
Astra F, petrol · Astra G, petrol · Astra G · Astra H · Astra J, petrol · Corsa B · Corsa C, petrol · Corsa C · Insignia A · Kadett D · Kadett E · Omega A · Omega B · Omega B2 · Vectra A, petrol · Vectra A · Vectra B, petrol · Vectra B · Vectra C · Zafira A, petrol · Frontera A, petrol · Frontera B · Ascona C · Vivaro A ·
We want your visit to be comfortable 🤝! We use cookies 🍪 to make that happen.