
OpelBook.ru
Cars AvtoVAZ Cars Mitsubishi Cars BMW Cars Mercedes Cars Nissan Cars Toyota Cars Chevrolet
English Русский
Български
Беларускі
Український
Српски
Hrvatski
Română
Polski
Slovenský
Magyar
 |  Sitemap  |  Contacts  |    


Main Astra Corsa Insignia Kadett Omega Vectra Zafira Others Articles
Corsa B (1993-2000) Corsa C (2000-2006, petrol) Corsa C (2000-2006)
  • Main
  • Corsa
  • Corsa B
  • Chassis
  • Brake system
  • Removal, maintenance and installation of wheel cylinders of drum brake mechanisms of rear wheels

Removal, maintenance and installation of wheel cylinders of drum brake mechanisms of rear wheels (Opel Corsa B)

            0

Contents: Removal ⬇ Service ⬇ Installation ⬇
In case of brake fluid leaks, wheel cylinders must be replaced without fail. Manufacturers do not recommend attempting to perform restorative repairs on these brake mechanism units.


Removal


1. Support the front wheels with wheel chocks. Jack up the rear of the car and place it on supports.

2. Remove the brake drum and shoes (see section Removal, inspection and installation of the brake drum).

3. Clean the wheel cylinder and surrounding surfaces from dirt.

4. Remove the cap from the brake master cylinder reservoir, place a piece of polyethylene film underneath it and screw it back into place. Placing the film underneath will seal the cap and prevent fluid from leaking when the flexible brake hose nipple is released.

5. Remove the upper tension spring and move the brake shoes apart, releasing them from the pistons.

6. After thoroughly wiping the nipple, disconnect the hydraulic line from the rear of the wheel cylinder. Use a special open-end wrench with a slotted head to avoid rounding the nipple splines. When disconnecting, do not pull on the metal tube of the brake line to avoid deformation, which can significantly complicate the connection procedure. Immediately plug the open end of the brake line to minimize fluid loss and prevent dirt from entering the hydraulic system.

7. Remove the wheel cylinder mounting bolt.

8. Remove the wheel cylinder from the brake shield and transfer it to a clean workbench.

If there are traces of hydraulic fluid on the friction linings of the brake shoes, the shoes should be replaced and the working surface of the drum should be thoroughly cleaned.


Service


1. Wipe the outside of the cylinder thoroughly.

2. The design of the wheel cylinder is presented on the accompanying illustration. Remove both dust boots from the cylinder.

Design of the wheel cylinder of the rear wheel drum brake mechanism
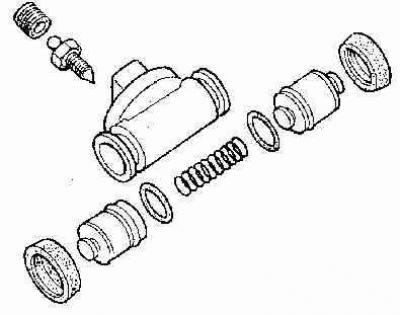
Design of the wheel cylinder of the rear wheel drum brake mechanism


3. Usually the pistons are freely pushed out of the cylinder under the action of the force developed by the spring. If necessary, plug the end hole of the cylinder with a wooden plug and push the piston out by feeding air into the cylinder through the inlet from the foot pump.

4. Carefully examine the condition of the working surfaces of the cylinder and pistons. If obvious defects are detected, replace the cylinder.

The authors of this Manual recommend replacing the cylinders of both rear wheel brake mechanisms at the same time.


5. If the condition of the components is considered satisfactory, replace the sealing cuffs and dust boots - the corresponding repair kits can always be found in car accessory stores.

6. Lubricate the new piston seals with clean brake fluid and use your finger to insert them into the cylinder, placing the spring in the middle.


7. Dip the pistons in clean brake fluid and fill them into the cylinder.

8. Install new dust boots and check the pistons for free movement.

Installation


1. Make sure the mating surfaces of the cylinder and brake shield are absolutely clean and dry. Spread the shoes, install the cylinder in its regular place and connect the hydraulic line to it - do not tighten the union nut yet.

2. Screw in the mounting bolts and tighten them securely - now the union nut can be finally tightened. Remove the polyethylene placed under the master cylinder reservoir cover.

(Material copied from this portal: «OpelBook.ru»)

3. Insert the shoes into the piston grooves and install the upper tension spring in place.

4. Reinstall the brake drum (see section Removal, inspection and installation of the brake drum).

5. Bleed the brake system (see section Bleeding the brake system), - it is enough to bleed only the circuit whose cylinder was removed.

6. Adjust the parking brake drive cable. And install the control lever boot in place.

7. Before operating the vehicle, make sure that the brakes are functioning properly.


This article is available at russian, bulgarian, belarusian, ukrainian, serbian, croatian, romanian, polish, slovak, hungarian
Checking the article: Trifonova Emilia

Share information:

Previous articles
Opel Corsa B: Brake system
Next articles

Removal, repair and installation of front wheel disc brake calipers
Removal, inspection and installation of the brake drum
Checking the condition, removing and installing the brake disc
Replacing brake linings of drum brakes
Removal and installation brake shoes
Replacing the front disc brake pads
Checking the proper functioning and tightness of the brake booster
Replacing and checking the brake booster servo vacuum pump (diesel models)
Adjusting the parking brake drive
Removal and installation parking brake cables
Replacing the brake light switch sensor
Pressure regulator valve in the hydraulic circuits of the rear wheel brake mechanisms


See similar ones from other Opel car manuals:
▶ Removal, maintenance and installation of wheel cylinders of… Opel Astra G (1998-2004)
▶ Removal and installation of the wheel cylinder of the rear… Opel Kadett E (1984-1995)
▶ Removal and installation rear wheel brake cylinders Opel Vectra A (1988-1995)
▶ Rear brake cylinders of the rear drum brake mechanism —… Opel Zafira A (1999-2005, petrol)
▶ Rear wheel brake caliper — removal, overhaul and… Opel Omega B2 (1999-2003)
Link to this page in different formats

Visitor comments


No comments yet


How much will 17 + 18 =


Corsa C (2000-2006) 
  • General information
  • Introduction to guide
  • Troubleshooting
  • Vehicle device
  • User manual
  • Maintenance
  • Power unit
  • Engine repair
  • Cooling system
  • Power and exhaust system
  • Control system
  • Engine electrical equipment
  • Transmission
  • Clutch
  • Mechanical gearbox
  • Automatic gearbox
  • Drive shafts
  • Chassis
  • Brake system
  • Wheel suspension
  • Steering
  • Body
  • Exterior
  • Interior
  • Doors and windows
  • Heating and air conditioning
  • Electrical equipment
  • Equipment and devices
  • Lamps and lighting
  • Electrical circuits
Corsa C (2000-2006, petrol) 
  • User manual
  • Car access
  • Governing bodies
  • Seat control
  • Heating and air conditioning
  • Driving and maintenance
  • Engines 1.0 and 1.2 l
  • Engine repair
  • Cooling and lubrication system
  • Injection system
  • Engines 1.4, 1.6 and 1.8 l
  • Engine repair
  • Cooling and lubrication system
  • Injection system
  • Transmission
  • Clutch
  • Mechanical gearbox
  • Automatic gearbox
  • Drive shafts
  • Chassis
  • Wheels and tires
  • Wheel suspension
  • Steering
  • Brake system
  • Body
  • Exterior
  • Doors and windows
  • Electrical equipment
  • Equipment and devices
  • Lighting system
  • Electrical circuits
Corsa B (1993-2000) 
  • General information
  • Introduction to guide
  • User manual
  • Maintenance
  • Power unit
  • SOHC gasoline engines
  • DOHC gasoline engines
  • Diesel engines
  • Engine repair
  • Cooling system
  • Supply system
  • Injection system (gasoline)
  • Injection system (diesel)
  • Exhaust systems
  • Control system (gasoline)
  • Preheat system (diesel)
  • Charge and launch system
  • Transmission
  • Mechanical gearbox
  • Automatic gearbox
  • Clutch and drive shafts
  • Chassis
  • Brake system
  • Front suspension
  • Rear suspension
  • Steering
  • Body
  • Ventilation and heating
  • Exterior
  • Interior
  • Doors and windows
  • Electrical equipment
  • Equipment and devices
  • Lamps and lighting
  • Electrical circuits
OpelBook.ru © 2017–2026 · Mobile version · · Sitemap: EN BG BY UA RS HR RO PL SK HU · Feedback · Site search
Astra F, petrol · Astra G, petrol · Astra G · Astra H · Astra J, petrol · Corsa B · Corsa C, petrol · Corsa C · Insignia A · Kadett D · Kadett E · Omega A · Omega B · Omega B2 · Vectra A, petrol · Vectra A · Vectra B, petrol · Vectra B · Vectra C · Zafira A, petrol · Frontera A, petrol · Frontera B · Ascona C · Vivaro A ·
We want your visit to be comfortable 🤝! We use cookies 🍪 to make that happen.