
Attention! Be sure to change all front brake pads, even if only one of them has reached the minimum wear limit. Never change the pads on only one wheel, because. this will cause uneven braking of the wheels. When cleaning the brake system, dust is generated. This dust is harmful to human health. Therefore, when cleaning the brake system, use a respirator to prevent brake dust from entering the respiratory tract. Do not use gasoline-based solvents to clean brake components. Use only special cleaner or methyl alcohol.
Removing
1. Apply the parking brake.
2. Jack up the front of the vehicle and place it on jack stands.
3. Unscrew wheel bolts and remove forward wheels.
4. Turn the steering wheel to the extreme right position and check the residual thickness of the brake linings of the right wheel pads through the inspection hole on the front side of the caliper.
5. Measure the pad thickness using a ruler or caliper and compare the result with the data given in the specifications.
6. Turn the steering wheel to the extreme left position and check the thickness of the brake pad of the left wheel as described above. If any of the brake pads are worn beyond the specification limit, replace all front brake pads and preload springs.
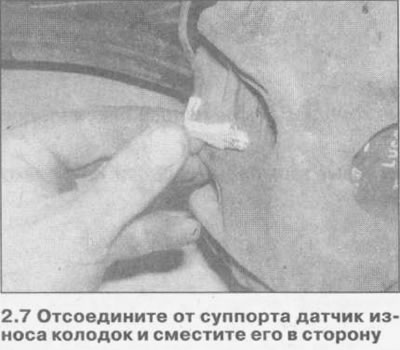
7. Disconnect from the caliper by prying off the pad wear sensor with a small flat screwdriver and move it to the side (see illustration).
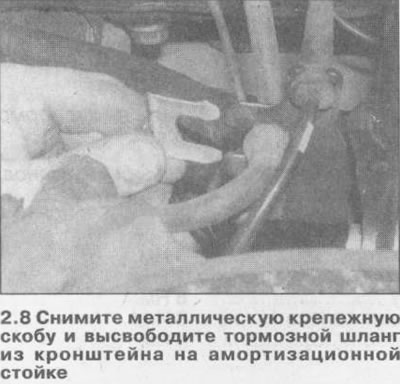
8. Remove the metal mounting bracket and release the brake hose from the bracket on the suspension strut (see illustration).
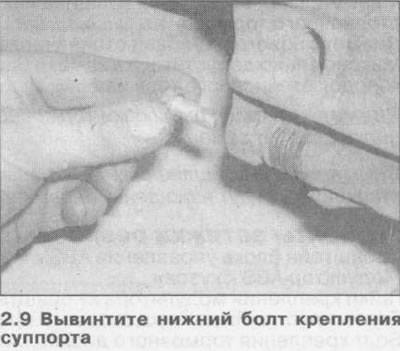
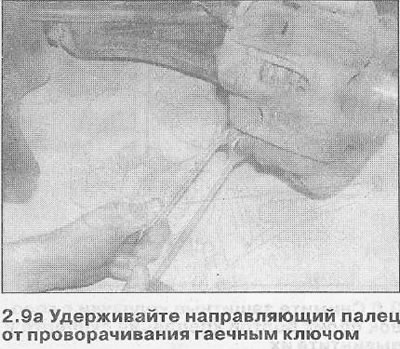
9. Remove the protective cap from the head of the lower caliper mounting bolt and unscrew it, holding the guide pin with a wrench from turning (see illustrations 2.9 and 2.9a).
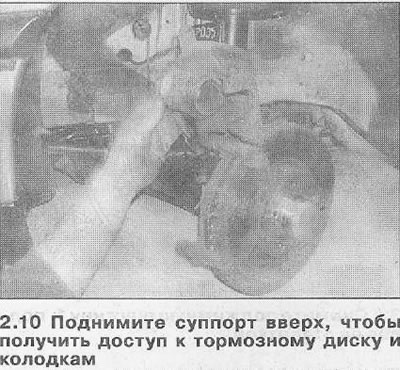
10. Raise the caliper up (see illustration), to gain access to the brake disc and pads, or remove and secure the caliper to the body in a vertical position with wire.
Attention! Do not disconnect the brake hose from the caliper. Otherwise, the brake system after installing the caliper will have to be pumped. Do not stretch the brake hose or kink it.
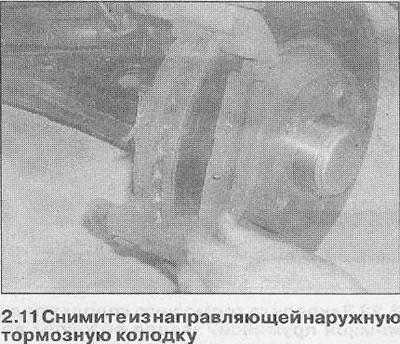
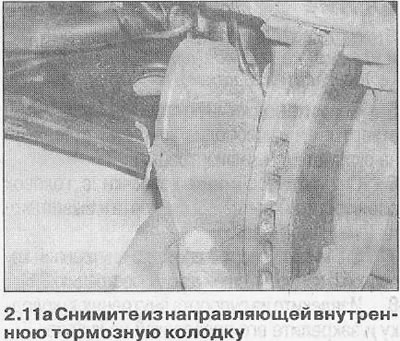
11. Remove both brake pads from the guide (see illustrations 2.11 and 2.11a).
Inspection
12. Measure the thickness of each brake pad (see illustration). If any of the pads are worn to the specified minimum thickness or contaminated with oil or grease, replace all four front wheel pads. In case of contamination or uneven wear of the pad, find and eliminate the cause. If the pad wear sensor has come into contact with the brake disc (the corresponding indicator light is on), also needs to be replaced.

13. Inspect the brake disc (see relevant chapter).
14. Gently clean the brake pads with a soft wire brush, if still serviceable, paying particular attention to the sides and back of the metal backing. Clean the grooves of the brake pads (if any) and remove large particles of dirt from the linings. Carefully clean the inside of the caliper and its bracket. Make sure the guide pins slide easily into the caliper mounting bushes. Remove dust and dirt from the caliper and piston. Check the condition of the dust seal around the piston and inspect the piston itself for leaks, corrosion, and damage. If the condition of any of these components is in doubt, replace it.
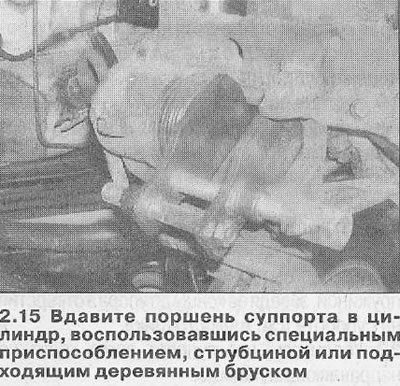
15. Press the caliper piston into the cylinder if new brake pads are being installed to create the required space.
Use a special tool for this, e.g. HAZET 4970/6, a clamp or a suitable piece of wood (see illustration).
Attention! When the piston is depressed, the brake fluid is squeezed out of the wheel brake cylinder into the expansion tank. Observe the liquid in the tank, if necessary, select it.
Note: Use a siphon or a plastic bottle that is not destroyed by the brake fluid to drain. Do not use regular drinking water bottles! Brake fluid is poisonous and must never be sucked out by mouth through a hose. Use a siphon. And after replacing the brake pads, the level of brake fluid in the reservoir should also not exceed the maximum mark, because. when heated, it expands. Leaking brake fluid flows down the brake master cylinder, destroying the paintwork and causing corrosion.
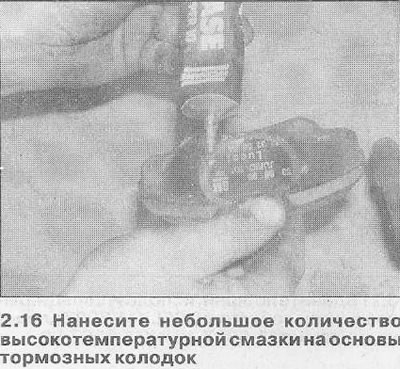
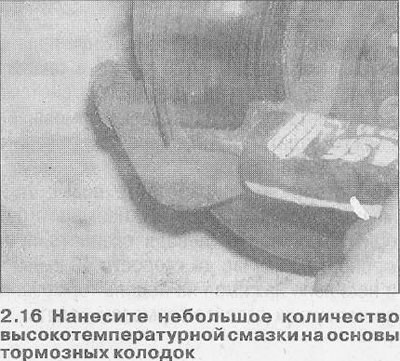
16. Before installing the pads, clean the parts of the brake mechanism, removing dust and dirt with a stiff brush and a special cleaner. Apply a small amount of high temperature brake grease to the caliper and piston mating areas of the metal bases of the pads and caliper bracket (see illustrations 2.16 and 2.16a). Check the condition of the dust seal around the piston and inspect the piston itself for leaks, corrosion, and damage.
Attention! Use some care and attention to ensure that grease does not get on the brake linings and the surface of the brake disc.
Installation
17. Install the inner and outer brake pads into the caliper bracket. Make sure the pads move easily in the guides.
18. Lower the caliper down to the working position so that the piston rests against the base of the inner pad, and the outer edge of the caliper against the base of the outer pad. Make sure the cruciform springs at the edge of the pads rest on the inside surface of the caliper and are not pinched in the caliper's inspection port.
19. Thoroughly clean the threads of the lower caliper mounting bolt, install it in the caliper and tighten with a force of 30 Nm.
20. Put on a protective cap on a head of a bolt.
21. Install the brake pad wear sensor.
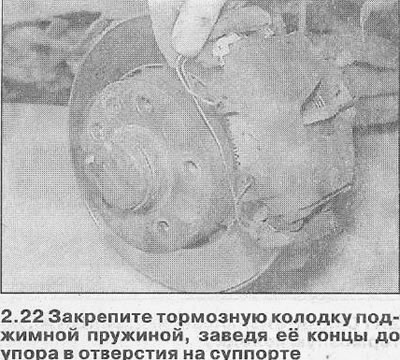
22. Secure the brake shoe with a preload spring, driving its ends all the way into the holes on the caliper (see illustration).
23. Make sure the caliper moves easily on the guide pins.
24. Squeeze the brake pedal several times so that the pads self-adjust and fit snugly against the brake disc.
25. Be convinced that the brake system is tight and in it the appropriate pressure is created, interfering with pedal depressing.
26. Repeat the above procedure for the brake pads of the second front wheel mechanism.
27. Install the wheels, lower the vehicle and tighten the wheel bolts to 110 Nm.
28. Check the brake fluid level and top up if necessary.
Attention! Make sure that
- A) brake hoses are securely connected,
- b) the brake hose is fixed in the holder,
- V) brake bleeders are screwed on,
- G) there is enough brake fluid in the expansion tank.
29. Carry out a leak test of the brake system with the engine running.
To do this, depress the brake pedal with a force of 200-300 N (20 -30 kg) for approximately 10 seconds. The pressure in the system and, accordingly, on the brake pedal, must not fall. Check all connections for tightness.
30. Carefully run in new brake pads. To do this, brake several times, bringing the speed from about 80 km / h to a speed of 40 km / h, and slightly pressing the brake pedal. Let the brakes cool down in between.
Attention! New brake pads should be worn in. Therefore, before driving approximately 200 km, refrain from braking, causing a complete stop of the car.
Visitor comments