


- a) Brake fluid is poisonous. It should never be sucked out by mouth through a hose. Pour brake fluid only into containers that prevent human consumption.
- b) Brake fluid has a corrosive effect, so it should not come into contact with car varnish. If brake fluid gets on painted surfaces, remove it immediately and wash the surface with plenty of water.
- c) Brake fluid is hygroscopic, which means that it absorbs moisture in the air, which lowers its boiling point. Therefore, store brake fluid only in closed containers.
- d) Brake fluid is flammable. Store it in a closed container at room temperature.
- d) Brake fluid that has already been used in the brake system once cannot be refilled. When bleeding the brake system, fill in only new brake fluid.
- e) Brake fluid specification: SAEJ 1703 and DOT 4.
- g) Brake fluid should not come into contact with petroleum products. Even small amounts of petroleum products make the brake fluid unsuitable for use or cause the brake system to fail. Brake system plugs and seals become unusable when in contact with products containing petroleum products. When cleaning, do not use rags soaked in petroleum products.
- h) Before removing the caps from the brake fluid container and the expansion tank, they should be cleaned of dirt. The same applies to the bleed nipples.
- i) The brake fluid must be replaced every 2 years, if possible after the cold season.
After any brake repair where the brake system was opened, air may enter the pressure lines. In this case, it is necessary to bleed this air from the brake system.
The presence of air in the pipelines can also be judged by the fact that when pressing the brake pedal, no strong resistance is felt. In this case, it is necessary to eliminate the leak and remove air from the system.
In workshops, air is removed from the system using a device for filling brake fluid and bleeding the brake system.
Removing air using this device is recommended in cases where one of the brake hoses has been removed, one of the expansion tank chambers has been emptied, or when it is necessary to bleed the clutch hydraulic drive.
In other cases, bleeding can be done in the usual way by pressing the brake pedal. An assistant is required for this operation.
If you need to bleed the entire system, you need to remove air from each brake mechanism. This happens when air has entered all the working brake cylinders. If only one brake mechanism support or only one working brake cylinder was replaced or overhauled, then, as a rule, it is enough to remove air only from the corresponding brake mechanism.
If air has entered the ABS hydraulic unit, it is recommended to have the air removed by a specialized workshop. This can happen in the event of a depressurization of the ABS hydraulics or in the event that the brake fluid has completely leaked out of at least one chamber of the expansion tank and, as a result, air has been pumped into the system. Air can also enter due to carelessness when removing air from the system, when the brake fluid volume was not replenished in time and air was sucked in.
Air removal sequence:
- a) rear left wheel brake mechanism,
- b) front right wheel brake mechanism,
- c) rear right wheel brake mechanism,
- d) front left wheel brake mechanism.
Attention! Loosen the brake drive bleed nipples carefully so as not to strip the threads. It is recommended to apply a rust remover to the nipples an hour before performing air removal work. If they do not unscrew, then this work should be entrusted to a workshop.
Attention! When bleeding, hold the container for collecting the brake fluid above the bleeding nipple by about 30 cm and check the brake fluid level in the expansion tank from time to time. Do not allow the brake fluid level in the tank to drop to the limit or for the tank to be completely "empty". In this case, air will be pumped into the system. Replenish the amount of brake fluid in the expansion tank!
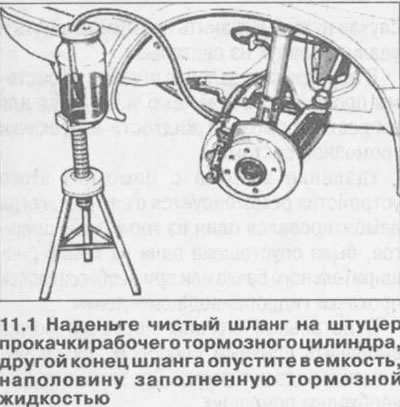
1. Remove the protective cap from the bleed nipple of the working brake cylinder. Clean the nipple, put a clean hose on it, lower the other end of the hose into a container half filled with brake fluid (see illustration). The appropriate hose and container are sold in auto parts stores.
The assistant must constantly press the brake pedal all the way ("pump") until the pressure in the brake system rises. This is felt by the increase in resistance to pressing the pedal.
Once sufficient pressure has been achieved, press the pedal all the way down and hold it in this position.
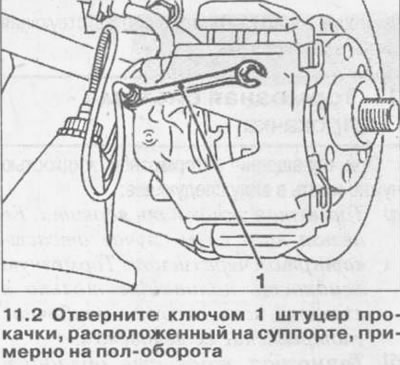
2. Use a wrench to loosen the bleed nipple located on the caliper by about half a turn. Collect the leaking brake fluid in a container. Make sure that the end of the hose in the container is always below the fluid level (see illustration).
3. Close the bleeder valve once the brake fluid pressure has dropped.
4. Repeat bleeding until pressure appears. Press the brake pedal down as far as it will go, leave your foot on the pedal. Open the bleeding nipple and, having reduced the pressure, close the nipple.
5. Repeat bleeding on one caliper until air bubbles stop appearing in the liquid flowing into the container.
6. After removing the air, remove the hose from the bleed nipple and close it with a dust cap.
In the same way, remove air from the brake cylinders of the other wheels, while observing the bleeding sequence.
7. After removing air, bring the brake fluid level in the expansion tank to the maximum mark.
8. Press the brake pedal with the engine off. The pressure in the brake system should not be "loose". If so, repeat the procedure for bleeding the brake system.
Attention! Make sure that:
- a) the brake hoses are securely connected,
- b) the brake hose is secured in the holder,
- c) the brake drive bleed nipples are screwed in,
- d) there is a sufficient volume of brake fluid in the expansion tank.
9. Perform a leak test of the brake system with the engine running.
To do this, press the brake pedal with a force of 200-300 N (20-30 kg) for about 10 seconds. The pressure in the system and, accordingly, on the brake pedal, should not drop. Check all connections for leaks.
10. Perform test braking on a road with light traffic. At least one sharp braking must be performed to activate the ABS. Its action will be felt by a slight pulsation of the brake pedal.
Attention! When braking, make sure that there is no oncoming traffic behind you.
Visitor comments