
OpelBook.ru
Cars AvtoVAZ Cars Mitsubishi Cars BMW Cars Mercedes Cars Nissan Cars Toyota Cars Chevrolet
English Русский
Български
Беларускі
Український
Српски
Hrvatski
Română
Polski
Slovenský
Magyar
 |  Sitemap  |  Contacts  |    


Main Astra Corsa Insignia Kadett Omega Vectra Zafira Others Articles
Omega A (1986-1993) Omega B (1993-1999) Omega B2 (1999-2003)
  • Main
  • Omega
  • Omega B2
  • Chassis
  • Brake system
  • Brake pedal — removal and installation

Brake pedal — removal and installation (Opel Omega B2)

            0

Contents: Removal ⬇ Installation ⬇

Removal


1. Unscrew the mounting bolts, remove the lower trim panel of the instrument panel in the footwell on the driver's side. Disconnect the fasteners and remove the air ducts.

2. Disconnect the brake light switch sensor plug, and then disconnect the switch from the pedal bracket, marking its position.

3. Disconnect both brake pedal return springs.

4. Remove the spring clip and push out the pin securing the booster push rod to the brake pedal.

5. Unscrew the upper pedal bracket mounting bolt.

6. Unscrew the nuts that secure the pedal bracket to the bulkhead. Note that the brake booster is also secured with these same nuts. Move the booster away from the bulkhead to remove its studs from the pedal bracket.

7. Rotate the bracket down to remove it from the top studs of the booster, then remove the bracket along with the pedal.

8. Remove the spring clip, unscrew the nut on the end of the pedal pivot shaft and remove the washer.

9. Remove the pedal mounting brackets and carefully slide the axle out of the bracket to allow the brake pedal to be removed. Remove the thrust washers (if any) and the central spring (see illustration).
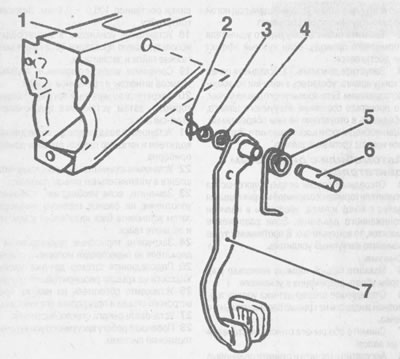
15.9 Brake pedal and its fastening

15.9 Brake pedal and its fastening
1 - pedal bracket
2 - spring clamp
3 - nut
4 - washer
5 - return spring
6 - pedal pivot axis
7 - pedal


Installation


10. Install the pedal in the reverse order of removal. Lubricate the pedal pivot and tighten the threaded connections to the specified torque.

The article was published on the website: OpelBook


This article is available at russian, bulgarian, belarusian, ukrainian, serbian, croatian, romanian, polish, slovak, hungarian
Checking the article: Shapovalov Yaroslav

Share information:

Previous articles
Opel Omega B2: Brake system
Next articles

Vacuum Booster Hose and Its One-Way Valve — Replacement
Brake booster — inspection, removal and installation
Brake hoses — removal and installation
Brake system — bleeding
Expansion tank and brake fluid level sensor — removal and installation
Master Brake Cylinder — Removal and Installation
ABS and Traction Control — General Description
ABS and Traction Control System — Removal and Installation of Components


See similar ones from other Opel car manuals:
▶ Removal and installation the brake pedal Opel Astra J (2009-2015, petrol)
▶ Removal and installation the foot brake pedal assembly Opel Corsa C (2000-2006)
▶ Checking the brake pedal travel Opel Insignia A (2008-2017)
▶ Checking the brake pedal travel Opel Vectra B (1995-2002, petrol)
▶ Removal and installation the brake pedal Opel Vivaro A (2001-2014)
Link to this page in different formats

Visitor comments


No comments yet


How much will 25 + 45 =


Omega B2 (1999-2003) 
  • General information
  • User manual
  • Maintenance
  • Troubleshooting
  • Power unit
  • Petrol 4-cylinder
  • Petrol 6-cylinder
  • Engine overhaul
  • Diesel engines 2.0 l
  • Diesel engines 2.5 l
  • Cooling and heating
  • Injection system (gasoline)
  • Fuel system (diesel)
  • Fuel system
  • Exhaust system
  • Ignition system
  • Transmission
  • Clutch
  • Mechanical gearbox
  • Automatic gearbox
  • Main gear and shafts
  • Chassis
  • Brake system
  • Car suspension
  • Steering
  • Body
  • Body elements
  • Electrical equipment
  • Equipment and devices
  • Electrical circuits
Omega B (1993-1999) 
  • General information
  • User manual
  • Tips for the car owner
  • Maintenance (gasoline)
  • Maintenance (diesel)
  • Power unit
  • Petrol engine SOHC 2.0 l
  • Petrol engine DOHC 2.0 l
  • Petrol engines 2.5 and 3.0 l
  • Repair of gasoline engines
  • Diesel engine 2.0 l
  • Diesel engine repair 2.0 l
  • Diesel engine 2.5 l
  • Cooling and heating
  • Power system (petrol)
  • Emission reduction
  • Fuel system (diesel 2.0 l)
  • Fuel system (diesel 2.5 l)
  • Launch system
  • Ignition system
  • Transmission
  • Clutch
  • Mechanical gearbox
  • Automatic gearbox
  • Drive shafts
  • Chassis
  • Brake system
  • Wheel suspension
  • Steering
  • Body
  • Exterior
  • Interior
  • Doors and windows
  • Electrical equipment
  • Equipment and devices
  • Wiring diagrams (early)
  • Wiring diagrams (late)
Omega A (1986-1993) 
  • General information
  • User manual
  • Maintenance
  • Changes and additions
  • Troubleshooting
  • Power unit
  • Gasoline engines
  • Diesel engines
  • Cooling system
  • Fuel system (gasoline)
  • Fuel system (diesel)
  • Ignition system
  • Transmission
  • Clutch
  • Mechanical gearbox
  • Automatic gearbox
  • Cardan shaft
  • Drive shafts
  • Chassis
  • Brake system
  • Car suspension
  • Steering
  • Body
  • Exterior
  • Interior
  • Electrical equipment
  • Power devices
  • Lighting and appliances
  • Electrical circuits
OpelBook.ru © 2017–2026 · Mobile version · · Sitemap: EN BG BY UA RS HR RO PL SK HU · Feedback · Site search
Astra F, petrol · Astra G, petrol · Astra G · Astra H · Astra J, petrol · Corsa B · Corsa C, petrol · Corsa C · Insignia A · Kadett D · Kadett E · Omega A · Omega B · Omega B2 · Vectra A, petrol · Vectra A · Vectra B, petrol · Vectra B · Vectra C · Zafira A, petrol · Frontera A, petrol · Frontera B · Ascona C · Vivaro A ·
We want your visit to be comfortable 🤝! We use cookies 🍪 to make that happen.